Note
Hello, welcome to the SunFounder Raspberry Pi & Arduino & ESP32 Enthusiasts Community on Facebook! Dive deeper into Raspberry Pi, Arduino, and ESP32 with fellow enthusiasts.
Why Join?
Expert Support: Solve post-sale issues and technical challenges with help from our community and team.
Learn & Share: Exchange tips and tutorials to enhance your skills.
Exclusive Previews: Get early access to new product announcements and sneak peeks.
Special Discounts: Enjoy exclusive discounts on our newest products.
Festive Promotions and Giveaways: Take part in giveaways and holiday promotions.
👉 Ready to explore and create with us? Click [here] and join today!
HueDial
This example controls the color of an RGB LED based on the position of a rotary knob. Different positions of the knob correspond to different HUE values, which are then translated into RGB color values, resulting in a color change for the RGB LED.
Required Components
In this project, we need the following components.
It’s definitely convenient to buy a whole kit, here’s the link:
Name |
ITEMS IN THIS KIT |
LINK |
|---|---|---|
Elite Explorer Kit |
300+ |
You can also buy them separately from the links below.
COMPONENT INTRODUCTION |
PURCHASE LINK |
|---|---|
- |
|
Wiring
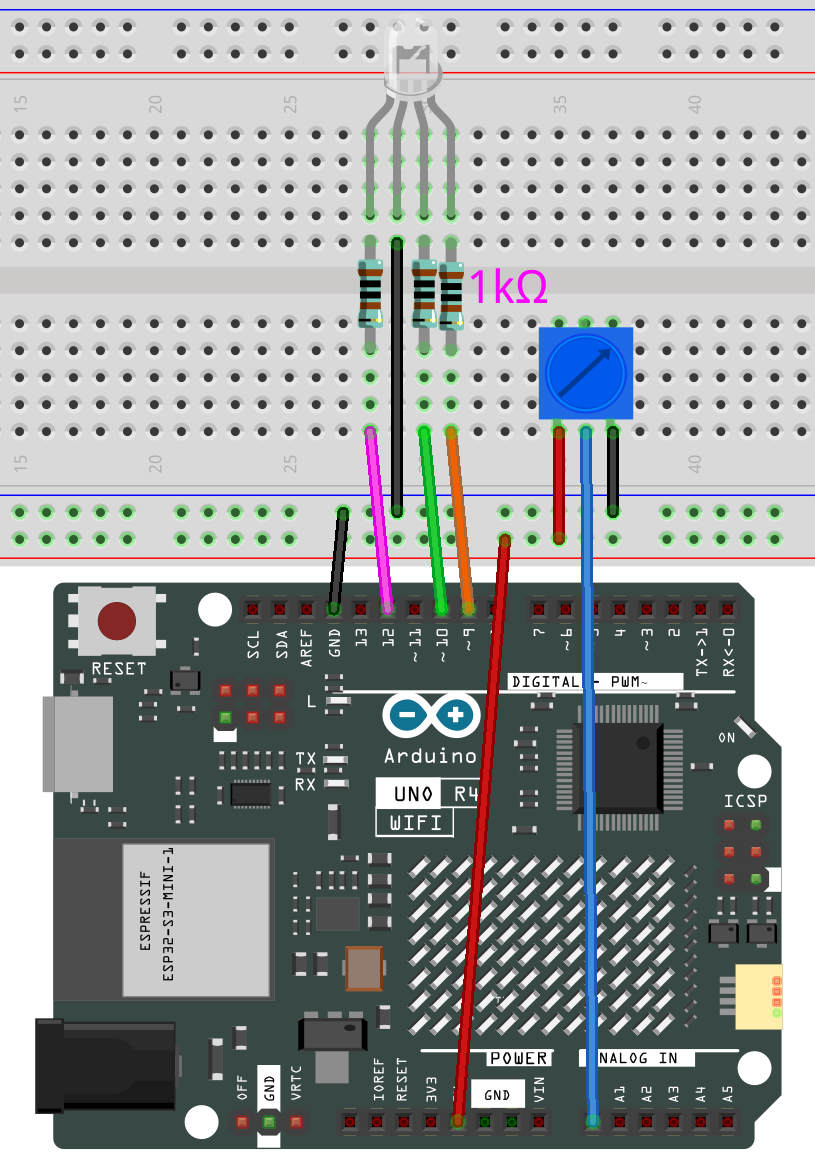
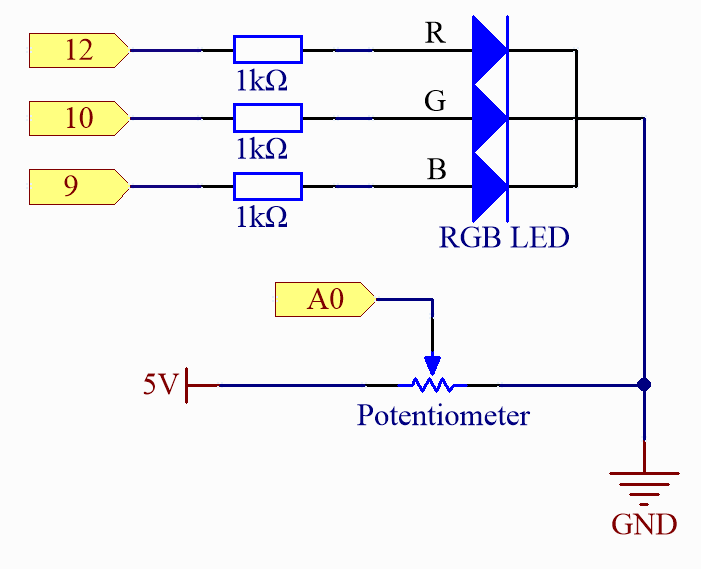
Schematic
Code
Note
You can open the file
03_huedial.inounder the path ofelite-explorer-kit-main\fun_project\03_huedialdirectly.Or copy this code into Arduino IDE.
 1/*
 2  This code controls an RGB LED using a potentiometer
 3  to change the hue of the color.
 4
 5  Board: Arduino Uno R4
 6  Component: RGB LED and Potentiometer
 7*/
 8
 9// Define RGB LED pins
10const int redPin = 12;    // Red channel
11const int greenPin = 10;  // Green channel
12const int bluePin = 9;    // Blue channel
13
14// Define the pin for the knob
15const int knobPin = A0;
16
17void setup() {
18  // Initialize RGB LED pins as outputs
19  pinMode(redPin, OUTPUT);
20  pinMode(greenPin, OUTPUT);
21  pinMode(bluePin, OUTPUT);
22}
23
24void loop() {
25  // Read the value of the knob
26  int knobValue = analogRead(knobPin);
27
28  // Normalize the knob value to the range 0-1
29  float hueValue = (float)knobValue / 1023.0;
30
31  // Convert the normalized value to a HUE value (0-360)
32  int hue = (int)(hueValue * 360);
33
34  // Convert the HUE value to RGB values
35  int red, green, blue;
36  HUEtoRGB(hue, &red, &green, &blue);
37
38  // Update the RGB LED with the new color values
39  setColor(red, green, blue);
40}
41
42// Function to set the RGB LED color
43void setColor(int red, int green, int blue) {
44  analogWrite(redPin, red);
45  analogWrite(greenPin, green);
46  analogWrite(bluePin, blue);
47}
48
49// Function to convert a hue value to RGB values
50void HUEtoRGB(int hue, int* red, int* green, int* blue) {
51  float h = (float)hue / 60.0;
52  float c = 1.0;
53  float x = c * (1.0 - fabs(fmod(h, 2.0) - 1.0));
54  float r, g, b;
55  if (h < 1.0) {
56    r = c;
57    g = x;
58    b = 0;
59  } else if (h < 2.0) {
60    r = x;
61    g = c;
62    b = 0;
63  } else if (h < 3.0) {
64    r = 0;
65    g = c;
66    b = x;
67  } else if (h < 4.0) {
68    r = 0;
69    g = x;
70    b = c;
71  } else if (h < 5.0) {
72    r = x;
73    g = 0;
74    b = c;
75  } else {
76    r = c;
77    g = 0;
78    b = x;
79  }
80  float m = 1.0 - c;
81  *red = (int)((r + m) * 255);
82  *green = (int)((g + m) * 255);
83  *blue = (int)((b + m) * 255);
84}
How it works?
Here’s a detailed explanation of the code:
Global Variable Definitions:
redPin,greenPin, andbluePin: These define the PWM pins connected to the red, green, and blue LEDs, respectively.KNOB_PIN: Defines the analog input pin connected to the rotary knob.setup():Set the pins for the RGB LED as output. By default, analog pins are set as inputs, so there’s no need to set the input mode for the knob’s pin.
loop():Read the value of the rotary knob. This value ranges from 0 to 1023. Normalize the knob’s value to a range of 0-1. Convert the normalized value to a HUE value ranging from 0-360. Convert the HUE value to RGB values. Update the LED’s color using these RGB values.
setColor():Set the appropriate PWM values for each LED pin using the
analogWrite()function to set the color of the RGB LED.HUEtoRGB():This function converts HUE values to RGB values using the HSL to RGB conversion method but focuses only on the HUE component, keeping saturation and brightness at 100%. The algorithm is divided into 6 stages, each covering 60 degrees. It calculates RGB values for each HUE stage and then scales these values to a range of 0-255, which is the expected range for the
analogWrite()function.