注釈
こんにちは、SunFounderのRaspberry Pi & Arduino & ESP32愛好家コミュニティへようこそ!Facebook上でRaspberry Pi、Arduino、ESP32についてもっと深く掘り下げ、他の愛好家と交流しましょう。
参加する理由は?
エキスパートサポート:コミュニティやチームの助けを借りて、販売後の問題や技術的な課題を解決します。
学び&共有:ヒントやチュートリアルを交換してスキルを向上させましょう。
独占的なプレビュー:新製品の発表や先行プレビューに早期アクセスしましょう。
特別割引:最新製品の独占割引をお楽しみください。
祭りのプロモーションとギフト:ギフトや祝日のプロモーションに参加しましょう。
👉 私たちと一緒に探索し、創造する準備はできていますか?[ここ]をクリックして今すぐ参加しましょう!
3.1.2 いらっしゃいませ
前書き
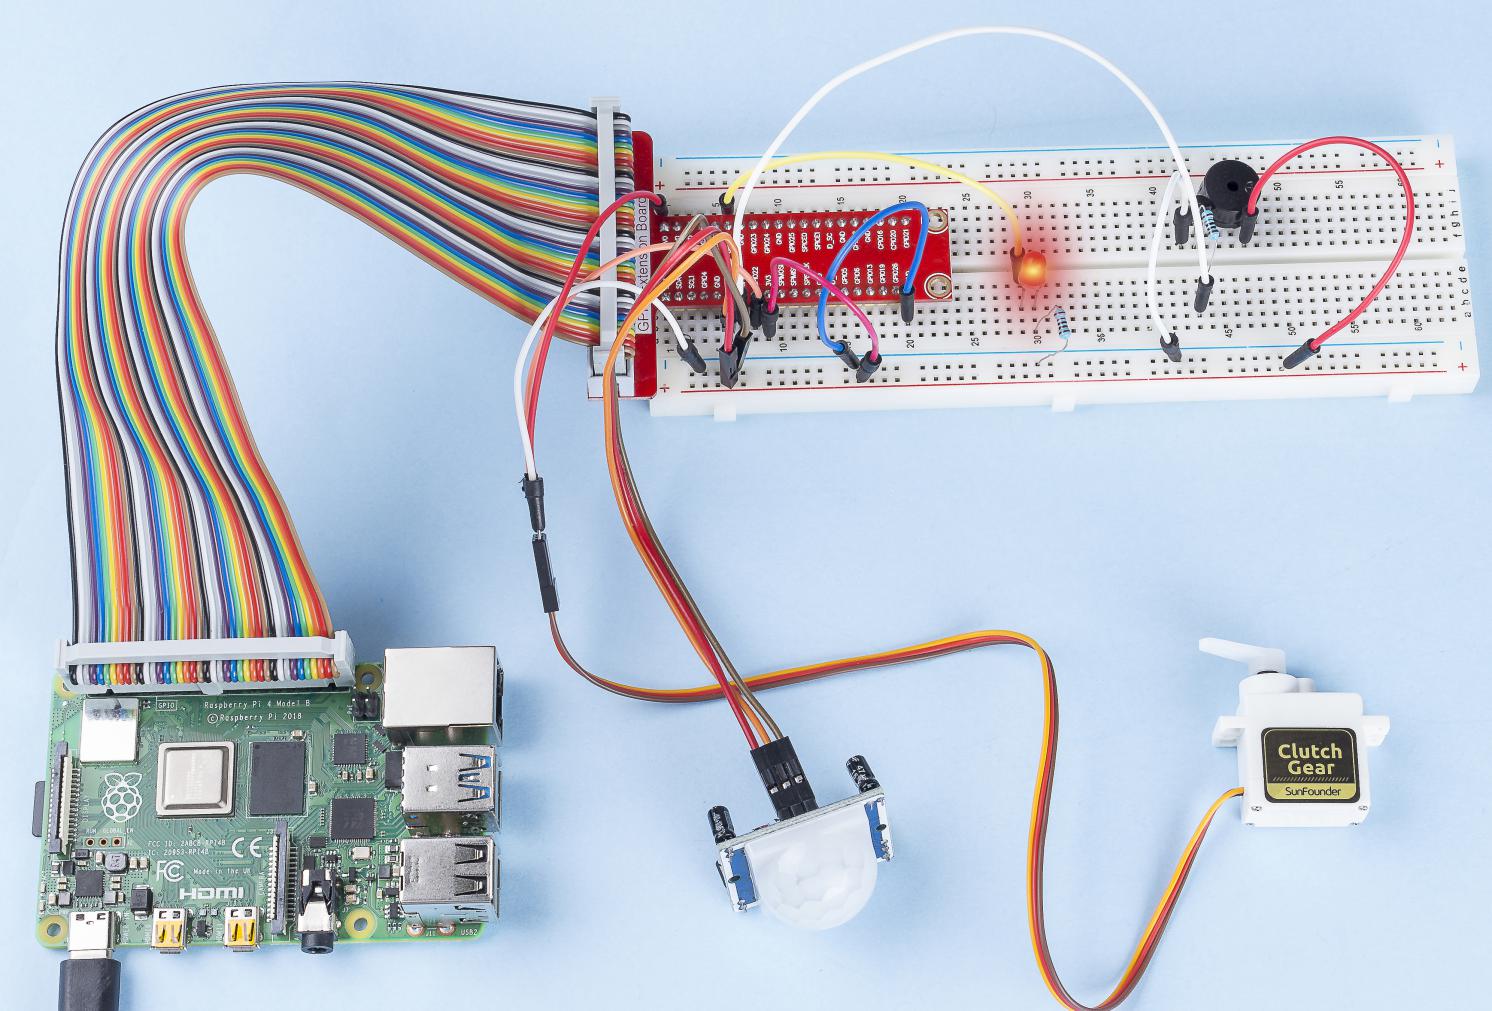
このプロジェクトでは、PIRを使用して歩行者の動きを検知し、サーボ、LED、ブザーを使用してコンビニのセンサードアの動作をシミュレートする。歩行者がPIRの検知範囲内に現れると、インジケータライトが点灯し、ドアが開き、ブザーがオープニングベルを鳴らす。
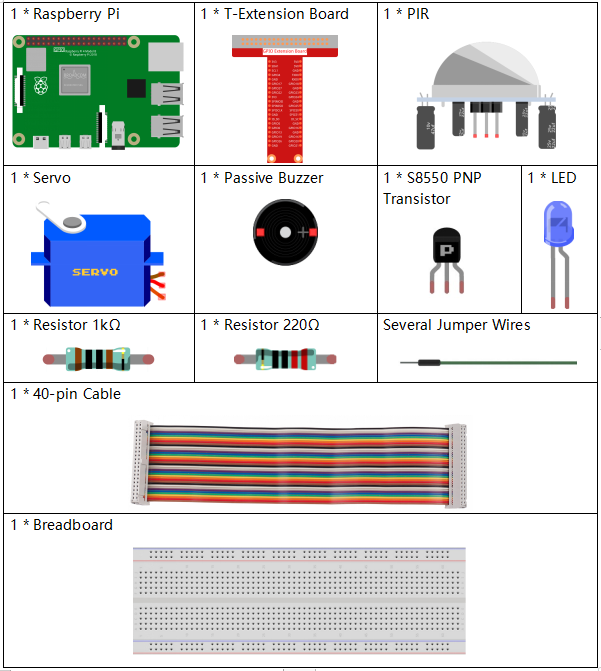
部品
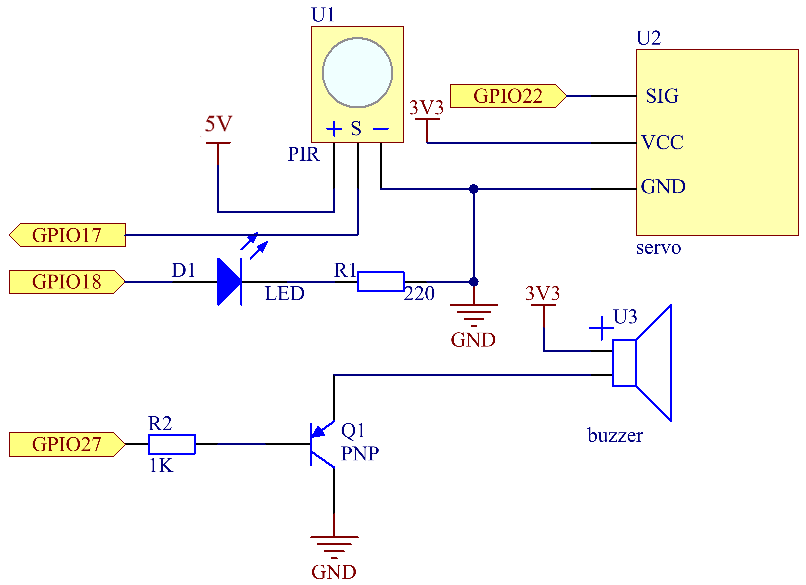
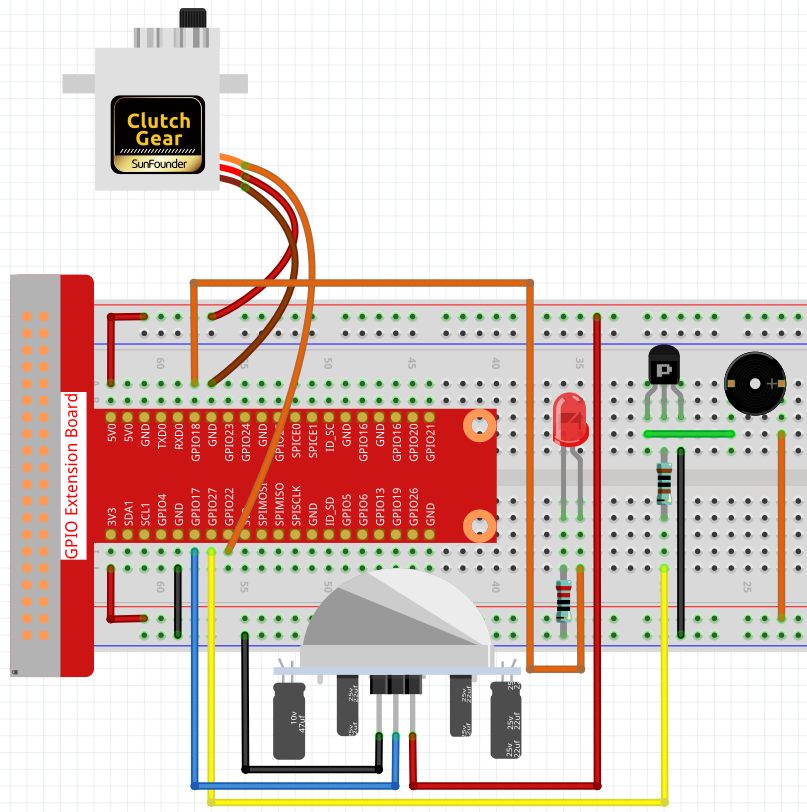
回路図
T-Board Name |
physical |
wiringPi |
BCM |
GPIO18 |
Pin 12 |
1 |
18 |
GPIO17 |
Pin 11 |
0 |
17 |
GPIO27 |
Pin 13 |
2 |
27 |
GPIO22 |
Pin 15 |
3 |
22 |
実験手順
ステップ1: 回路を作る。
C言語ユーザー向け
ステップ2: ディレクトリを変更する。
cd ~/davinci-kit-for-raspberry-pi/c/3.1.2/
ステップ3: コンパイルする。
gcc 3.1.2_Welcome.c -lwiringPi
ステップ4: 実行する。
sudo ./a.out
コードの実行後、PIRセンサーが通り過ぎる人を検出すると、 ドアが自動的に開き(サーボによってシミュレートされる)、 インジケーターをオンにして、ドアベルの音楽を再生する。ドアベルの音楽が再生されると、 システムは自動的にドアを閉じてインジケータライトをオフにし、次に誰かが通り過ぎることを待つ。
PIR モジュールには 2 つのポテンショメータがあり、 1 つは感度を調整するためのもので、もう 1 つは検出距離を調整するためのものです。 PIR モジュールがうまく機能するためには、両方を完全に反時計回りに回す必要があります。
コードの説明
void setAngle(int pin, int angle){    //Create a funtion to control the angle of the servo.
    if(angle < 0)
        angle = 0;
    if(angle > 180)
        angle = 180;
    softPwmWrite(pin,Map(angle, 0, 180, 5, 25));
}
0〜180の角度をサーボに書き込むための関数、 setAngle を作成する。
void doorbell(){
for(int i=0;i<sizeof(song)/4;i++){
        softToneWrite(BuzPin, song[i]);
        delay(beat[i] * 250);
    }
ブザーで音楽を再生できるようにする関数、 doorbell を作成する。
void closedoor(){
digitalWrite(ledPin, LOW);   //led off
for(int i=180;i>-1;i--){  //make servo rotate from maximum angle to minimum angle
    setAngle(servoPin,i);
    delay(1);
    }
}
ドアの閉鎖をシミュレートする関数 closedoor を作成し、
LEDをオフにし、サーボを180度から0度に回転させる。
void opendoor(){
    digitalWrite(ledPin, HIGH);   //led on
    for(int i=0;i<181;i++){  //make servo rotate from minimum angle to maximum angle
        setAngle(servoPin,i);
        delay(1);
    }
    doorbell();
    closedoor();
}
関数 opendoor() にはいくつかの部分が含まれている:インジケータライトをオンにし、
サーボを回転させ(ドアを開く動作をシミュレートする)、
コンビニのドアベル音楽を再生し、音楽を再生した後に関数 closedoor() を呼び出す。
    int main(void)
{
    if(wiringPiSetup() == -1){ //when initialize wiring failed,print message to screen
        printf("setup wiringPi failed !");
        return 1;
    }
    if(softToneCreate(BuzPin) == -1){
        printf("setup softTone failed !");
        return 1;
......
関数 main() で、ライブラリー wiringPi を初期化し、
softTone をセットアップしてから、 ledPin を出力状態に、
pirPin を入力状態に設定する。PIRセンサーが通り過ぎる人を検出すると、
ドアを開くことをシミュレートするために関数 opendoor が呼び出される。
Python言語ユーザー向け
ステップ2: ディレクトリを変更する。
cd ~/davinci-kit-for-raspberry-pi/python/
ステップ3: 実行する。
sudo python3 3.1.2_Welcome.py
コードの実行後、PIRセンサーが通り過ぎる人を検出すると、 ドアが自動的に開き(サーボによってシミュレートされる)、 インジケーターをオンにして、ドアベルの音楽を再生する。ドアベルの音楽が再生されると、 システムは自動的にドアを閉じてインジケータライトをオフにし、次に誰かが通り過ぎることを待つ。
PIR モジュールには 2 つのポテンショメータがあり、 1 つは感度を調整するためのもので、もう 1 つは検出距離を調整するためのものです。 PIR モジュールがうまく機能するためには、両方を完全に反時計回りに回す必要があります。
コード
注釈
以下のコードを 変更/リセット/コピー/実行/停止 できます。 ただし、その前に、 davinci-kit-for-raspberry-pi/python のようなソースコードパスに移動する必要があります。
import RPi.GPIO as GPIO
import time

SERVO_MIN_PULSE = 500
SERVO_MAX_PULSE = 2500

ledPin = 18    # define the ledPin
pirPin = 17    # define the sensorPin
servoPin = 22  # define the servoPin
buzPin = 27    # define the buzzerpin


CL = [0, 131, 147, 165, 175, 196, 211, 248]        # Frequency of Low C notes

CM = [0, 262, 294, 330, 350, 393, 441, 495]        # Frequency of Middle C notes

CH = [0, 525, 589, 661, 700, 786, 882, 990]        # Frequency of High C notes

song = [    CH[5],CH[2],CM[6],CH[2],CH[3],CH[6],CH[3],CH[5],CH[3],CM[6],CH[2]    ]

beat = [    1,1,1,1,1,2,1,1,1,1,1,]


def setup():
    global p
    global Buzz                        # Assign a global variable to replace GPIO.PWM
    GPIO.setmode(GPIO.BCM)       # Numbers GPIOs by physical location
    GPIO.setup(ledPin, GPIO.OUT)   # Set ledPin's mode is output
    GPIO.setup(pirPin, GPIO.IN)    # Set sensorPin's mode is input
    GPIO.setup(servoPin, GPIO.OUT)   # Set servoPin's mode is output
    GPIO.output(servoPin, GPIO.LOW)  # Set servoPin to low
    GPIO.setup(buzPin, GPIO.OUT)    # Set pins' mode is output

    Buzz = GPIO.PWM(buzPin, 440)    # 440 is initial frequency.
    Buzz.start(50)                    # Start Buzzer pin with 50% duty ration

    p = GPIO.PWM(servoPin, 50)     # set Frequece to 50Hz
    p.start(0)                     # Duty Cycle = 0

def map(value, inMin, inMax, outMin, outMax):
    return (outMax - outMin) * (value - inMin) / (inMax - inMin) + outMin


def setAngle(angle):      # make the servo rotate to specific angle (0-180 degrees)
    angle = max(0, min(180, angle))
    pulse_width = map(angle, 0, 180, SERVO_MIN_PULSE, SERVO_MAX_PULSE)
    pwm = map(pulse_width, 0, 20000, 0, 100)
    p.ChangeDutyCycle(pwm)#map the angle to duty cycle and output it

def doorbell():
    for i in range(1, len(song)):        # Play song 1
        Buzz.ChangeFrequency(song[i])    # Change the frequency along the song note
        time.sleep(beat[i] * 0.25)        # delay a note for beat * 0.25s
    time.sleep(1)                        # Wait a second for next song.

def closedoor():
    GPIO.output(ledPin, GPIO.LOW)
    for i in range(180, -1, -1): #make servo rotate from 180 to 0 deg
        setAngle(i)
        time.sleep(0.001)
    time.sleep(1)
def opendoor():
    GPIO.output(ledPin, GPIO.LOW)
    for i in range(0, 181, 1):   #make servo rotate from 0 to 180 deg
        setAngle(i)     # Write to servo
        time.sleep(0.001)
    time.sleep(1)
    doorbell()
    closedoor()

def loop():
    while True:
        if GPIO.input(pirPin)==GPIO.HIGH:
            opendoor()


def destroy():
    GPIO.cleanup()                     # Release resource
    p.stop()
    Buzz.stop()

if __name__ == '__main__':     # Program start from here
    setup()
    try:
        loop()
    except KeyboardInterrupt:  # When 'Ctrl+C' is pressed, the program destroy() will be  executed.
        destroy()
コードの説明
def setup():
    global p
    global Buzz                        # Assign a global variable to replace GPIO.PWM
    GPIO.setmode(GPIO.BCM)       # Numbers GPIOs by physical location
    GPIO.setup(ledPin, GPIO.OUT)   # Set ledPin's mode is output
    GPIO.setup(pirPin, GPIO.IN)    # Set sensorPin's mode is input
    GPIO.setup(buzPin, GPIO.OUT)    # Set pins' mode is output
    Buzz = GPIO.PWM(buzPin, 440)    # 440 is initial frequency.
    Buzz.start(50)                    # Start Buzzer pin with 50% duty ration
    GPIO.setup(servoPin, GPIO.OUT)   # Set servoPin's mode is output
    GPIO.output(servoPin, GPIO.LOW)  # Set servoPin to low
    p = GPIO.PWM(servoPin, 50)     # set Frequece to 50Hz
    p.start(0)                     # Duty Cycle = 0
これらのステートメントは、各部品のピンを初期化するために使用される。
def setAngle(angle):      # make the servo rotate to specific angle (0-180 degrees)
    angle = max(0, min(180, angle))
    pulse_width = map(angle, 0, 180, SERVO_MIN_PULSE, SERVO_MAX_PULSE)
    pwm = map(pulse_width, 0, 20000, 0, 100)
    p.ChangeDutyCycle(pwm)#map the angle to duty cycle and output it
0〜180の角度をサーボに書き込むための関数、 setAngle を作成する。
def doorbell():
    for i in range(1,len(song)): # Play song1
        Buzz.ChangeFrequency(song[i]) # Change the frequency along the song note
        time.sleep(beat[i] * 0.25) # delay a note for beat * 0.25s
ブザーで音楽を再生できるようにする関数、 doorbell を作成する。
def closedoor():
    GPIO.output(ledPin, GPIO.LOW)
    Buzz.ChangeFrequency(1)
    for i in range(180, -1, -1): #make servo rotate from 180 to 0 deg
        setAngle(i)
        time.sleep(0.001)
ドアを閉じて、インジケータライトをオフにする。
def opendoor():
    GPIO.output(ledPin, GPIO.LOW)
    for i in range(0, 181, 1):   #make servo rotate from 0 to 180 deg
        setAngle(i)     # Write to servo
        time.sleep(0.001)
    doorbell()
    closedoor()
関数 opendoor() にはいくつかの部分が含まれている:インジケータライトをオンにし、
サーボを回転させ(ドアを開く動作をシミュレートする)、コンビニのドアベル音楽を再生し、
音楽を再生した後に関数 closedoor() を呼び出す。
def loop():
while True:
    if GPIO.input(pirPin)==GPIO.HIGH:
        opendoor()
PIRは誰かが通り過ぎることを検知すると、関数 opendoor() を呼び出す。
現象画像