注釈
こんにちは、SunFounderのRaspberry Pi & Arduino & ESP32愛好家コミュニティへようこそ!Facebook上でRaspberry Pi、Arduino、ESP32についてもっと深く掘り下げ、他の愛好家と交流しましょう。
参加する理由は?
エキスパートサポート:コミュニティやチームの助けを借りて、販売後の問題や技術的な課題を解決します。
学び&共有:ヒントやチュートリアルを交換してスキルを向上させましょう。
独占的なプレビュー:新製品の発表や先行プレビューに早期アクセスしましょう。
特別割引:最新製品の独占割引をお楽しみください。
祭りのプロモーションとギフト:ギフトや祝日のプロモーションに参加しましょう。
👉 私たちと一緒に探索し、創造する準備はできていますか?[ここ]をクリックして今すぐ参加しましょう!
3.1.13 ゲーム– 10秒
前書き
それから、あなたの集中力に挑戦できるゲームデバイスを作ろう。傾斜スイッチをスティックにつないで、魔法の棒を作る。棒を振ると、4桁のセグメントディスプレイがカウントを開始し、もう一度振るとカウントを停止する。表示されたカウントを10.00に保つことに成功した場合、あなたが勝つ。友達とゲームをプレイして、タイムウィザードが誰かを確認できる。
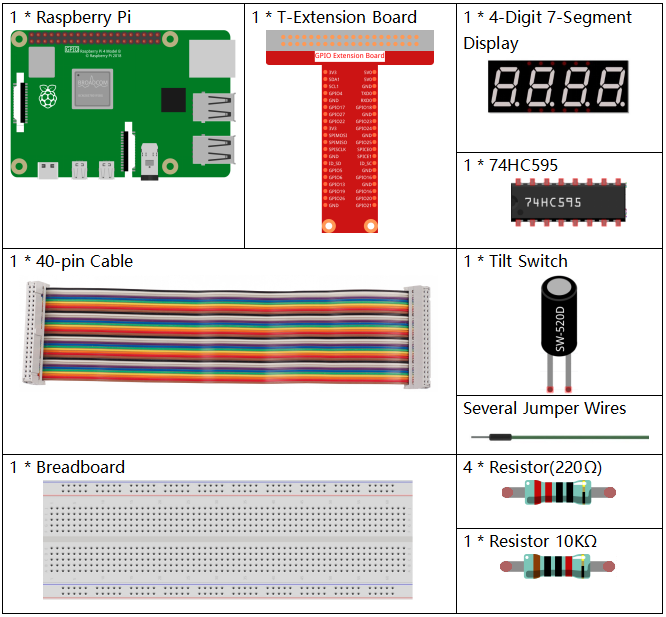
部品
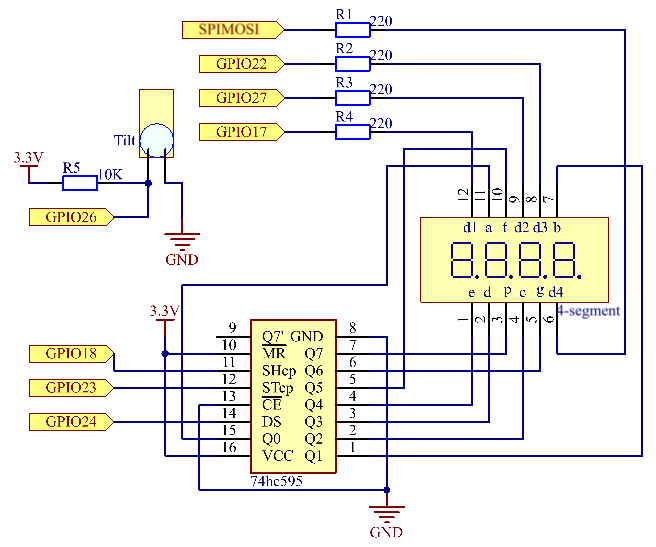
回路図
T-Board Name |
physical |
wiringPi |
BCM |
GPIO17 |
Pin 11 |
0 |
17 |
GPIO27 |
Pin 13 |
2 |
27 |
GPIO22 |
Pin 15 |
3 |
22 |
SPIMOSI |
Pin 19 |
12 |
10 |
GPIO18 |
Pin 12 |
1 |
18 |
GPIO23 |
Pin 16 |
4 |
23 |
GPIO24 |
Pin 18 |
5 |
24 |
GPIO26 |
Pin 37 |
25 |
26 |
実験手順
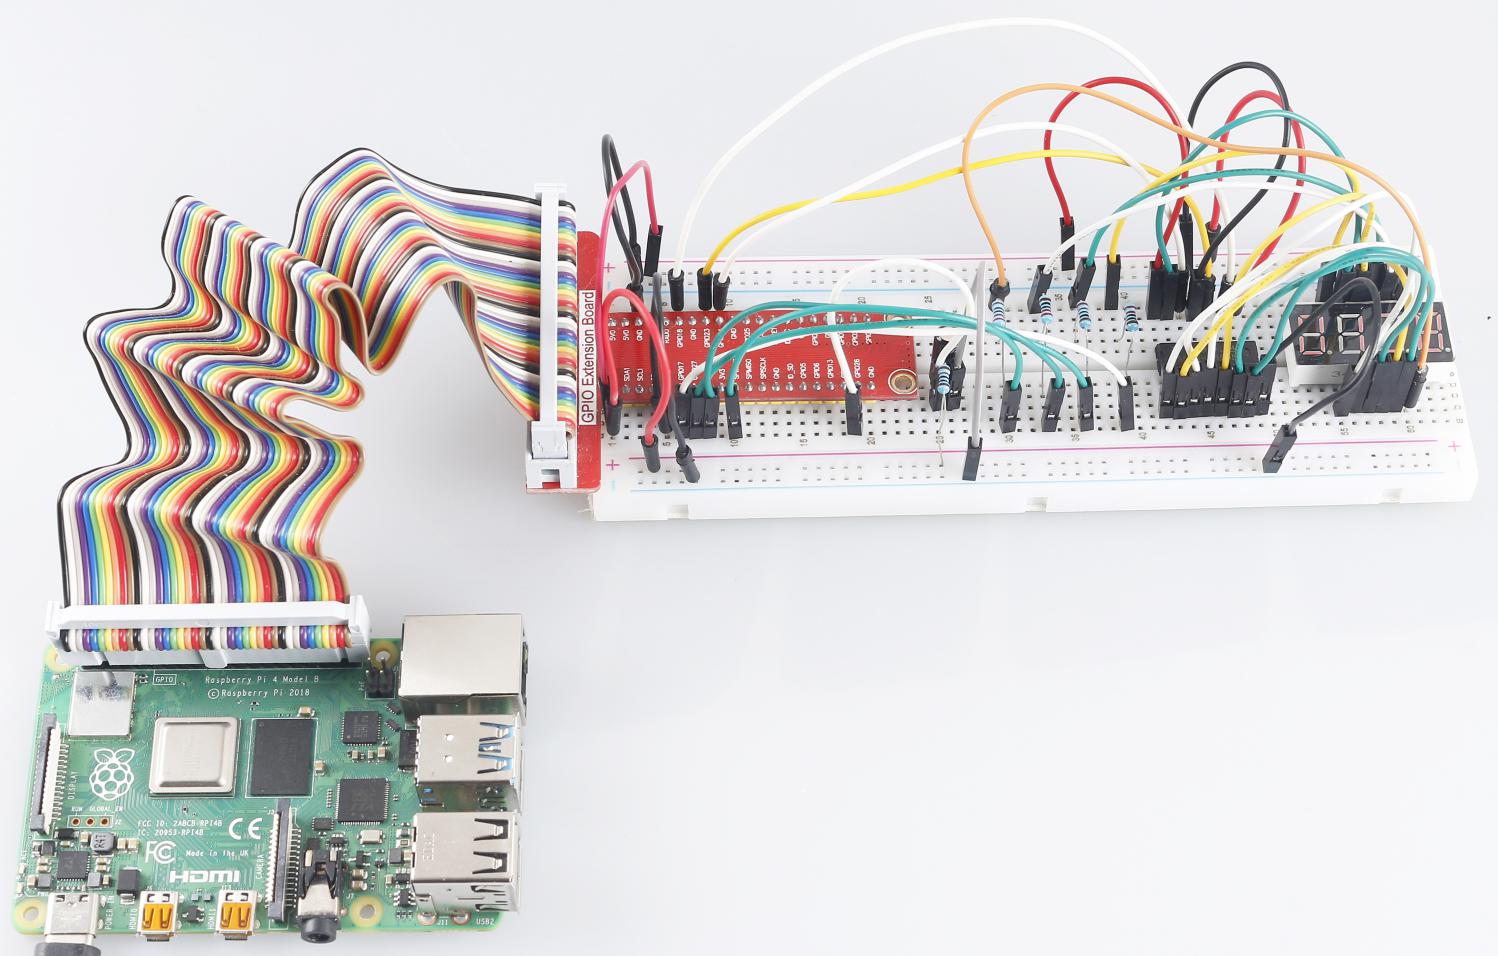
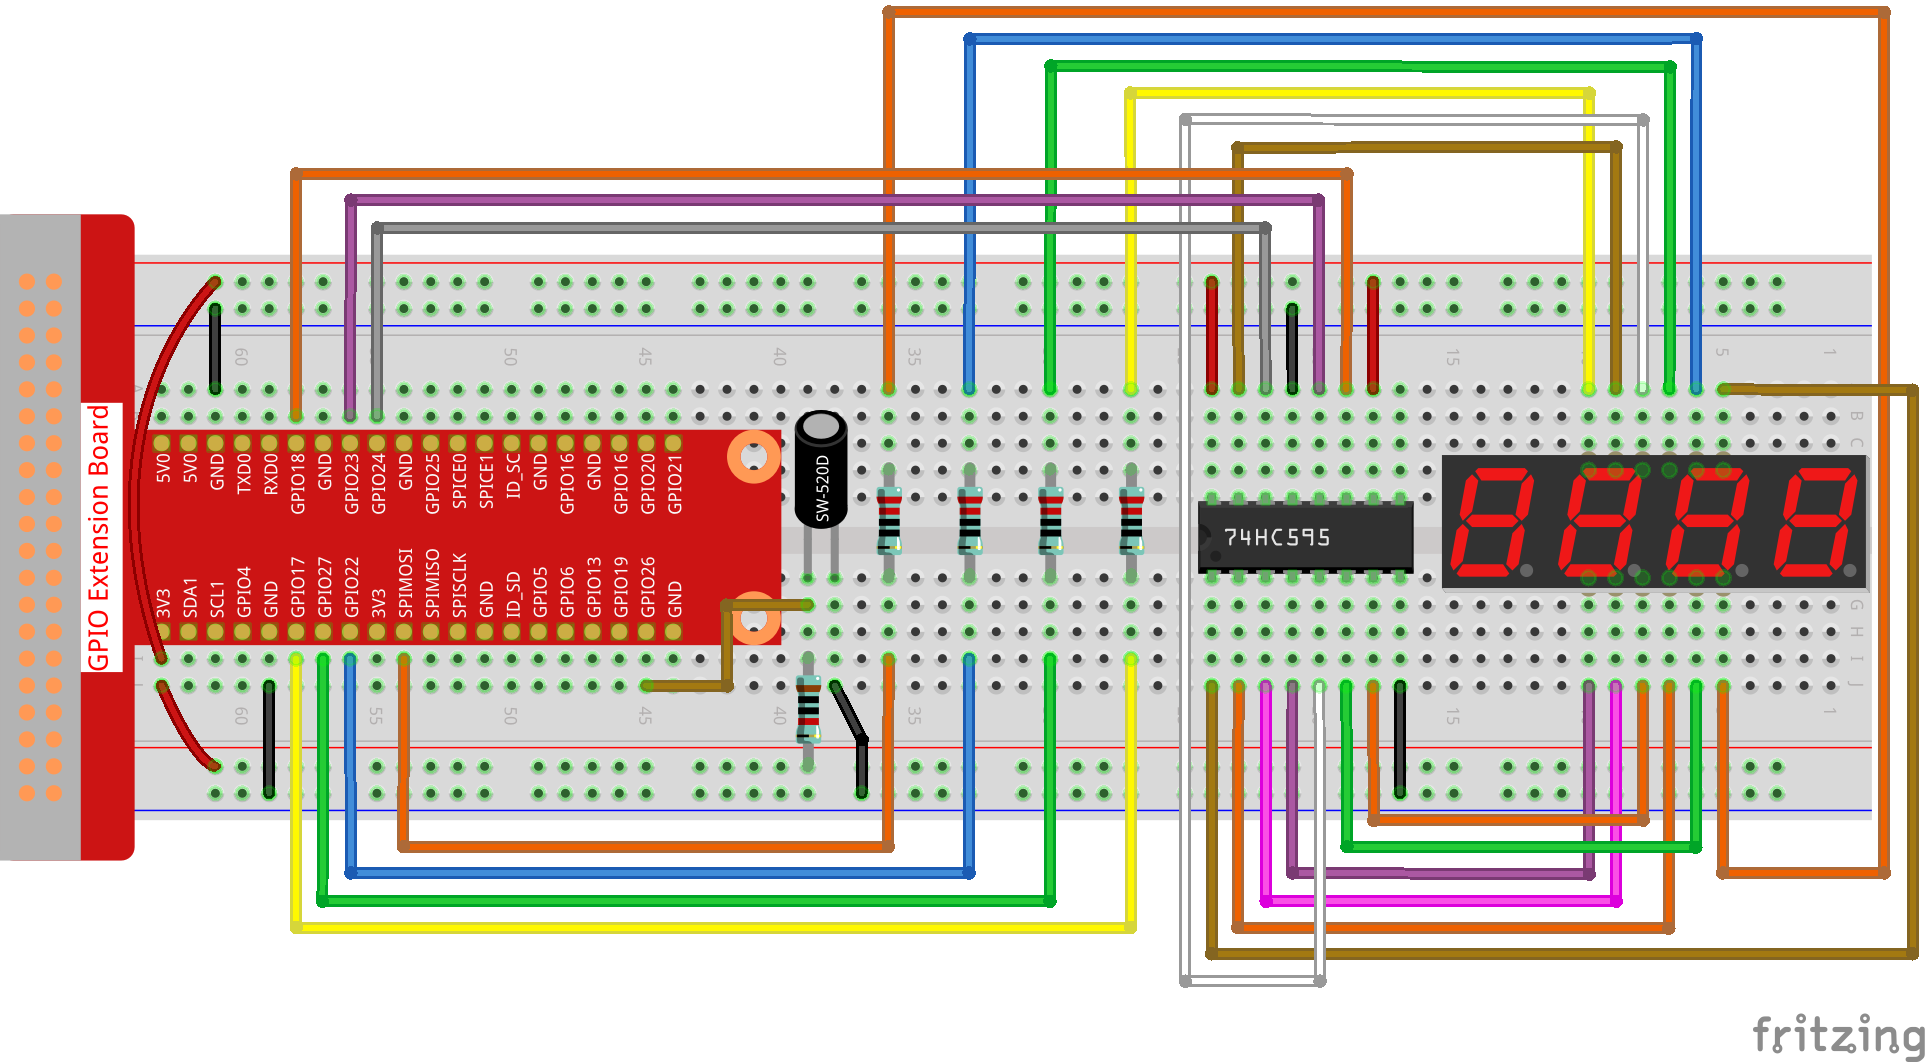
ステップ1: 回路を作る。
C言語ユーザー向け
ステップ2: コードのフォルダーに入る。
cd ~/davinci-kit-for-raspberry-pi/c/3.1.13/
ステップ3: コードをコンパイルする。
gcc 3.1.13_GAME_10Second.c -lwiringPi
ステップ4: EXEファイルを実行する。
sudo ./a.out
棒を振ると、4桁のセグメントディスプレイがカウントを開始し、もう一度振るとカウントを停止する。 表示されたカウントを 10.00 に保つことに成功した場合、あなたが勝つ。 もう一度振って、ゲームの次のラウンドを開始する。
コードの説明
void stateChange(){
    if (gameState == 0){
        counter = 0;
        delay(1000);
        ualarm(10000,10000);
    }else{
        alarm(0);
        delay(1000);
    }
    gameState = (gameState + 1)%2;
}
ゲームは二つのモードに分けられている:
gameState = 0 は「開始」モードであり、このモードでは、時間を計測してセグメントディスプレイに表示し、傾斜スイッチを振って「表示」モードに入る。
GameState = 1 は「表示」モードであり、タイミングを停止し、セグメントディスプレイに時間を表示する。傾斜スイッチを再度振ると、タイマーがリセットされ、ゲームが再起動する。
void loop(){
    int currentState =0;
    int lastState=0;
    while(1){
        display();
        currentState=digitalRead(sensorPin);
        if((currentState==0)&&(lastState==1)){
            stateChange();
        }
        lastState=currentState;
    }
}
Loop() が主な関数である。最初に、4ビットセグメントディスプレイに時間が表示され、
傾斜スイッチの値が読み取られる。傾斜スイッチの状態が変更された場合、 stateChange() が呼び出される。
Python言語ユーザー向け
ステップ2: コードのフォルダーに入る。
cd ~/davinci-kit-for-raspberry-pi/python/
ステップ3: EXEファイルを実行する。
sudo python3 3.1.13_GAME_10Second.py
棒を振ると、4桁のセグメントディスプレイがカウントを開始し、 もう一度振るとカウントを停止する。表示されたカウントを 10.00 に保つことに成功した場合、あなたが勝つ。 もう一度振って、ゲームの次のラウンドを開始する。
コード
注釈
以下のコードを 変更/リセット/コピー/実行/停止 できます。 ただし、その前に、 davinci-kit-for-raspberry-pi/python のようなソースコードパスに移動する必要があります。
import RPi.GPIO as GPIO
import time
import threading

sensorPin = 26

SDI = 24
RCLK = 23
SRCLK = 18

placePin = (10, 22, 27, 17)
number = (0xc0, 0xf9, 0xa4, 0xb0, 0x99, 0x92, 0x82, 0xf8, 0x80, 0x90)

counter = 0
timer =0
gameState =0

def clearDisplay():
    for i in range(8):
        GPIO.output(SDI, 1)
        GPIO.output(SRCLK, GPIO.HIGH)
        GPIO.output(SRCLK, GPIO.LOW)
    GPIO.output(RCLK, GPIO.HIGH)
    GPIO.output(RCLK, GPIO.LOW)

def hc595_shift(data):
    for i in range(8):
        GPIO.output(SDI, 0x80 & (data << i))
        GPIO.output(SRCLK, GPIO.HIGH)
        GPIO.output(SRCLK, GPIO.LOW)
    GPIO.output(RCLK, GPIO.HIGH)
    GPIO.output(RCLK, GPIO.LOW)

def pickDigit(digit):
    for i in placePin:
        GPIO.output(i,GPIO.LOW)
    GPIO.output(placePin[digit], GPIO.HIGH)

def display():
    global counter
    clearDisplay()
    pickDigit(0)
    hc595_shift(number[counter % 10])

    clearDisplay()
    pickDigit(1)
    hc595_shift(number[counter % 100//10])

    clearDisplay()
    pickDigit(2)
    hc595_shift(number[counter % 1000//100]-0x80)

    clearDisplay()
    pickDigit(3)
    hc595_shift(number[counter % 10000//1000])

def stateChange():
    global gameState
    global counter
    global timer1
    if gameState == 0:
        counter = 0
        time.sleep(1)
        timer()
    elif gameState ==1:
        timer1.cancel()
        time.sleep(1)
    gameState = (gameState+1)%2

def loop():
    global counter
    currentState = 0
    lastState = 0
    while True:
        display()
        currentState=GPIO.input(sensorPin)
        if (currentState == 0) and (lastState == 1):
            stateChange()
        lastState=currentState

def timer():
    global counter
    global timer1
    timer1 = threading.Timer(0.01, timer)
    timer1.start()
    counter += 1

def setup():
    GPIO.setmode(GPIO.BCM)
    GPIO.setup(SDI, GPIO.OUT)
    GPIO.setup(RCLK, GPIO.OUT)
    GPIO.setup(SRCLK, GPIO.OUT)
    for i in placePin:
        GPIO.setup(i, GPIO.OUT)
    GPIO.setup(sensorPin, GPIO.IN)

def destroy():   # When \"Ctrl+C\" is pressed, the function is executed.
    GPIO.cleanup()
    global timer1
    timer1.cancel()

if __name__ == '__main__':  # Program starting from here
    setup()
    try:
        loop()
    except KeyboardInterrupt:
        destroy()
コードの説明
def stateChange():
    global gameState
    global counter
    global timer1
    if gameState == 0:
        counter = 0
        time.sleep(1)
        timer()
    elif gameState ==1:
        timer1.cancel()
        time.sleep(1)
    gameState = (gameState+1)%2
ゲームは二つのモードに分けられている:
gameState = 0 は「開始」モードであり、このモードでは、時間を計測してセグメントディスプレイに表示し、傾斜スイッチを振って「表示」モードに入る。
GameState = 1 は「表示」モードであり、タイミングを停止し、セグメントディスプレイに時間を表示する。傾斜スイッチを再度振ると、タイマーがリセットされ、ゲームが再起動する。
def loop():
    global counter
    currentState = 0
    lastState = 0
    while True:
        display()
        currentState=GPIO.input(sensorPin)
        if (currentState == 0) and (lastState == 1):
            stateChange()
        lastState=currentState
loop() が主な関数である。最初に、4ビットセグメントディスプレイに時間が表示され、
傾斜スイッチの値が読み取られる。
傾斜スイッチの状態が変更された場合、 stateChange() が呼び出される。
def timer():
    global counter
    global timer1
    timer1 = threading.Timer(0.01, timer)
    timer1.start()
    counter += 1
間隔が0.01秒に達すると、Timer関数が呼び出される。カウンターに1を追加すると、タイマーが再び使用されて、0.01秒ごとに繰り返し実行される。
現象画像