Note
Bonjour et bienvenue dans la Communauté Facebook des passionnés de Raspberry Pi, Arduino et ESP32 de SunFounder ! Plongez plus profondément dans l’univers des Raspberry Pi, Arduino et ESP32 avec d’autres passionnés.
Pourquoi rejoindre ?
Support d’experts : Résolvez les problèmes après-vente et les défis techniques avec l’aide de notre communauté et de notre équipe.
Apprendre et partager : Échangez des astuces et des tutoriels pour améliorer vos compétences.
Aperçus exclusifs : Accédez en avant-première aux annonces de nouveaux produits et aux aperçus.
Réductions spéciales : Profitez de réductions exclusives sur nos produits les plus récents.
Promotions festives et cadeaux : Participez à des cadeaux et des promotions de vacances.
👉 Prêt à explorer et à créer avec nous ? Cliquez [Ici] et rejoignez-nous aujourd’hui !
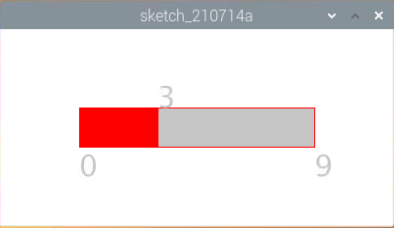
Nombre à glisser
Dessinons une barre de défilement pour contrôler l’affichage à 7 segments.
Composants requis
Dans ce projet, nous avons besoin des composants suivants.
Il est définitivement pratique d’acheter un kit complet, voici le lien :
Nom |
ARTICLES DANS CE KIT |
LIEN |
|---|---|---|
Kit Raphael |
337 |
Vous pouvez également les acheter séparément à partir des liens ci-dessous.
INTRODUCTION DES COMPOSANTS |
LIEN D’ACHAT |
|---|---|
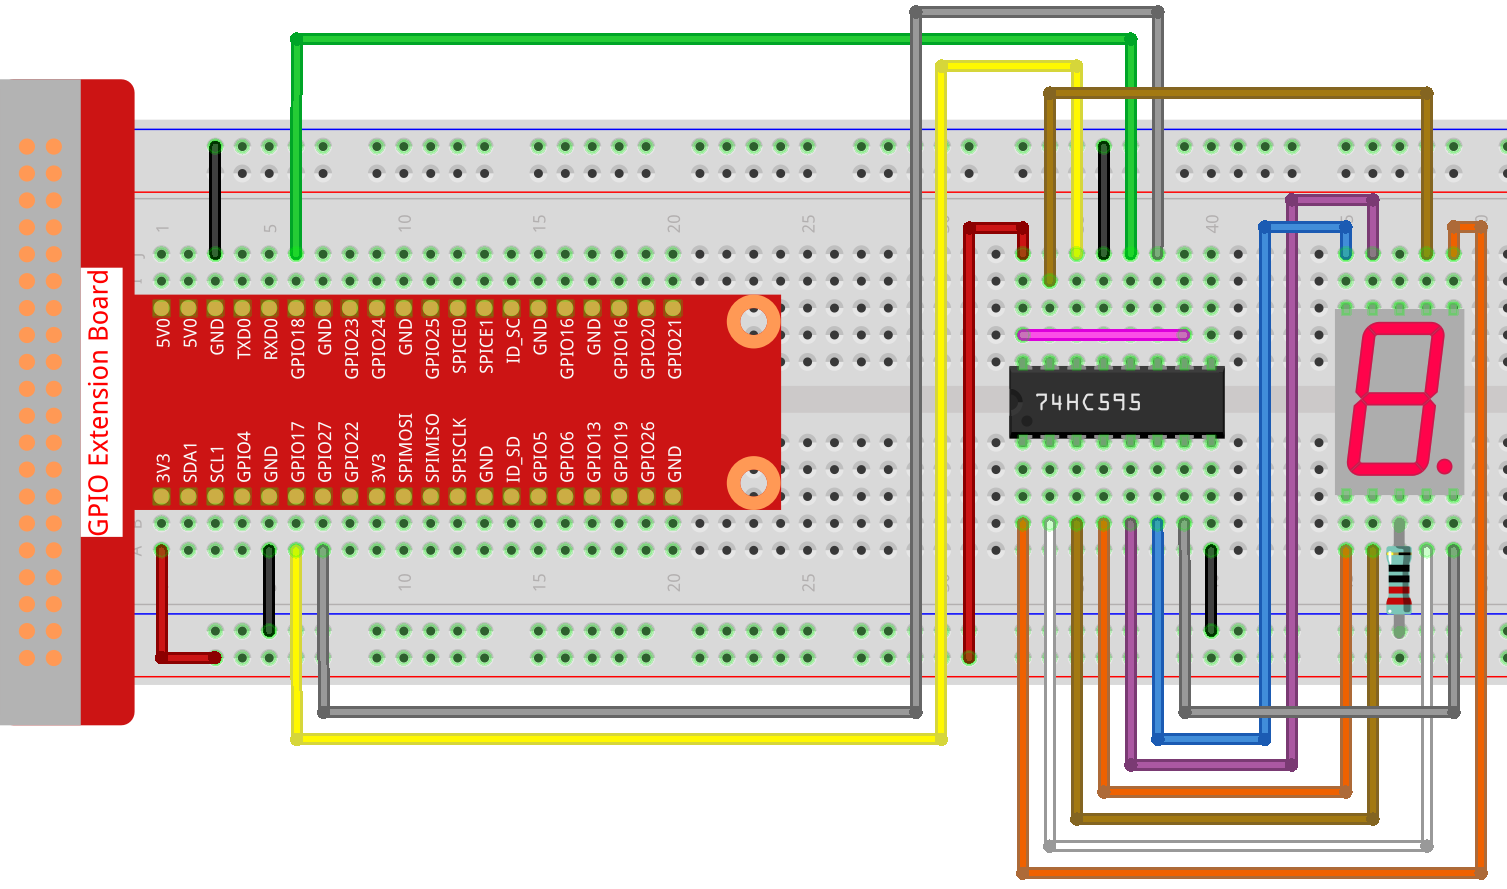
Câblage
Croquis
import processing.io.*;

int number = 0;
int levelRange=9;
Slider mySlider;

int SDI=17;   //serial data input
int RCLK=18;  //memory clock input(STCP)
int SRCLK =27;   //shift register clock input(SHCP)


int[] SegCode= {0x3f,0x06,0x5b,0x4f,0x66,0x6d,0x7d,0x07,0x7f,0x6f,0x77,0x7c,0x39,0x5e,0x79,0x71};

void hc595_shift(int dat){
int i;

for(i=0;i<8;i++){
    int n=(0x80 & (dat << i));
    if ( n==0){
    GPIO.digitalWrite(SDI, 0);
    } else {
    GPIO.digitalWrite(SDI, 1);
    }
    GPIO.digitalWrite(SRCLK, 1);
    delay(1);
    GPIO.digitalWrite(SRCLK, 0);
}

    GPIO.digitalWrite(RCLK, 1);
    delay(1);
    GPIO.digitalWrite(RCLK, 0);
}

void setup() {
    size(400, 200);
    frameRate(50);
    mySlider = new Slider(width * 0.2,height * 0.4,width * 0.8,height * 0.6,0,levelRange,number);
    GPIO.pinMode(SDI, GPIO.OUTPUT);
    GPIO.pinMode(RCLK, GPIO.OUTPUT);
    GPIO.pinMode(SRCLK, GPIO.OUTPUT);

    GPIO.digitalWrite(SDI, 0);
    GPIO.digitalWrite(RCLK, 0);
    GPIO.digitalWrite(SRCLK, 0);
}

void draw() {

    background(255);
    mySlider.show();
    hc595_shift(SegCode[number]);
}

void mouseDragged(){
    number = mySlider.dragPoint(mouseX,mouseY);
}


class Slider{
    float slotPointAX;
    float slotPointBX;
    float slotPointAY;
    float slotPointBY;
    float linePoint;
    float depth;
    int maxRange;
    int minRange;
    int value;

    Slider(float ax, float ay, float bx, float by, int min, int max, int v){
        slotPointAX = ax;
        slotPointAY = ay;
        slotPointBX = bx;
        slotPointBY = by;
        maxRange = max;
        minRange = min;
        value = v;
        linePoint = slotPointAX;// + map(value, minRange, maxRange, slotPointAX, slotPointBX);
        depth = (slotPointBY - slotPointAY)*0.75;
    }

    void show(){
        rectMode(CORNERS);
        fill(200);
        stroke(255,0,0);
        rect(slotPointAX, slotPointAY, slotPointBX, slotPointBY);
        fill(255,0,0);
        rect(slotPointAX, slotPointAY, linePoint, slotPointBY);
        fill(200);
        textSize(depth);
        text(minRange, slotPointAX, slotPointBY+depth);
        text(maxRange, slotPointBX, slotPointBY+depth);
        text(value, linePoint, slotPointAY);
    }

    int dragPoint(float mx, float my){
        if(mx>=slotPointAX && mx<=slotPointBX && my>=slotPointAY && my<=slotPointBY){
            value = int(map(mx,slotPointAX,slotPointBX,minRange,maxRange));
            linePoint = map(value,minRange,maxRange,slotPointAX,slotPointBX);
        }
        return value;
    }
}
Comment ça fonctionne ?
Ce projet intègre le curseur et l’affichage à 7 segments du projet précédent. Pour des points de connaissances spécifiques, veuillez vous référer à Afficher un chiffre et Métronome.