Nota
Hola, ¡bienvenido a la Comunidad de Entusiastas de SunFounder Raspberry Pi, Arduino y ESP32 en Facebook! Sumérgete más en Raspberry Pi, Arduino y ESP32 con otros entusiastas.
¿Por qué unirse?
Soporte experto: Resuelve problemas post-venta y desafíos técnicos con la ayuda de nuestra comunidad y equipo.
Aprender y compartir: Intercambia consejos y tutoriales para mejorar tus habilidades.
Avances exclusivos: Obtén acceso anticipado a nuevos anuncios de productos y adelantos.
Descuentos especiales: Disfruta de descuentos exclusivos en nuestros productos más recientes.
Promociones y sorteos festivos: Participa en sorteos y promociones de temporada.
👉 ¿Listo para explorar y crear con nosotros? Haz clic en [Aquí] y únete hoy mismo!
Metrónomo
Aquí haremos un metrónomo, el metrónomo se divide en 5 niveles, cuanto mayor sea el nivel, más urgente será el sonido del zumbador.
Componentes Requeridos
En este proyecto, necesitamos los siguientes componentes.
Es definitivamente conveniente comprar un kit completo, aquí está el enlace:
Nombre |
ELEMENTOS EN ESTE KIT |
ENLACE |
|---|---|---|
Kit Raphael |
337 |
También puedes comprarlos por separado desde los enlaces a continuación.
INTRODUCCIÓN DEL COMPONENTE |
ENLACE DE COMPRA |
|---|---|
Cableado
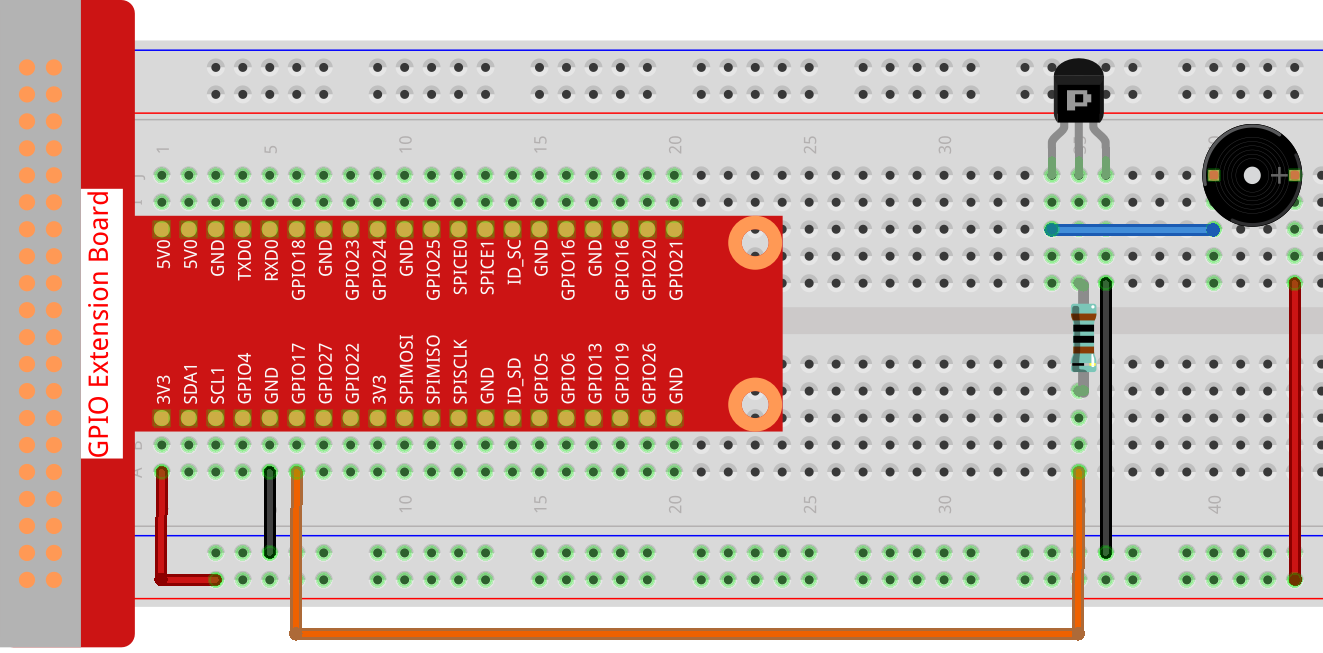
Nota
Aquí se utiliza un zumbador activo, y tiene una etiqueta blanca en él.
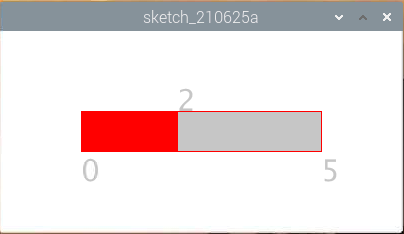
Boceto
import processing.io.*;

int level = 0;
int buzzerPin = 17;
int levelRange=5;
Slider mySlider;

void setup() {
    size(400, 200);
    frameRate(50);
    mySlider = new Slider(width * 0.2,height * 0.4,width * 0.8,height * 0.6,0,levelRange,level);
    GPIO.pinMode(buzzerPin, GPIO.OUTPUT);
}

void draw() {

    background(255);
    mySlider.show();
    if(level==0){
        GPIO.digitalWrite(buzzerPin, GPIO.HIGH);
    }else if((frameCount/5) % (levelRange-level+1) ==0){
        GPIO.digitalWrite(buzzerPin, GPIO.LOW);
    }else{
        GPIO.digitalWrite(buzzerPin, GPIO.HIGH);
    }
}

void mouseDragged(){
    level = mySlider.dragPoint(mouseX,mouseY);
}

class Slider{
    float slotPointAX;
    float slotPointBX;
    float slotPointAY;
    float slotPointBY;
    float linePoint;
    float depth;
    int maxRange;
    int minRange;
    int value;

    Slider(float ax, float ay, float bx, float by, int min, int max, int v){
        slotPointAX = ax;
        slotPointAY = ay;
        slotPointBX = bx;
        slotPointBY = by;
        maxRange = max;
        minRange = min;
        value = v;
        linePoint = slotPointAX;// + map(value, minRange, maxRange, slotPointAX, slotPointBX);
        depth = (slotPointBY - slotPointAY)*0.75;
    }

    void show(){
        rectMode(CORNERS);
        fill(200);
        stroke(255,0,0);
        rect(slotPointAX, slotPointAY, slotPointBX, slotPointBY);
        fill(255,0,0);
        rect(slotPointAX, slotPointAY, linePoint, slotPointBY);
        fill(200);
        textSize(depth);
        text(minRange, slotPointAX, slotPointBY+depth);
        text(maxRange, slotPointBX, slotPointBY+depth);
        text(value, linePoint, slotPointAY);
    }

    int dragPoint(float mx, float my){
        if(mx>=slotPointAX && mx<=slotPointBX && my>=slotPointAY && my<=slotPointBY){
            value = int(map(mx,slotPointAX,slotPointBX,minRange,maxRange));
            linePoint = map(value,minRange,maxRange,slotPointAX,slotPointBX);
        }
        return value;
    }
}
¿Cómo funciona?
.. As in the previous project, we created a Slider class and made it act as WIDGET.
Aquí, creamos una clase Slider y la hicimos actuar como un WIDGET.
Slider(ax, ay, bx, by, min, max, v)
En la declaración, necesita recibir 7 parámetros.
Los primeros cuatro parámetros determinan el tamaño del widget, seguidos de las coordenadas (x1, y1) del punto inicial en la esquina superior izquierda y (x2, y2) en la esquina inferior derecha.
Los últimos tres parámetros determinan su rango numérico (de min a max) y el valor inicial.
Tiene dos métodos, el efecto de dragPoint() es hacer que el deslizador sea arrastrable y devolver el valor de la posición actual del deslizador.
int dragPoint(float mx, float my){
    if(mx>=slotPointAX && mx<=slotPointBX && my>=slotPointAY && my<=slotPointBY){
        value = int(map(mx,slotPointAX,slotPointBX,minRange,maxRange));
        linePoint = map(value,minRange,maxRange,slotPointAX,slotPointBX);
    }
    return value;
}
Otro método show() es para mostrar el deslizador. Al mismo tiempo, se muestran los valores de rango y el valor actual en la posición correspondiente.
void show(){
    rectMode(CORNERS);
    fill(200);
    stroke(255,0,0);
    rect(slotPointAX, slotPointAY, slotPointBX, slotPointBY);
    fill(255,0,0);
    rect(slotPointAX, slotPointAY, linePoint, slotPointBY);
    fill(200);
    textSize(depth);
    text(minRange, slotPointAX, slotPointBY+depth);
    text(maxRange, slotPointBX, slotPointBY+depth);
    text(value, linePoint, slotPointAY);
}