注釈
こんにちは、SunFounderのRaspberry Pi & Arduino & ESP32愛好家コミュニティへようこそ!Facebook上でRaspberry Pi、Arduino、ESP32についてもっと深く掘り下げ、他の愛好家と交流しましょう。
参加する理由は?
エキスパートサポート:コミュニティやチームの助けを借りて、販売後の問題や技術的な課題を解決します。
学び&共有:ヒントやチュートリアルを交換してスキルを向上させましょう。
独占的なプレビュー:新製品の発表や先行プレビューに早期アクセスしましょう。
特別割引:最新製品の独占割引をお楽しみください。
祭りのプロモーションとギフト:ギフトや祝日のプロモーションに参加しましょう。
👉 私たちと一緒に探索し、創造する準備はできていますか?[ ここ]をクリックして今すぐ参加しましょう!
ゲーム - 脱出
このゲームは「脱出」と呼ばれています。 プレイヤーの目的は、MPU6050センサーを傾けてLEDマトリックス上でピクセルを動かし、マトリックスの境界にある開口部(出口)を通過させることです。
必要なコンポーネント
このプロジェクトでは、以下のコンポーネントが必要です。
一式を購入するのが便利です。こちらがリンクです:
名称 |
このキットのアイテム数 |
リンク |
|---|---|---|
Elite Explorer Kit |
300+ |
以下のリンクから個別に購入することもできます。
コンポーネント紹介 |
購入リンク |
|---|---|
- |
|
- |
配線図
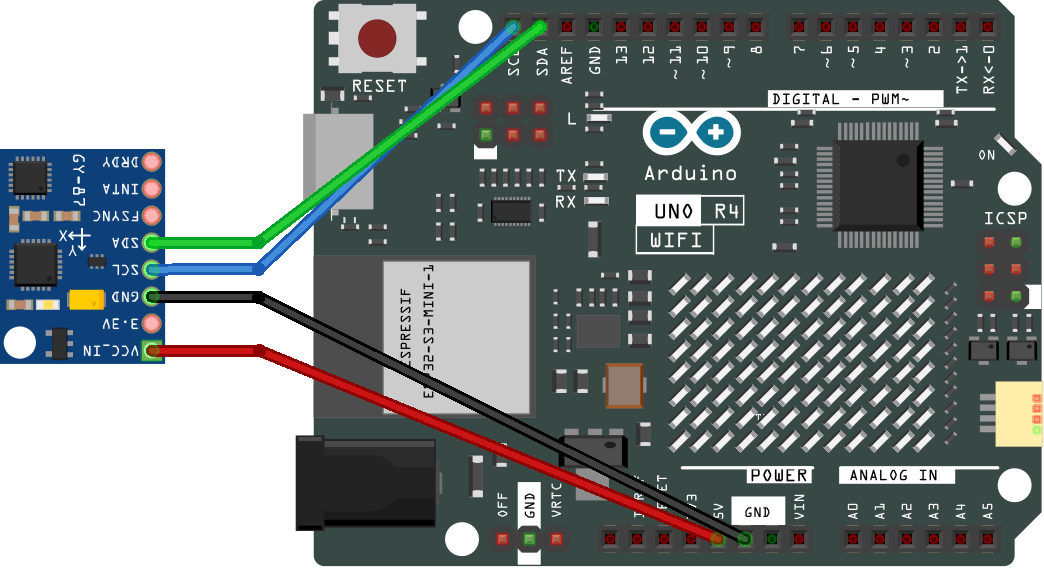
回路図
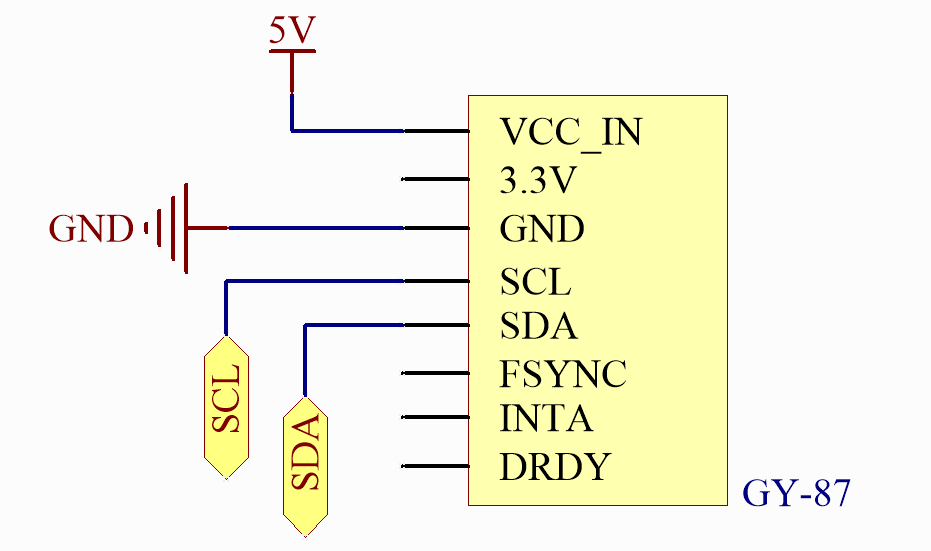
コード
注釈
ファイル
11_escape_square.inoは、パスelite-explorer-kit-main\fun_project\11_escape_squareで直接開けます。または、このコードをArduino IDEにコピーしてください。
注釈
ライブラリをインストールするには、Arduinoライブラリマネージャーで 「Adafruit MPU6050」 を検索し、インストールしてください。
  1/*
  2  The code utilizes an Arduino Uno and a GY-87 IMU module to create the "Escape" game.
  3  The goal is for the player to tilt the MPU6050 sensor, which controls the movement
  4  of a pixel on the LED matrix. The objective is to guide the pixel through an opening
  5  in the border of the matrix (the exit). Each successful passage through the opening
  6  raises the game level.
  7
  8  Board: Arduino Uno R4
  9  Component: GY-87 IMU module
 10  Library: https://github.com/adafruit/Adafruit_MPU6050  (Adafruit MPU6050 by Adafruit)
 11*/
 12
 13// Include necessary libraries
 14#include "Arduino_LED_Matrix.h"
 15#include <Wire.h>
 16#include <Adafruit_MPU6050.h>
 17#include <Adafruit_Sensor.h>
 18
 19// Create instances of sensor and matrix
 20Adafruit_MPU6050 mpu;
 21ArduinoLEDMatrix matrix;
 22byte frame[8][12];
 23
 24int gapStart = 0;
 25int side = 0;  // 0: top, 1: right, 2: bottom, 3: left
 26
 27int pixelX = 4;  // Initial position of the pixel in the center
 28int pixelY = 3;
 29int level =0;
 30bool pass = false;
 31
 32unsigned long gapLastUpdate = 0;
 33unsigned long pixelLastUpdate = 0;
 34
 35void setup() {
 36  //init matrix
 37  matrix.begin();
 38  drawSquareWithGap();
 39  matrix.loadPixels((uint8_t*)frame, 8 * 12);
 40  matrix.renderFrame(0);
 41
 42  //init mpu6050
 43  Serial.begin(9600);
 44  if (!mpu.begin()) {
 45    Serial.println("Failed to find MPU6050 chip");
 46    while (1) {
 47      delay(10);
 48    }
 49  }
 50  mpu.setAccelerometerRange(MPU6050_RANGE_2_G);
 51}
 52
 53void loop() {
 54  // movePixelBasedOnMPU();
 55  // moveGap();
 56
 57  unsigned long currentMillis = millis();
 58
 59  if (currentMillis - pixelLastUpdate >= 200) {
 60    movePixelBasedOnMPU();
 61    checkPixelPosition();
 62    pixelLastUpdate = currentMillis;
 63  }
 64
 65  if (currentMillis - gapLastUpdate >= 1020-level*100) {
 66    moveGap();
 67    gapLastUpdate = currentMillis;
 68  }
 69
 70  matrix.loadPixels((uint8_t*)frame, 8 * 12);
 71  matrix.renderFrame(0);
 72  if (pass){
 73    delay(1500); //delay for show
 74    pass=false;
 75    resetPixel();
 76  }
 77}
 78
 79
 80
 81
 82void drawSquareWithGap() {
 83  memset(frame, 0, 8 * 12);  // Clear the frame
 84
 85  for (int i = 0; i < 8; i++) {
 86    for (int j = 0; j < 8; j++) {
 87      if (i == 0 || i == 7 || j == 0 || j == 7) {
 88        frame[i][j] = 1;  // Set border pixel
 89      }
 90    }
 91  }
 92
 93  createGap();
 94
 95  // Redraw the pixel after drawing the square and gap
 96  frame[pixelY][pixelX] = 1;
 97}
 98
 99void createGap() {
100  switch (side) {
101    case 0:  // top
102      frame[0][gapStart] = 0;
103      frame[0][gapStart + 1] = 0;
104      // frame[0][gapStart + 2] = 0;
105      break;
106    case 1:  // right
107      frame[gapStart][7] = 0;
108      frame[gapStart + 1][7] = 0;
109      // frame[gapStart + 2][7] = 0;
110      break;
111    case 2:  // bottom
112      frame[7][7 - gapStart] = 0;
113      frame[7][6 - gapStart] = 0;
114      // frame[7][5 - gapStart] = 0;
115      break;
116    case 3:  // left
117      frame[7 - gapStart][0] = 0;
118      frame[6 - gapStart][0] = 0;
119      // frame[5 - gapStart][0] = 0;
120      break;
121  }
122}
123
124void moveGap() {
125  gapStart++;
126
127  if (side == 0 && gapStart > 5) {
128    gapStart = 0;
129    side = 1;
130  } else if (side == 1 && gapStart > 5) {
131    gapStart = 0;
132    side = 2;
133  } else if (side == 2 && gapStart > 5) {
134    gapStart = 0;
135    side = 3;
136  } else if (side == 3 && gapStart > 5) {
137    gapStart = 0;
138    side = 0;
139  }
140
141  drawSquareWithGap();  // Redraw the square with the moved gap
142}
143
144
145void movePixelBasedOnMPU() {
146  sensors_event_t a, g, temp;
147  mpu.getEvent(&a, &g, &temp);
148
149  frame[pixelY][pixelX] = 0;  // Clear current pixel
150
151  if (a.acceleration.x > 1.0) {
152    // pixelY++;
153    pixelY--;
154  } else if (a.acceleration.x < -1.0) {
155    // pixelY--;
156    pixelY++;
157  }
158
159  if (a.acceleration.y > 1.0) {
160    pixelX--;
161  } else if (a.acceleration.y < -1.0) {
162    pixelX++;
163  }
164
165  if (pixelX > 7 || pixelX < 0 || pixelY > 7 || pixelY < 0 || frame[pixelY][pixelX] == 1) {
166    resetPixel();
167  } else {
168    frame[pixelY][pixelX] = 1;
169  }
170}
171
172void resetPixel() {
173  pixelX = 4;
174  pixelY = 3;
175  frame[pixelY][pixelX] = 1;
176}
177
178void checkPixelPosition() {
179  bool isOnGap = false;
180
181  // Check if the pixel is on the gap
182  switch (side) {
183    case 0: // top
184      if (pixelY == 0 && pixelX >= gapStart && pixelX <= gapStart + 2) isOnGap = true;
185      break;
186    case 1: // right
187      if (pixelX == 7 && pixelY >= gapStart && pixelY <= gapStart + 2) isOnGap = true;
188      break;
189    case 2: // bottom
190      if (pixelY == 7 && pixelX >= 5 - gapStart && pixelX <= 7 - gapStart) isOnGap = true;
191      break;
192    case 3: // left
193      if (pixelX == 0 && pixelY >= 5 - gapStart && pixelY <= 7 - gapStart) isOnGap = true;
194      break;
195  }
196
197  if (isOnGap) {
198    if (level<=10){ level++;}
199    else {level=0;}
200    pass = true;
201  }
202
203  // Optionally, you can print out the level for debugging
204  // Serial.println("Level: " + String(level));
205}
どのように動作するのか?
コードの詳細な説明はこちらです:
ライブラリのインポートとグローバル変数:
LEDマトリックス、Wire(I2C通信用)、MPU6050(モーションセンサー)、および
Adafruit_Sensorライブラリをインポートします。 MPU6050とLEDマトリックスオブジェクトを初期化します。 pixelXやpixelY(ピクセルの位置)、gapStartやside(ギャップの開始位置とその側面)、level(ゲームの難易度レベル)などのグローバル変数を定義します。setup():LEDマトリックスを初期化し、ギャップ付きのマトリックスを描きます。 シリアル通信を初期化し、MPU6050センサーが正しく起動しているか確認し、加速度範囲を2gに設定します。
loop():MPU6050センサーの読み取りに基づいてピクセルの位置を定期的に更新します。 ギャップの位置を定期的に移動させます。 新しいピクセルのレイアウトを読み込み、LEDマトリックスにレンダリングします。 ピクセルがギャップを通過したかどうかを確認します。 通過した場合、成功を表示するために1.5秒間遅延させ、ゲームの難易度を上げ、ピクセルの位置をリセットします。
その他の関数:
drawSquareWithGap():8x8の境界を描き、その中にギャップを作成します。createGap():指定された側に長さ2のギャップを作成します。moveGap():現在の側面とgapStartに基づいてギャップの位置を移動させ、必要に応じて側面を変更します。movePixelBasedOnMPU():MPU6050から加速度データを読み取ります。加速度データに基づいてピクセルの位置を移動させます(ピクセルが境界外や壁に当たった場合はリセット)。resetPixel():ピクセルの位置をマトリックスの中心にリセットします。checkPixelPosition():ピクセルがギャップ上にあるかどうかを確認します。もしそうなら、ゲームの難易度レベルを上げ、パスフラグをtrueに設定します。