注釈
こんにちは、SunFounderのRaspberry Pi & Arduino & ESP32愛好家コミュニティへようこそ!Facebook上でRaspberry Pi、Arduino、ESP32についてもっと深く掘り下げ、他の愛好家と交流しましょう。
参加する理由は?
エキスパートサポート:コミュニティやチームの助けを借りて、販売後の問題や技術的な課題を解決します。
学び&共有:ヒントやチュートリアルを交換してスキルを向上させましょう。
独占的なプレビュー:新製品の発表や先行プレビューに早期アクセスしましょう。
特別割引:最新製品の独占割引をお楽しみください。
祭りのプロモーションとギフト:ギフトや祝日のプロモーションに参加しましょう。
👉 私たちと一緒に探索し、創造する準備はできていますか?[ここ]をクリックして今すぐ参加しましょう!
3.1.13 GAME - 10秒間
はじめに
次に、集中力を試すゲームデバイスを作ってみましょう。 傾きスイッチを棒に結び付けて、魔法の杖を作ります。杖を振ると、 4桁のセグメント表示がカウントを開始し、もう一度振るとカウントが停止します。表示されたカウントを 10.00 で停止させることができれば、あなたの勝利です。友達とこのゲームをして、 誰が時間の魔法使いかを競い合うことができます。
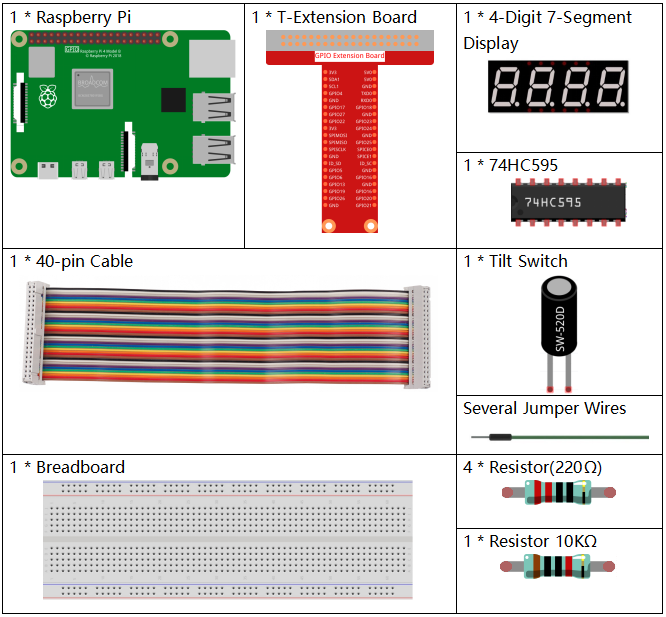
必要なコンポーネント
このプロジェクトには以下のコンポーネントが必要です。
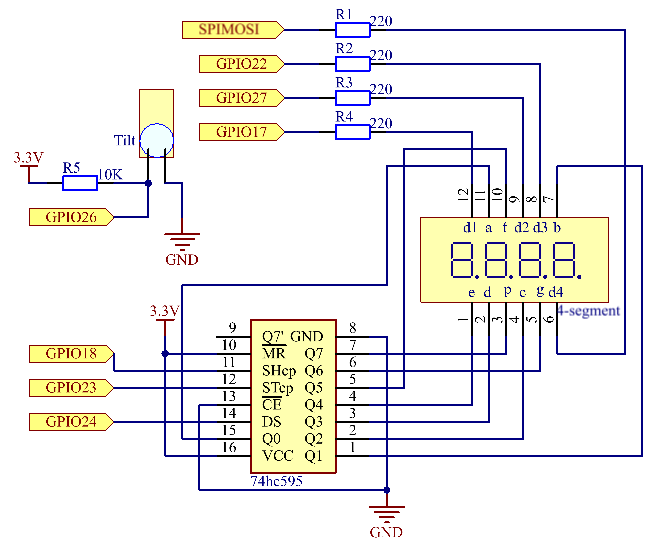
回路図
T-Board Name |
physical |
wiringPi |
BCM |
GPIO17 |
Pin 11 |
0 |
17 |
GPIO27 |
Pin 13 |
2 |
27 |
GPIO22 |
Pin 15 |
3 |
22 |
SPIMOSI |
Pin 19 |
12 |
10 |
GPIO18 |
Pin 12 |
1 |
18 |
GPIO23 |
Pin 16 |
4 |
23 |
GPIO24 |
Pin 18 |
5 |
24 |
GPIO26 |
Pin 37 |
25 |
26 |
実験手順
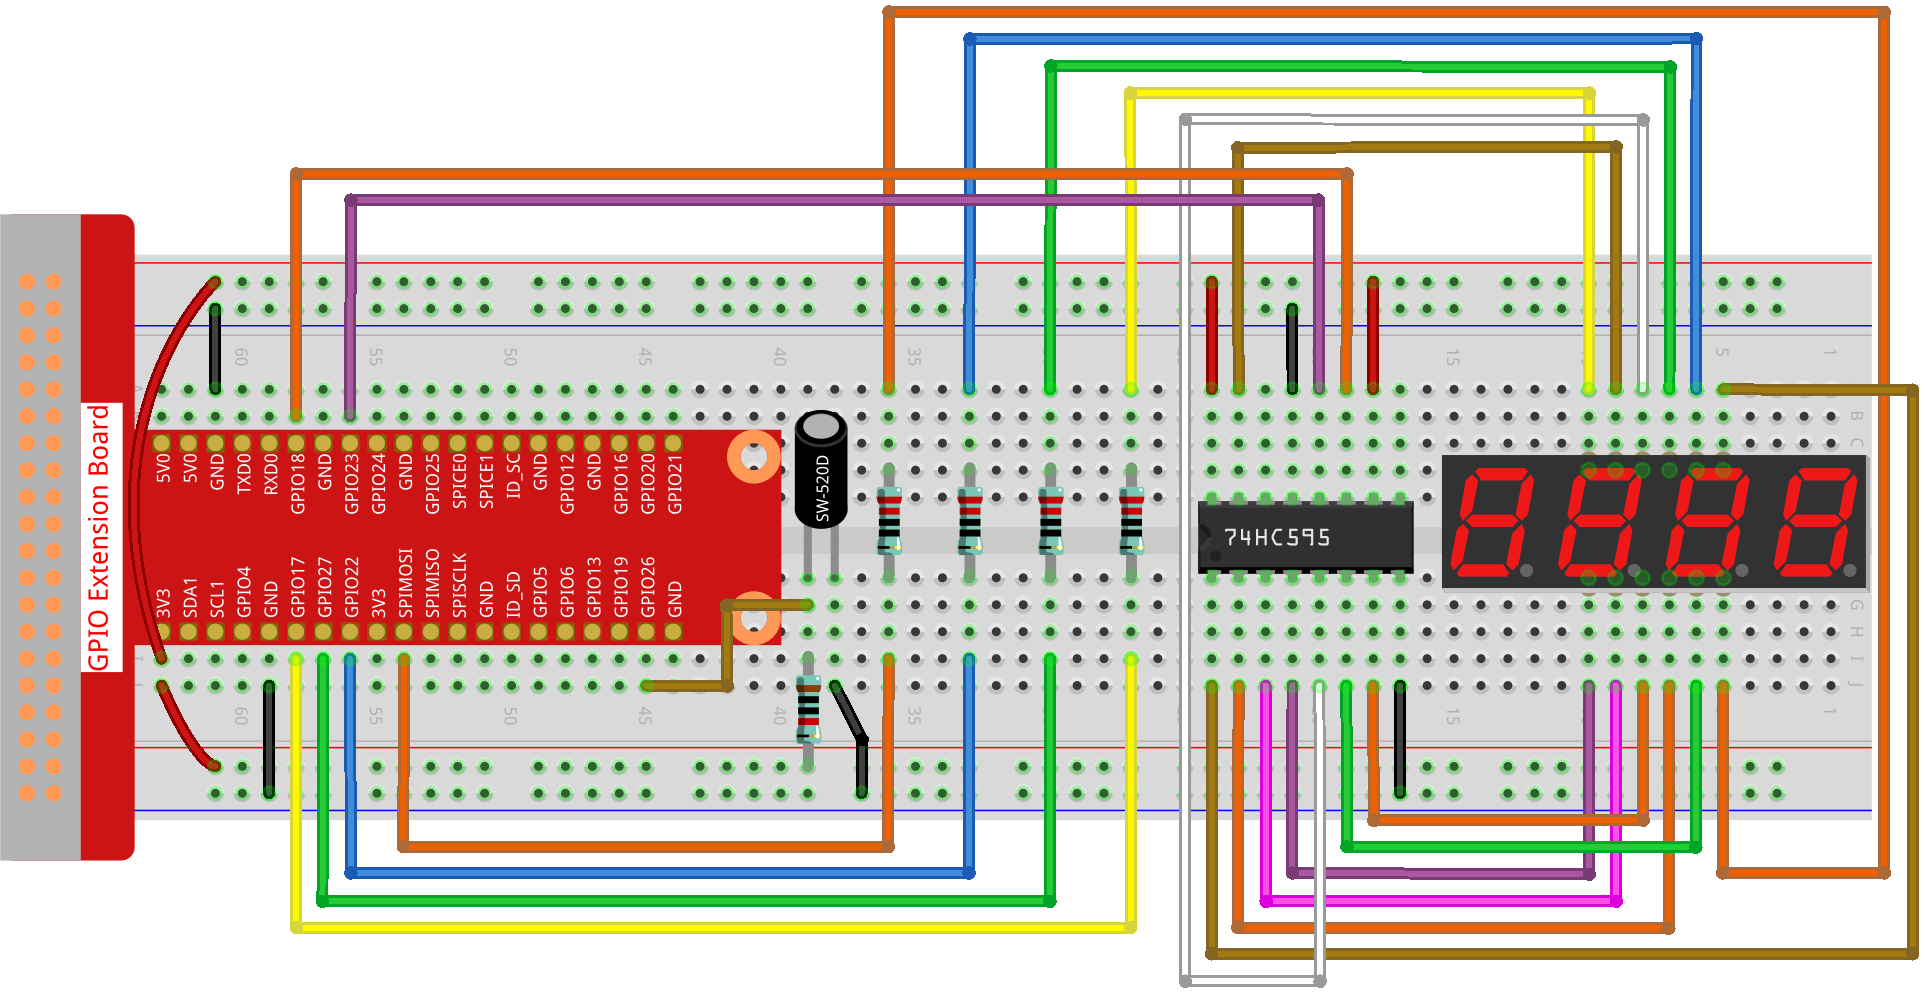
ステップ1: 回路を組み立てる。
ステップ2: コードのフォルダに移動する。
cd ~/davinci-kit-for-raspberry-pi/python-pi5
ステップ3: 実行可能ファイルを実行する。
sudo python3 3.1.13_GAME_10Second.py
杖を振ると、4桁のセグメント表示がカウントを開始し、もう一度振るとカウントが停止します。表示されたカウントを 10.00 で停止させることができれば、あなたの勝利です。もう一度振ると、ゲームの次のラウンドが始まります。
警告
エラー メッセージ RuntimeError: Cannot determine SOC peripheral base address が表示された場合は、 「gpiozero」が動作しない場合。 を参照してください。
コード
注釈
下記のコードは 変更/リセット/コピー/実行/停止 が可能です。しかし、それを行う前に、 davinci-kit-for-raspberry-pi/python-pi5 のようなソースコードのパスに移動する必要があります。コードを変更した後、直接実行して効果を確認することができます。
#!/usr/bin/env python3

from gpiozero import OutputDevice, Button
import time
import threading

# GPIO 26に接続されたボタンを初期化
sensorPin = Button(26)

# 74HC595シフトレジスタに接続されたGPIOピンを定義
SDI = OutputDevice(24)   # シリアルデータ入力
RCLK = OutputDevice(23)  # レジスタクロック
SRCLK = OutputDevice(18) # シフトレジスタクロック

# 7セグメント表示の各桁の選択用のGPIOピンを定義
placePin = [OutputDevice(pin) for pin in (10, 22, 27, 17)]

# 7セグメント表示で0〜9の数字を表示するためのセグメントコードを定義
number = (0xc0, 0xf9, 0xa4, 0xb0, 0x99, 0x92, 0x82, 0xf8, 0x80, 0x90)

# カウンターとタイマー変数
counter = 0
timer1 = None
gameState = 0

def clearDisplay():
    """ 7セグメント表示の全セグメントを消去します。 """
    for _ in range(8):
        SDI.on()
        SRCLK.on()
        SRCLK.off()
    RCLK.on()
    RCLK.off()

def hc595_shift(data):
    """ デジットを表示するために74HC595シフトレジスタにデータをシフトします。 """
    for i in range(8):
        SDI.value = 0x80 & (data << i)
        SRCLK.on()
        SRCLK.off()
    RCLK.on()
    RCLK.off()

def pickDigit(digit):
    """ 7セグメント表示でどの桁を表示するかを選択します。 """
    for pin in placePin:
        pin.off()
    placePin[digit].on()

def display():
    """ 現在のカウンター値を7セグメント表示に表示します。 """
    global counter
    clearDisplay()
    pickDigit(0)
    hc595_shift(number[counter % 10])

    clearDisplay()
    pickDigit(1)
    hc595_shift(number[counter % 100 // 10])

    clearDisplay()
    pickDigit(2)
    hc595_shift(number[counter % 1000 // 100] - 0x80)

    clearDisplay()
    pickDigit(3)
    hc595_shift(number[counter % 10000 // 1000])

def stateChange():
    """ ボタン押下に基づいてカウンターの状態を変更します。 """
    global gameState, counter, timer1
    if gameState == 0:
        counter = 0
        time.sleep(1)
        timer()
    elif gameState == 1 and timer1 is not None:
        timer1.cancel()
        time.sleep(1)
    gameState = (gameState + 1) % 2

def loop():
    """ ボタンの状態をチェックし、表示を更新するメインループです。 """
    global counter
    currentState = 0
    lastState = 0
    while True:
        display()
        currentState = sensorPin.value
        if (currentState == 0) and (lastState == 1):
            stateChange()
        lastState = currentState

def timer():
    """ 0.01秒ごとにカウンターを増加させるタイマー関数です。 """
    global counter, timer1
    timer1 = threading.Timer(0.01, timer)
    timer1.start()
    counter += 1

try:
    loop()
except KeyboardInterrupt:
    if timer1:
        timer1.cancel()
コードの説明
必要なモジュールをインポートしてスクリプトを開始します。
gpiozeroライブラリはボタンなどのGPIOデバイスとのインターフェースに使用され、timeおよびthreadingモジュールはタイミング関連のタスクや並行操作を扱うために使用されるかもしれません。#!/usr/bin/env python3 from gpiozero import OutputDevice, Button import time import threading
GPIOピン26に接続された
Buttonオブジェクトを初期化します。このセットアップにより、ボタン押下を検出することができます。# GPIO 26に接続されたボタンを初期化 sensorPin = Button(26)
シフトレジスタのシリアルデータ入力(SDI)、レジスタクロック入力(RCLK)、シフトレジスタクロック入力(SRCLK)に接続されたGPIOピンを初期化します。
# 74HC595シフトレジスタに接続されたGPIOピンを定義
SDI = OutputDevice(24)   # シリアルデータ入力
RCLK = OutputDevice(23)  # レジスタクロック
SRCLK = OutputDevice(18) # シフトレジスタクロック
7セグメント表示の各桁の選択用のピンを初期化し、0〜9の数字を表示するためのバイナリコードを定義します。
# 7セグメント表示の各桁の選択用のGPIOピンを定義
placePin = [OutputDevice(pin) for pin in (10, 22, 27, 17)]

# 7セグメント表示で0〜9の数字を表示するためのセグメントコードを定義
number = (0xc0, 0xf9, 0xa4, 0xb0, 0x99, 0x92, 0x82, 0xf8, 0x80, 0x90)
7セグメント表示を制御するための関数です。
clearDisplayはすべてのセグメントをオフにし、hc595_shiftはシフトレジスタにデータをシフトし、pickDigitは表示上の特定の桁をアクティブにします。def clearDisplay(): """ 7セグメント表示の全セグメントを消去します。 """ for _ in range(8): SDI.on() SRCLK.on() SRCLK.off() RCLK.on() RCLK.off() def hc595_shift(data): """ デジットを表示するために74HC595シフトレジスタにデータをシフトします。 """ for i in range(8): SDI.value = 0x80 & (data << i) SRCLK.on() SRCLK.off() RCLK.on() RCLK.off() def pickDigit(digit): """ 7セグメント表示でどの桁を表示するかを選択します。 """ for pin in placePin: pin.off() placePin[digit].on()
現在のカウンター値を7セグメント表示に表示する関数です。
def display():
    """ 現在のカウンター値を7セグメント表示に表示します。 """
    global counter
    clearDisplay()
    pickDigit(0)
    hc595_shift(number[counter % 10])

    clearDisplay()
    pickDigit(1)
    hc595_shift(number[counter % 100 // 10])

    clearDisplay()
    pickDigit(2)
    hc595_shift(number[counter % 1000 // 100] - 0x80)

    clearDisplay()
    pickDigit(3)
    hc595_shift(number[counter % 10000 // 1000])
ボタン押下に基づいてカウンターの状態を変更する関数です。
def stateChange():
    """ ボタン押下に基づいてカウンターの状態を変更します。 """
    global gameState, counter, timer1
    if gameState == 0:
        counter = 0
        time.sleep(1)
        timer()
    elif gameState == 1 and timer1 is not None:
        timer1.cancel()
        time.sleep(1)
    gameState = (gameState + 1) % 2
ボタンの状態を継続的にチェックし、表示を更新するメインループです。ボタンの状態が変わると、
stateChangeを呼び出します。def loop(): """ ボタンの状態をチェックし、表示を更新するメインループです。 """ global counter currentState = 0 lastState = 0 while True: display() currentState = sensorPin.value if (currentState == 0) and (lastState == 1): stateChange() lastState = currentState
0.01秒ごとにカウンターを増加させるタイマー関数です。
def timer():
    """ 0.01秒ごとにカウンターを増加させるタイマー関数です。 """
    global counter, timer1
    timer1 = threading.Timer(0.01, timer)
    timer1.start()
    counter += 1
メインループを実行し、キーボード割り込み(Ctrl+C)を使用してプログラムからクリーンに終了することができます。
try:
    loop()
except KeyboardInterrupt:
    if timer1:
        timer1.cancel()