Note
Hello, welcome to the SunFounder Raspberry Pi & Arduino & ESP32 Enthusiasts Community on Facebook! Dive deeper into Raspberry Pi, Arduino, and ESP32 with fellow enthusiasts.
Why Join?
Expert Support: Solve post-sale issues and technical challenges with help from our community and team.
Learn & Share: Exchange tips and tutorials to enhance your skills.
Exclusive Previews: Get early access to new product announcements and sneak peeks.
Special Discounts: Enjoy exclusive discounts on our newest products.
Festive Promotions and Giveaways: Take part in giveaways and holiday promotions.
👉 Ready to explore and create with us? Click [here] and join today!
2.1.5 Keypad
Introduction
A keypad is a rectangular array of buttons. In this project, We will use it input characters.
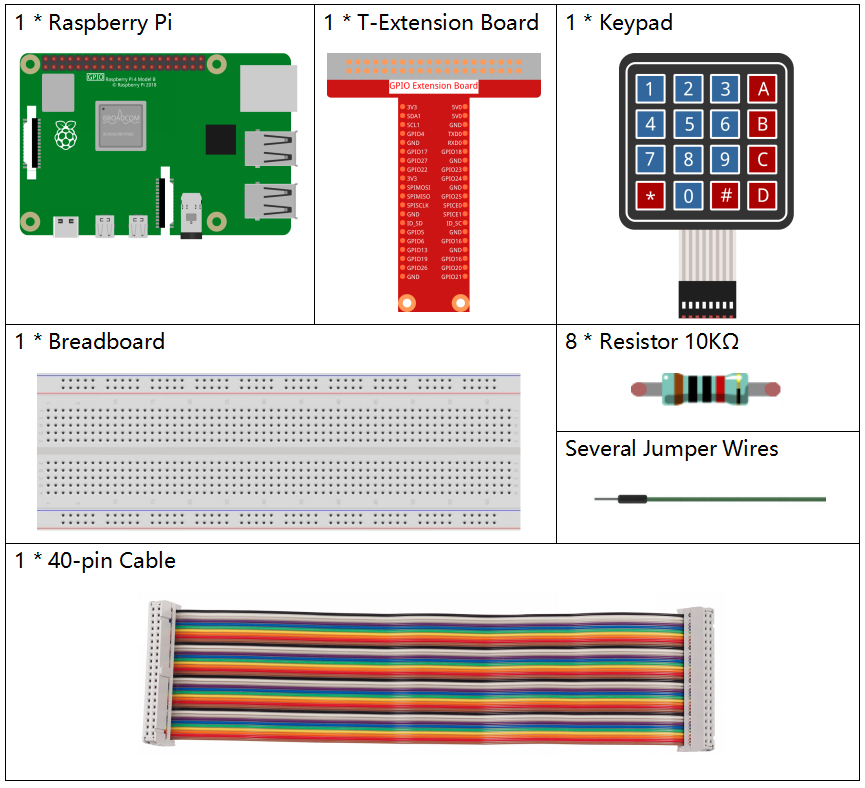
Components
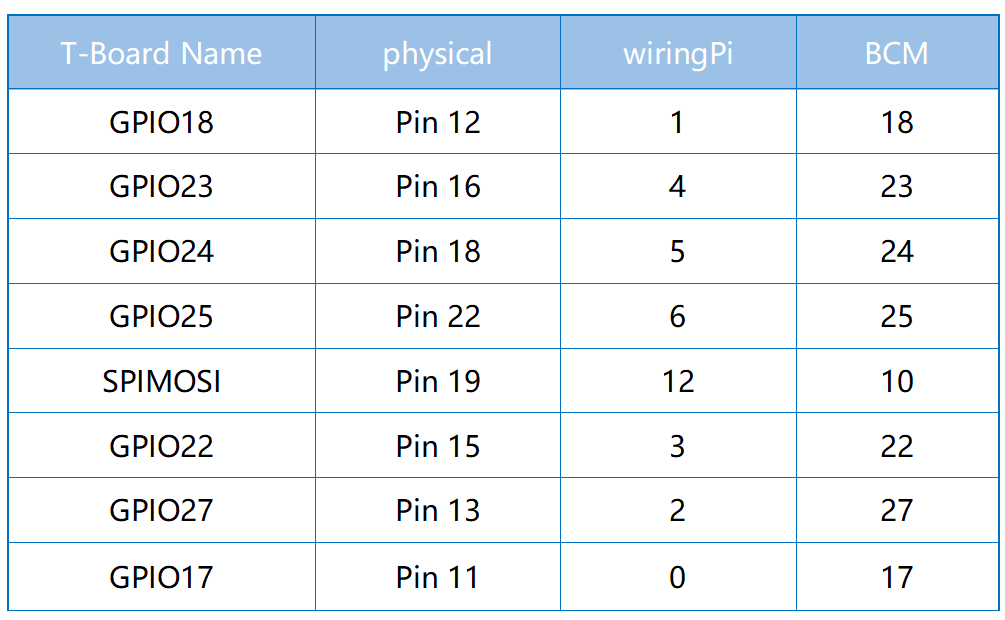
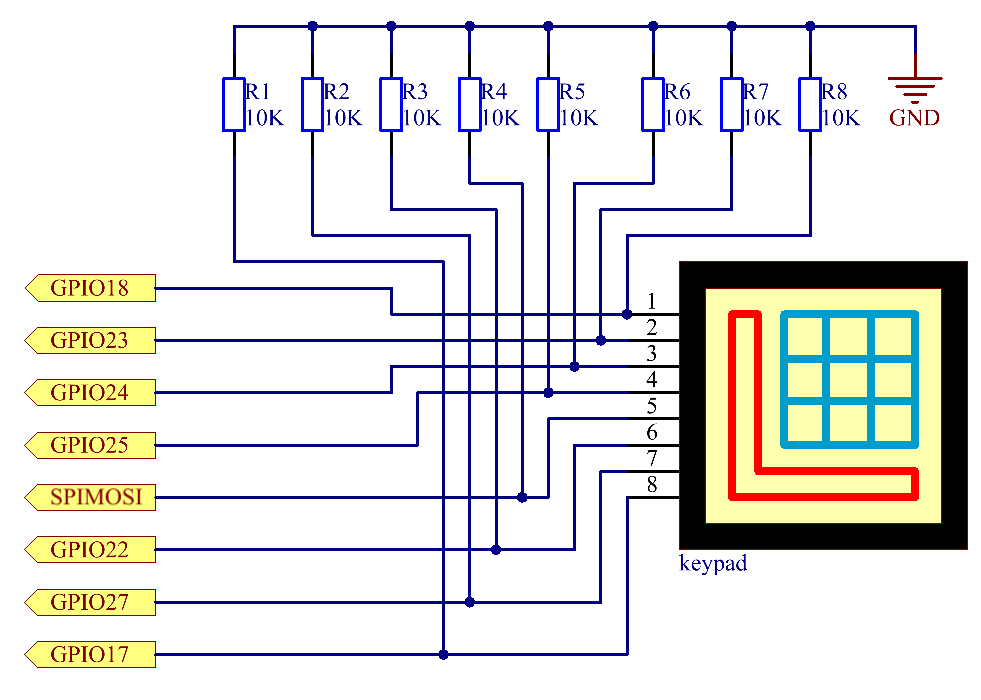
Schematic Diagram
Experimental Procedures
Step 1: Build the circuit.

Step 2: Open the code file.
cd ~/davinci-kit-for-raspberry-pi/nodejs/
Step 3: Run.
sudo node keypad.js
After the code runs, the values of pressed buttons on keypad (button Value) will be printed on the screen.
Code
const Gpio = require('pigpio').Gpio;

var rowsPins = [18,23,24,25];
var colsPins = [10,6,27,17];
var keys = ["1","2","3","A",
        "4","5","6","B",
        "7","8","9","C",
        "*","0","#","D"];

for(let i=0;i<rowsPins.length;i++){
    rowsPins[i] = new Gpio(rowsPins[i],{mode: Gpio.OUTPUT})
}
for(let i=0;i<colsPins.length;i++){
    colsPins[i] = new Gpio(colsPins[i],{
        mode: Gpio.INPUT,
        pullUpDown: Gpio.PUD_DOWN,
        edge: Gpio.RISING_EDGE
    })
}

var last_key_pressed = 0;

var col=-1;
for(let i=0;i<colsPins.length;i++){
    colsPins[i].on('interrupt',()=>{
        col=i;
        pressed_keys=keys[row*colsPins.length+col];
        if(last_key_pressed!=pressed_keys){
            console.log(`${pressed_keys}`);
        }
        last_key_pressed = pressed_keys;
    });
}

var row=-1;
setInterval(() => {
    row=(row+1)%rowsPins.length;
    for(let i=0;i<rowsPins.length;i++){
        rowsPins[i].digitalWrite(0);
    }
    rowsPins[row].digitalWrite(1);
}, 10);
Code Explanation
const Gpio = require('pigpio').Gpio;

var rowsPins = [18,23,24,25];
var colsPins = [10,6,27,17];
var keys = ["1","2","3","A",
        "4","5","6","B",
        "7","8","9","C",
        "*","0","#","D"];

for(let i=0;i<rowsPins.length;i++){
    rowsPins[i] = new Gpio(rowsPins[i],{mode: Gpio.OUTPUT})
}
for(let i=0;i<colsPins.length;i++){
    colsPins[i] = new Gpio(colsPins[i],{
        mode: Gpio.INPUT,
        pullUpDown: Gpio.PUD_DOWN,
        edge: Gpio.RISING_EDGE
    })
}
In the style of the keypad, declare two sets of pins and a matrix.
Four of the pins are the row of the keypad, set these pins to OUTPUT mode; The other four pins are the columns of the keypad, set these pins to INPUT mode, and set the rising edge interrupt for them.
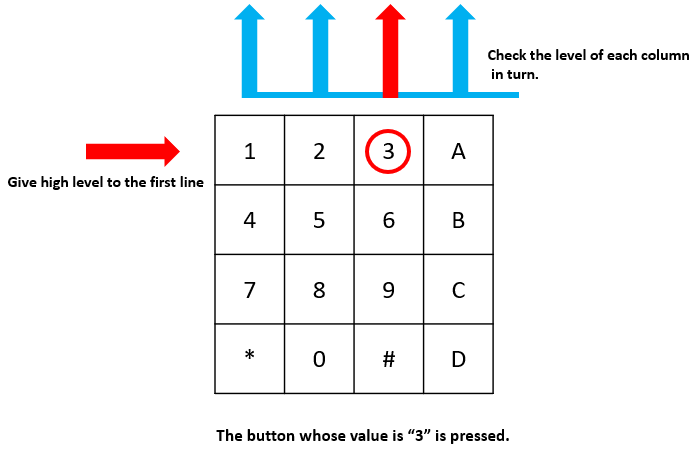
The principle that the main controller can obtain the key value is as follows: The four row pins provide high level in turn, if a button is pressed, The corresponding column pin will get the high level released by the row pin, which will trigger the rising edge interrupt.
For example, if I press the button 3 , when the 2nd, 3rd, and 4th row pins release the high level, there is no effect; When the row pin in the first position releases the high level, the third column pin will be able to obtain the high level and trigger the rising edge interrupt. At this time, the 1st, 2nd, and 4th column pins do not trigger any events.
Then, according to the 1st row pin that releases the high level and the 3rd column pin that gets the high level, the main controller will be able to know that the position of the pressed button is (1,3), which is the button 3.
var row=-1;
setInterval(() => {
    row=(row+1)%rowsPins.length;
    for(let i=0;i<rowsPins.length;i++){
        rowsPins[i].digitalWrite(0);
    }
    rowsPins[row].digitalWrite(1);
}, 10);
The four row pins are periodically supplied high, and the variable row is used to locate the currently working row pin.
var col=-1;
for(let i=0;i<colsPins.length;i++){
    colsPins[i].on('interrupt',()=>{
        col=i;
        // pressed_keys=keys[row*colsPins.length+col];
        // if(last_key_pressed!=pressed_keys){
        //     console.log(`${pressed_keys}`);
        // }
        // last_key_pressed = pressed_keys;
    });
}
Set up interrupt functions for the four column pins,
and the variable col is used to locate the column pins that trigger the rising edge interrupt event.
pressed_keys=keys[row*colsPins.length+col];
if(last_key_pressed!=pressed_keys){
    console.log(`${pressed_keys}`);
}
last_key_pressed = pressed_keys;
There is also a piece of code in the break function to get the specific key value from the keys matrix according to row and col.
And every time you get a new key value, print the value.
Phenomenon Picture
