Note
Hello, welcome to the SunFounder Raspberry Pi & Arduino & ESP32 Enthusiasts Community on Facebook! Dive deeper into Raspberry Pi, Arduino, and ESP32 with fellow enthusiasts.
Why Join?
Expert Support: Solve post-sale issues and technical challenges with help from our community and team.
Learn & Share: Exchange tips and tutorials to enhance your skills.
Exclusive Previews: Get early access to new product announcements and sneak peeks.
Special Discounts: Enjoy exclusive discounts on our newest products.
Festive Promotions and Giveaways: Take part in giveaways and holiday promotions.
👉 Ready to explore and create with us? Click [here] and join today!
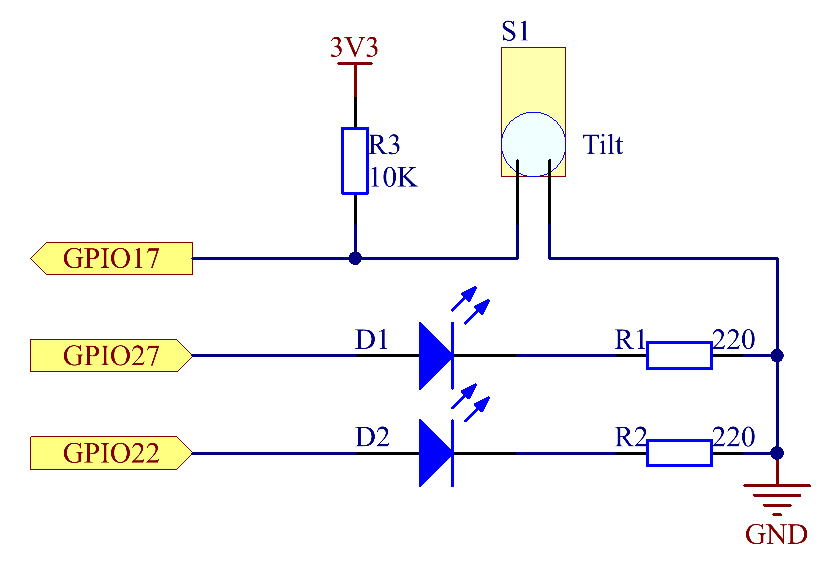
2.1.3 Tilt Switch
Introduction
This is a ball tilt-switch with a metal ball inside. It is used to detect inclinations of a small angle.
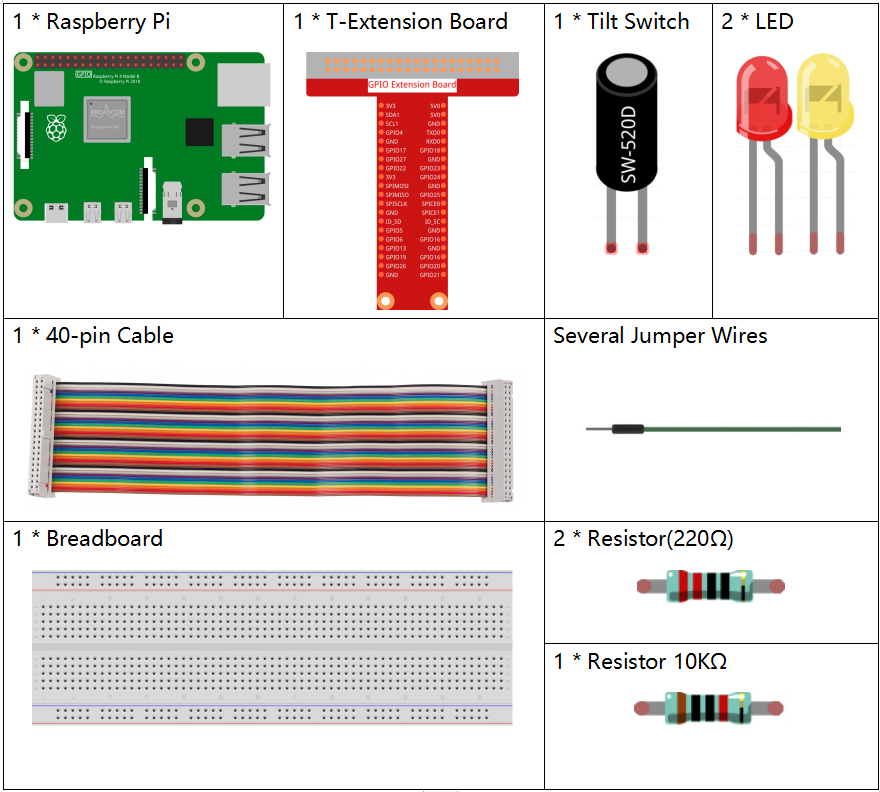
Components
Principle
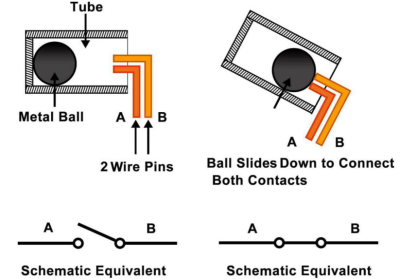
Tilt
The principle is very simple. When the switch is tilted in a certain angle, the ball inside rolls down and touches the two contacts connected to the pins outside, thus triggering circuits. Otherwise the ball will stay away from the contacts, thus breaking the circuits.
Schematic Diagram
Experimental Procedures
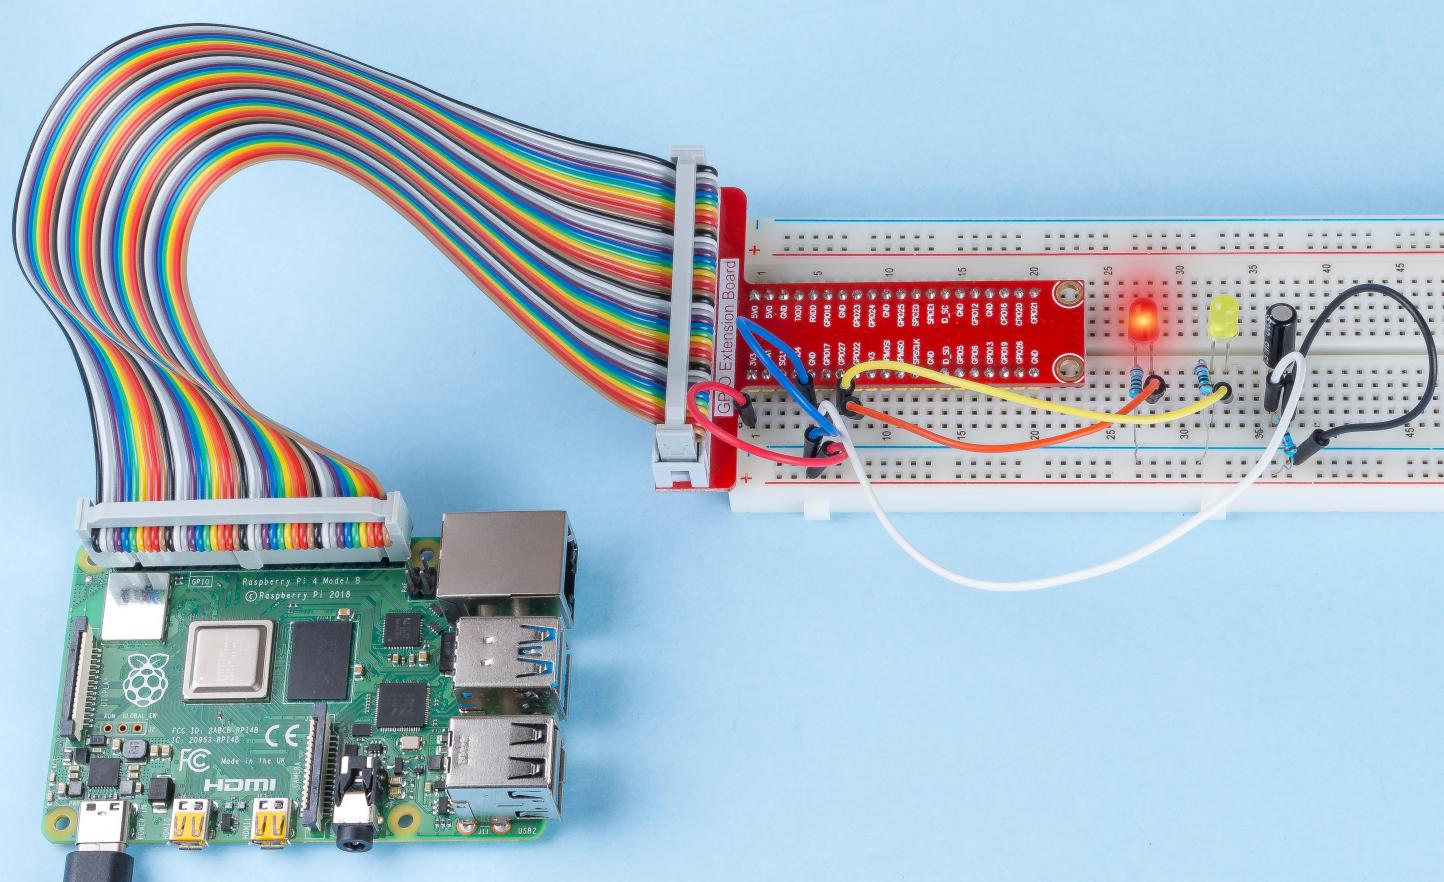
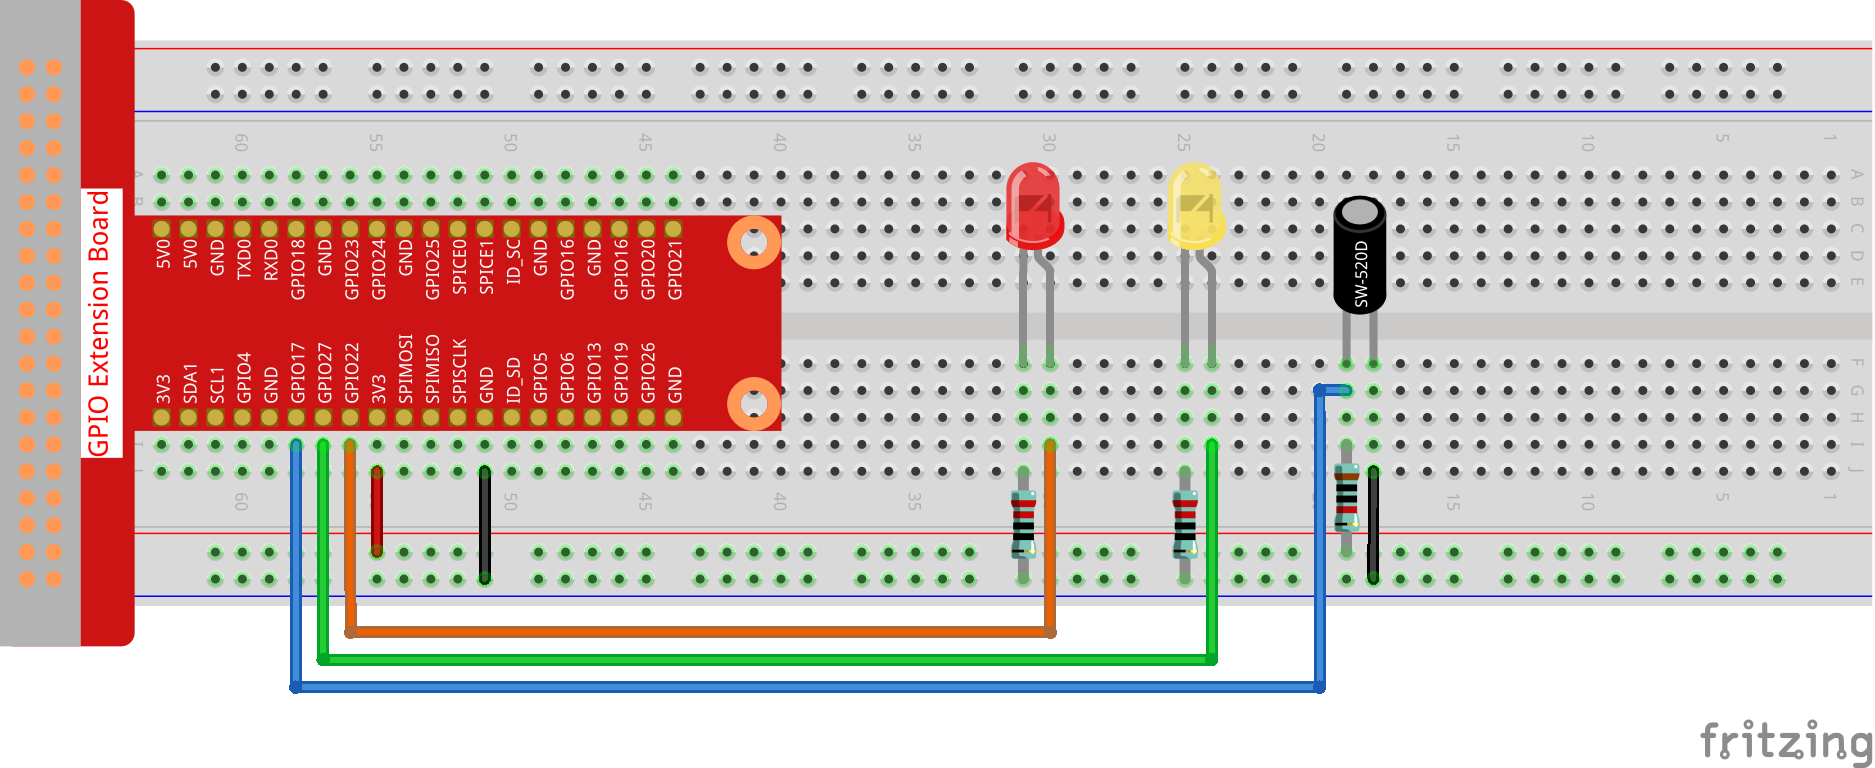
Step 1: Build the circuit.
For C Language Users
Step 2: Change directory.
cd ~/davinci-kit-for-raspberry-pi/c/2.1.3/
Step 3: Compile.
gcc 2.1.3_Tilt.c -lwiringPi
Step 4: Run.
sudo ./a.out
Place the tilt horizontally, and the green LED will turns on. If you tilt it, "Tilt!" will be printed on the screen and the red LED will lights on. Place it horizontally again, and the green LED will turns on again.
Note
If it does not work after running, or there is an error prompt: "wiringPi.h: No such file or directory", please refer to Install and Check the WiringPi.
Code
#include <wiringPi.h>
#include <stdio.h>

#define TiltPin     0
#define Gpin        2
#define Rpin        3

void LED(char* color)
{
    pinMode(Gpin, OUTPUT);
    pinMode(Rpin, OUTPUT);
    if (color == "RED")
    {
        digitalWrite(Rpin, HIGH);
        digitalWrite(Gpin, LOW);
    }
    else if (color == "GREEN")
    {
        digitalWrite(Rpin, LOW);
        digitalWrite(Gpin, HIGH);
    }
    else
        printf("LED Error");
}

int main(void)
{
    if(wiringPiSetup() == -1){ //when initialize wiring failed,print message to screen
        printf("setup wiringPi failed !");
        return 1;
    }

    pinMode(TiltPin, INPUT);
    LED("GREEN");

    while(1){
        if(0 == digitalRead(TiltPin)){
            delay(10);
            if(0 == digitalRead(TiltPin)){
                LED("RED");
                printf("Tilt!\n");
                delay(100);
            }
        }
        else if(1 == digitalRead(TiltPin)){
            delay(10);
            if(1 == digitalRead(TiltPin)){
                LED("GREEN");
            }
        }
    }
    return 0;
}
Code Explanation
void LED(char* color)
{
    pinMode(Gpin, OUTPUT);
    pinMode(Rpin, OUTPUT);
    if (color == "RED")
    {
        digitalWrite(Rpin, HIGH);
        digitalWrite(Gpin, LOW);
    }
    else if (color == "GREEN")
    {
        digitalWrite(Rpin, LOW);
        digitalWrite(Gpin, HIGH);
    }
    else
        printf("LED Error");
}
Define a function LED() to turn the two LEDs on or off. If the parameter color is RED, the red LED lights up; similarly, if the parameter color is GREEN, the green LED will turns on.
while(1){
        if(0 == digitalRead(TiltPin)){
            delay(10);
            if(0 == digitalRead(TiltPin)){
                LED("RED");
                printf("Tilt!\n");
            }
        }
        else if(1 == digitalRead(TiltPin)){
            delay(10);
            if(1 == digitalRead(TiltPin)){
                LED("GREEN");
            }
        }
    }
If the read value of tilt switch is 0, it means that the tilt switch is tilted then you write the parameter "RED" into function LED to get the red LED lighten up; otherwise, the green LED will lit.
For Python Language Users
Step 2: Change directory.
cd ~/davinci-kit-for-raspberry-pi/python/
Step 3: Run.
sudo python3 2.1.3_Tilt.py
Place the tilt horizontally, and the green LED will turns on. If you tilt it, "Tilt!" will be printed on the screen and the red LED will turns on. Place it horizontally again, and the green LED will lights on.
Code
Note
You can Modify/Reset/Copy/Run/Stop the code below. But before that, you need to go to source code path like davinci-kit-for-raspberry-pi/python.
import RPi.GPIO as GPIO
import time

dhtPin = 17

GPIO.setmode(GPIO.BCM)

MAX_UNCHANGE_COUNT = 100

STATE_INIT_PULL_DOWN = 1
STATE_INIT_PULL_UP = 2
STATE_DATA_FIRST_PULL_DOWN = 3
STATE_DATA_PULL_UP = 4
STATE_DATA_PULL_DOWN = 5

def readDht11():
    GPIO.setup(dhtPin, GPIO.OUT)
    GPIO.output(dhtPin, GPIO.HIGH)
    time.sleep(0.05)
    GPIO.output(dhtPin, GPIO.LOW)
    time.sleep(0.02)
    GPIO.setup(dhtPin, GPIO.IN, GPIO.PUD_UP)

    unchanged_count = 0
    last = -1
    data = []
    while True:
        current = GPIO.input(dhtPin)
        data.append(current)
        if last != current:
            unchanged_count = 0
            last = current
        else:
            unchanged_count += 1
            if unchanged_count > MAX_UNCHANGE_COUNT:
                break

    state = STATE_INIT_PULL_DOWN

    lengths = []
    current_length = 0

    for current in data:
        current_length += 1

        if state == STATE_INIT_PULL_DOWN:
            if current == GPIO.LOW:
                state = STATE_INIT_PULL_UP
            else:
                continue
        if state == STATE_INIT_PULL_UP:
            if current == GPIO.HIGH:
                state = STATE_DATA_FIRST_PULL_DOWN
            else:
                continue
        if state == STATE_DATA_FIRST_PULL_DOWN:
            if current == GPIO.LOW:
                state = STATE_DATA_PULL_UP
            else:
                continue
        if state == STATE_DATA_PULL_UP:
            if current == GPIO.HIGH:
                current_length = 0
                state = STATE_DATA_PULL_DOWN
            else:
                continue
        if state == STATE_DATA_PULL_DOWN:
            if current == GPIO.LOW:
                lengths.append(current_length)
                state = STATE_DATA_PULL_UP
            else:
                continue
    if len(lengths) != 40:
        #print ("Data not good, skip")
        return False

    shortest_pull_up = min(lengths)
    longest_pull_up = max(lengths)
    halfway = (longest_pull_up + shortest_pull_up) / 2
    bits = []
    the_bytes = []
    byte = 0

    for length in lengths:
        bit = 0
        if length > halfway:
            bit = 1
        bits.append(bit)
    #print ("bits: %s, length: %d" % (bits, len(bits)))
    for i in range(0, len(bits)):
        byte = byte << 1
        if (bits[i]):
            byte = byte | 1
        else:
            byte = byte | 0
        if ((i + 1) % 8 == 0):
            the_bytes.append(byte)
            byte = 0
    #print (the_bytes)
    checksum = (the_bytes[0] + the_bytes[1] + the_bytes[2] + the_bytes[3]) & 0xFF
    if the_bytes[4] != checksum:
        #print ("Data not good, skip")
        return False

    return the_bytes[0], the_bytes[2]

def main():

    while True:
        result = readDht11()
        if result:
            humidity, temperature = result
            print ("humidity: %s %%,  Temperature: %s C`" % (humidity, temperature))
        time.sleep(1)

def destroy():
    GPIO.cleanup()

if __name__ == '__main__':
    try:
        main()
    except KeyboardInterrupt:
        destroy()
Code Explanation
GPIO.add_event_detect(TiltPin, GPIO.BOTH, callback=detect, bouncetime=200)
Set up a detect on TiltPin, and callback function to detect.
def Led(x):
    if x == 0:
        GPIO.output(Rpin, 1)
        GPIO.output(Gpin, 0)
    if x == 1:
        GPIO.output(Rpin, 0)
        GPIO.output(Gpin, 1)
Define a function Led() to turn the two LEDs on or off. If x=0, the red LED lights up; otherwise, the green LED will be lit.
def Print(x):
    if x == 0:
        print ('    *************')
        print ('    *   Tilt!   *')
        print ('    *************')
Create a function, Print() to print the characters above on the screen.
def detect(chn):
    Led(GPIO.input(TiltPin))
    Print(GPIO.input(TiltPin))
Define a callback function for tilt callback. Get the read value of the tilt switch then the function Led() controls the turning on or off of the two LEDs that is depended on the read value of the tilt switch.
Phenomenon Picture