2.6 Two Kinds of Transistors
Transistor is a semiconductor device that controls a large current through a small current. Its function is to amplify weak signals into larger amplitude signals, and can also be used as a non-contact switch. It is the core component of electronic circuits.
This sounds a bit complicated. In simple words, some components use high-current (such as Buzzer). If the power is directly supplied from the GPIO of the microcontroller, the power may be insufficient or the microcontroller may be damaged. Then, the transistor has played a “dam” role here. Transistor receives the weak electrical signal from the GPIO pin to control the turn-on and turn-off of the large current (from VCC to GND). In this way, high-current components can be driven and the microcontroller can be protected.
This kit is equipped with two types of transistors, S8550 and S8050, the former is PNP and the latter is NPN. They look very similar, and we need to check carefully to see their labels. When a High level signal goes through an NPN transistor, it is energized. But a PNP one needs a Low level signal to manage it. Both types of transistor are frequently used for contactless switches, just like in this experiment.
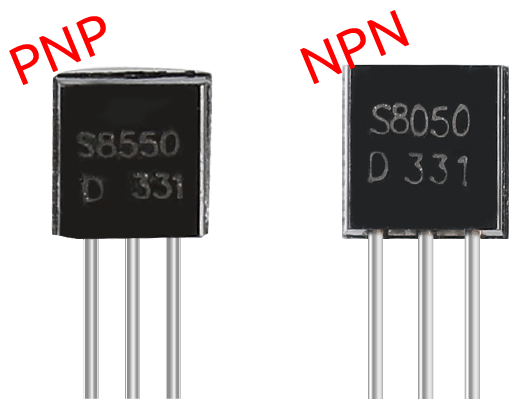
Let’s use LED and button to understand how to use transistor!
Wiring
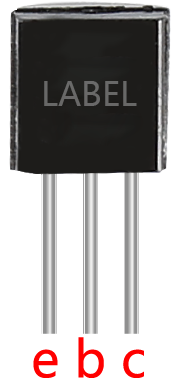
Put the label side facing us and the pins facing down. The pins from left to right are emitter(e), base(b), and collector(c).
Note
The base is the gate controller device for the larger electrical supply.
In the NPN transistor, the collector is the larger electrical supply and the emitter is the outlet for that supply, the PNP transistor is just the opposite.
Way to connect NPN (S8050) transistor.
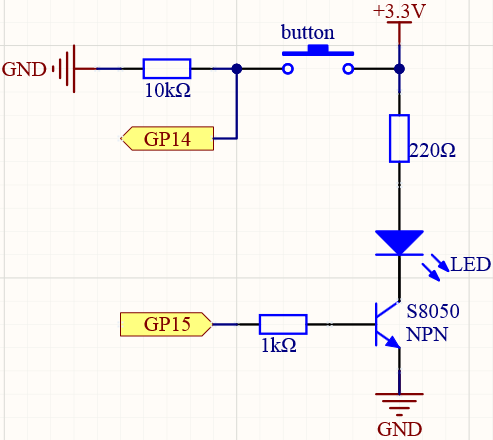
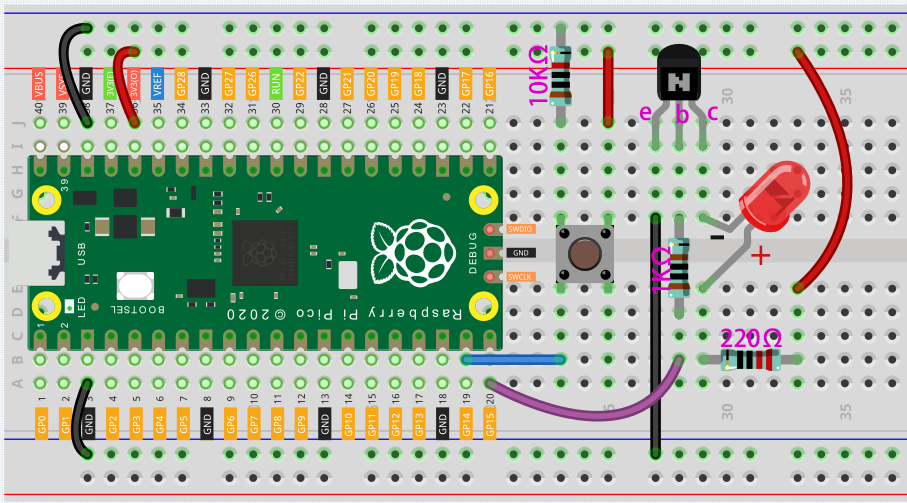
Connect 3V3 and GND of Pico to the power bus of the breadboard.
Connect the anode lead of the LED to the positive power bus via a 220Ω resistor.
Connect the cathode lead of the LED to the collector lead of the transistor.
Connect the base lead of the transistor to the GP15 pin through a 1kΩ resistor.
Connect the emitter lead of the transistor to the negative power bus.
Connect one side of the button to the GP14 pin, and use a 10kΩ resistor connect the same side and negative power bus. The other side to the positive power bus.
Note
The color ring of 220Ω resistor is red, red, black, black and brown.
The color ring of the 1kΩ resistor is brown, black, black, brown and brown.
The color ring of the 10kΩ resistor is brown, black, black, red and brown.
Way to connect PNP(S8550) transistor.
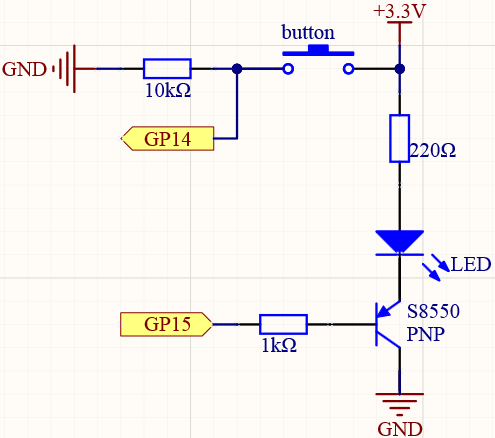
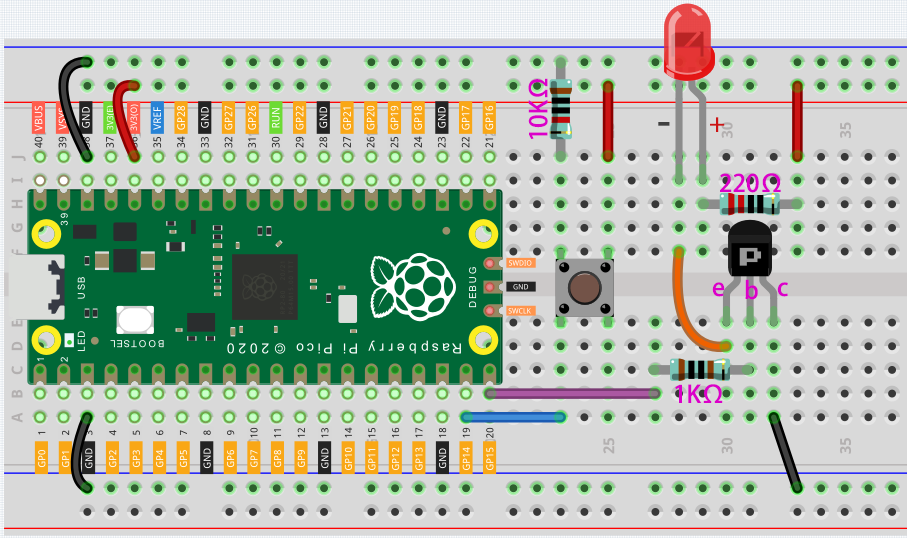
Connect 3V3 and GND of Pico to the power bus of the breadboard.
Connect the anode lead of the LED to the positive power bus via a 220Ω resistor.
Connect the cathode lead of the LED to the emitter lead of the transistor.
Connect the base lead of the transistor to the GP15 pin through a 1kΩ resistor.
Connect the collector lead of the transistor to the negative power bus.
Connect one side of the button to the GP14 pin, and use a 10kΩ resistor connect the same side and negative power bus. The other side to the positive power bus.
Code
Two kinds of transistors can be controlled with the same code. When we press the button, Pico will send a high-level signal to the transistor; when we release it, it will send a low-level signal. We can see that diametrically opposite phenomena have occurred in the two circuits. The circuit using the NPN transistor will light up when the button is pressed, which means it is receiving a high-level conduction circuit; The circuit that uses the PNP transistor will light up when it is released, which means it is receiving a low-level conduction circuit.
import machine
button = machine.Pin(14, machine.Pin.IN)
signal = machine.Pin(15, machine.Pin.OUT)

while True:
    button_status = button.value()
    if button_status== 1:
        signal.value(1)
    elif button_status == 0:
        signal.value(0)