Note
Hello, welcome to the SunFounder Raspberry Pi & Arduino & ESP32 Enthusiasts Community on Facebook! Dive deeper into Raspberry Pi, Arduino, and ESP32 with fellow enthusiasts.
Why Join?
Expert Support: Solve post-sale issues and technical challenges with help from our community and team.
Learn & Share: Exchange tips and tutorials to enhance your skills.
Exclusive Previews: Get early access to new product announcements and sneak peeks.
Special Discounts: Enjoy exclusive discounts on our newest products.
Festive Promotions and Giveaways: Take part in giveaways and holiday promotions.
👉 Ready to explore and create with us? Click [here] and join today!
2.5 Traffic Light
In addition to home electronic devices, many microcontrollers can also be found in the social environment, including traffic lights. Traffic lights are used to direct traffic operation and are generally composed of red, green, and yellow lights. Building a huge traffic management system is a fairly advanced project, but using Pico to drive a miniature traffic light is a project we can try.
Let’s make a mini pedestrian crossing system with a few LEDs and a button!
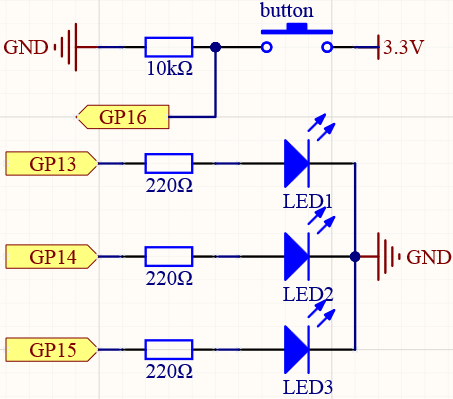
Schematic
Wiring
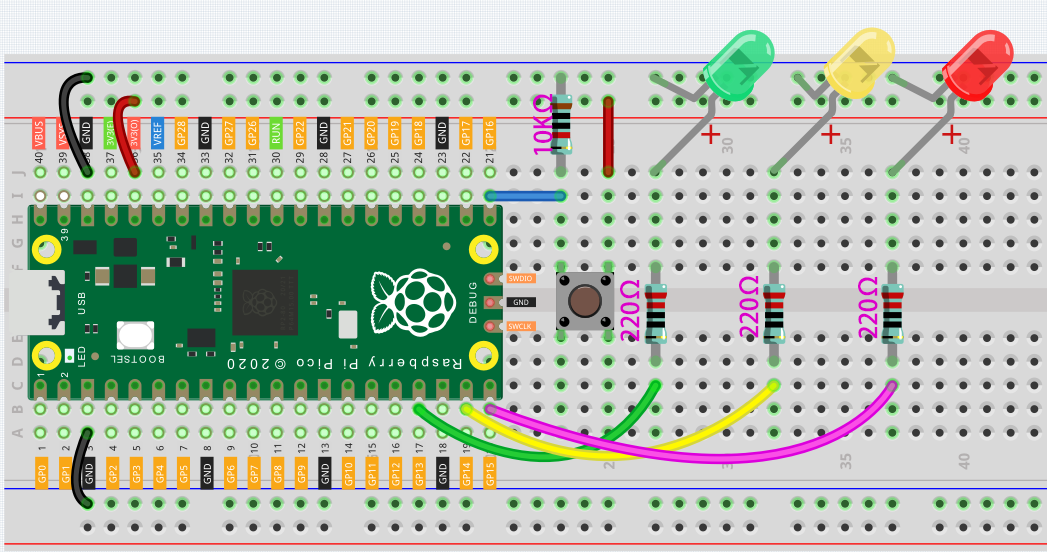
Connect 3V3 and GND of Pico to the breadboard power bus.
Insert the green, yellow and red LEDs on the breadboard.
GP13, GP14, GP15 are each connected to a 220Ω resistor and then connected to the anode of the LED.
Connect the cathodes of the LEDs to the negative power bus of the breadboard.
Insert the Button, connect one side of it to the GP16 pin, then use a 10K resistor to connect the same side and the negative bus. Do not forget to connect the other side to the positive power bus.
Note
The color ring of 220 ohm resistor is red, red, black, black and brown.
The color ring of the 10k ohm resistor is brown, black, black, red and brown.
Code
When the program is started, the traffic light will switch in the order of red for 5 seconds, yellow for 2 seconds, green for 5 seconds, and yellow for 2 seconds. If we (pedestrians) press the button, the red LED will be extended to 15 seconds, which will give us more time to cross the road.
import machine
import utime
import _thread

led_red = machine.Pin(15, machine.Pin.OUT)
led_yellow = machine.Pin(14, machine.Pin.OUT)
led_green = machine.Pin(13, machine.Pin.OUT)
button = machine.Pin(16, machine.Pin.IN)

global button_status
button_status = 0

def button_thread():
    global button_status
    while True:
        if button.value() == 1:
            button_status = 1

_thread.start_new_thread(button_thread, ())

while True:
    if button_status == 1:
        led_red.value(1)
        utime.sleep(10)
    global button_status
    button_status = 0

    led_red.value(1)
    utime.sleep(5)
    led_red.value(0)

    led_yellow.value(1)
    utime.sleep(2)
    led_yellow.value(0)

    led_green.value(1)
    utime.sleep(5)
    led_green.value(0)

    led_yellow.value(1)
    utime.sleep(2)
    led_yellow.value(0)
How it works?
In the previous projects, we have successfully made the LED blink. In other words, it is very simple for us to write a code that makes the traffic light cycle color. What we need to do is to add a judgment on the state of the button.
But if we directly write the statement that reads the button value into the main program, we will find that it doesn’t fit anywhere. Even if it is written in, it is difficult for us to read this value.
This is because the program is stuck when executing utime.sleep(), and the statement to read the button value is not executed at this time.
Of course, we can read the button value through the IRQ in the previous project. But this time we take another approach-multithreading.
Multi-threading can be simply understood as dividing a thing into multiple parts, which are executed by different people (or processors). Just like when the chef is frying the steak, the assistant chef makes the sauce so that the newly prepared sauce can be poured on the properly prepared steak to make the best cooking.
Look at these lines:
import machine
import utime
import _thread

led_red = machine.Pin(15, machine.Pin.OUT)
led_yellow = machine.Pin(14, machine.Pin.OUT)
led_green = machine.Pin(13, machine.Pin.OUT)
button = machine.Pin(16, machine.Pin.IN)

global button_status
button_status = 0

def button_thread():
    global button_status
    while True:
        if button.value() == 1:
            button_status = 1

_thread.start_new_thread(button_thread, ())

while True:
    if button_status == 1:
        led_red.value(1)
        utime.sleep(10)
    global button_status
    button_status = 0

    led_red.value(1)
    utime.sleep(5)
    led_red.value(0)

    led_yellow.value(1)
    utime.sleep(2)
    led_yellow.value(0)

    led_green.value(1)
    utime.sleep(5)
    led_green.value(0)

    led_yellow.value(1)
    utime.sleep(2)
    led_yellow.value(0)
Here, the _thread library is imported first. This module implements multithreading support.
Then define a thread button_thread(), which is independent of the main thread. It is used here to read the state of the button.
Finally use _thread.start_new_thread(button_thread, ()) to start the thread.
The following sample code can help you better understand multithreading:
import machine
import utime
import _thread

led_red = machine.Pin(15, machine.Pin.OUT)
led_yellow = machine.Pin(14, machine.Pin.OUT)
button = machine.Pin(16, machine.Pin.IN)

def led_yellow_thread():
    while True:
        led_yellow.toggle()
        utime.sleep(2)

_thread.start_new_thread(led_yellow_thread, ())

while True:
    button_status = button.value()
    if button_status == 1:
        led_red.value(1)
    elif button_status == 0:
        led_red.value(0)
In the main thread, the button is used to control the red LED on and off. In the new thread (led_yellow_thread()), the yellow LED will change every 2 seconds. The two threads work independently of each other.
Let’s go back to the traffic signal program. We let the main thread change the light and let the new thread read the button value. However, the threads are independent of each other, and we need a way for the new thread to pass information to the main thread, which requires the use of global variable.
The variables we have used before are all local variables, acting only in a certain part of the program (Variables declared in the main function cannot be used in sub-functions, and variables declared in the main thread cannot be used in the new thread). The global variable can be used anywhere, we change it in one thread, and the other can get its updated value.
Global variables are in these places:
import machine
import utime
import _thread

led_red = machine.Pin(15, machine.Pin.OUT)
led_yellow = machine.Pin(14, machine.Pin.OUT)
led_green = machine.Pin(13, machine.Pin.OUT)
button = machine.Pin(16, machine.Pin.IN)

global button_status
button_status = 0

def button_thread():
    global button_status
    while True:
        if button.value() == 1:
            button_status = 1

_thread.start_new_thread(button_thread, ())

while True:
    if button_status == 1:
        led_red.value(1)
        utime.sleep(10)
    global button_status
    button_status = 0

    led_red.value(1)
    utime.sleep(5)
    led_red.value(0)

    led_yellow.value(1)
    utime.sleep(2)
    led_yellow.value(0)

    led_green.value(1)
    utime.sleep(5)
    led_green.value(0)

    led_yellow.value(1)
    utime.sleep(2)
    led_yellow.value(0)
When the program is just running,
button_statusis assigned a value of 0, which means that the button has not been pressed.In the new thread–button_thread, when the program detects that the button is pressed,
button_statusis assigned the value 1.At the beginning of each cycle, it will detect whether the button has been pressed, if the button is pressed (button_status == 1), the red light will be on for 10 seconds. Then
button_statusswitch to 0, and wait for the next button press.
The function of global button_status is to tell the program that we are going to modify the value of button_status, but if we just want to read the variable value, this line is not needed.