Note
Hello, welcome to the SunFounder Raspberry Pi & Arduino & ESP32 Enthusiasts Community on Facebook! Dive deeper into Raspberry Pi, Arduino, and ESP32 with fellow enthusiasts.
Why Join?
Expert Support: Solve post-sale issues and technical challenges with help from our community and team.
Learn & Share: Exchange tips and tutorials to enhance your skills.
Exclusive Previews: Get early access to new product announcements and sneak peeks.
Special Discounts: Enjoy exclusive discounts on our newest products.
Festive Promotions and Giveaways: Take part in giveaways and holiday promotions.
👉 Ready to explore and create with us? Click [here] and join today!
2.1.1 Button
Introduction
In this project, we will learn how to turn on or off the LED by using a button.
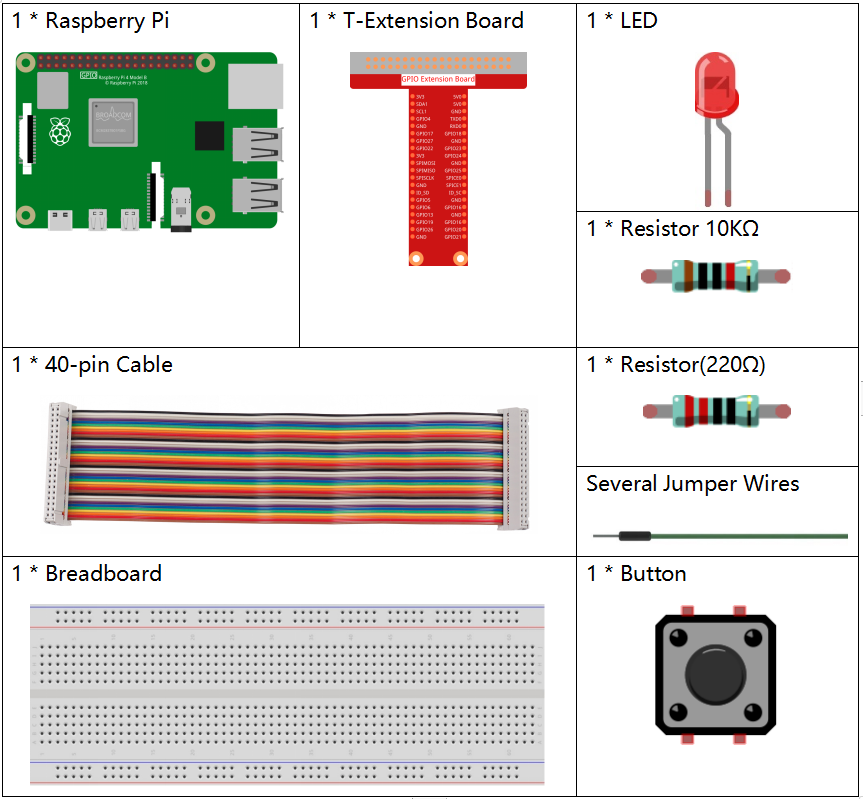
Required Components
In this project, we need the following components.
It’s definitely convenient to buy a whole kit, here’s the link:
Name |
ITEMS IN THIS KIT |
LINK |
|---|---|---|
Raphael Kit |
337 |
You can also buy them separately from the links below.
COMPONENT INTRODUCTION |
PURCHASE LINK |
|---|---|
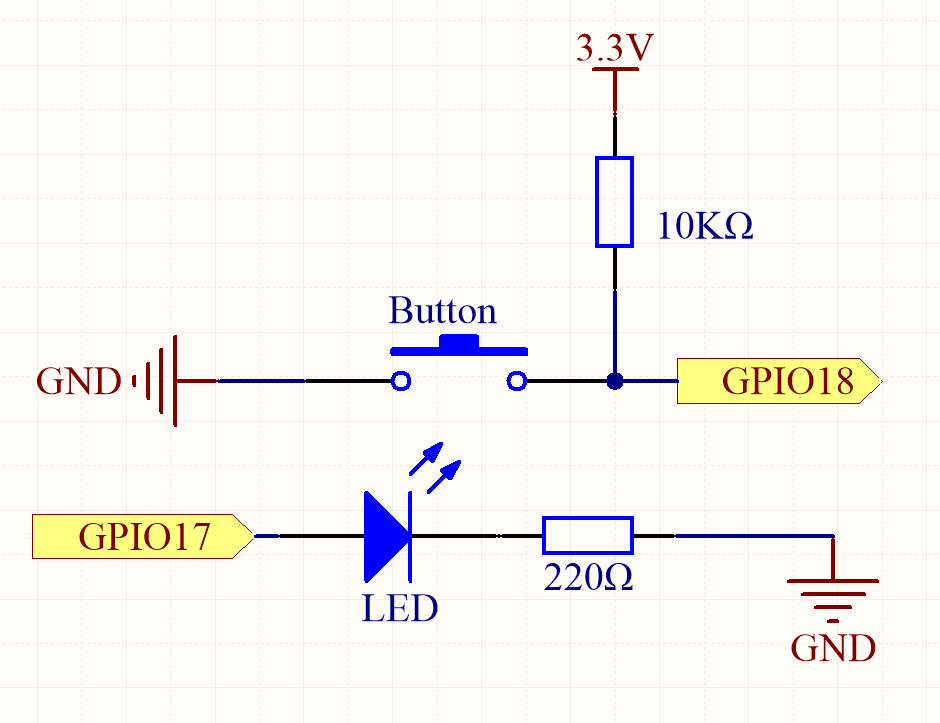
Schematic Diagram
Use a normally open button as the input of Raspberry Pi, the connection is shown in the schematic diagram below. When the button is pressed, the GPIO18 will turn into high level (3.3V). We can detect the state of the GPIO18 through programming. That is, if the GPIO18 turns into high level, it means the button is pressed. You can run the corresponding code when the button is pressed, and then the LED will light up.
Note
The longer pin of the LED is the anode and the shorter one is the cathode.
Experimental Procedures
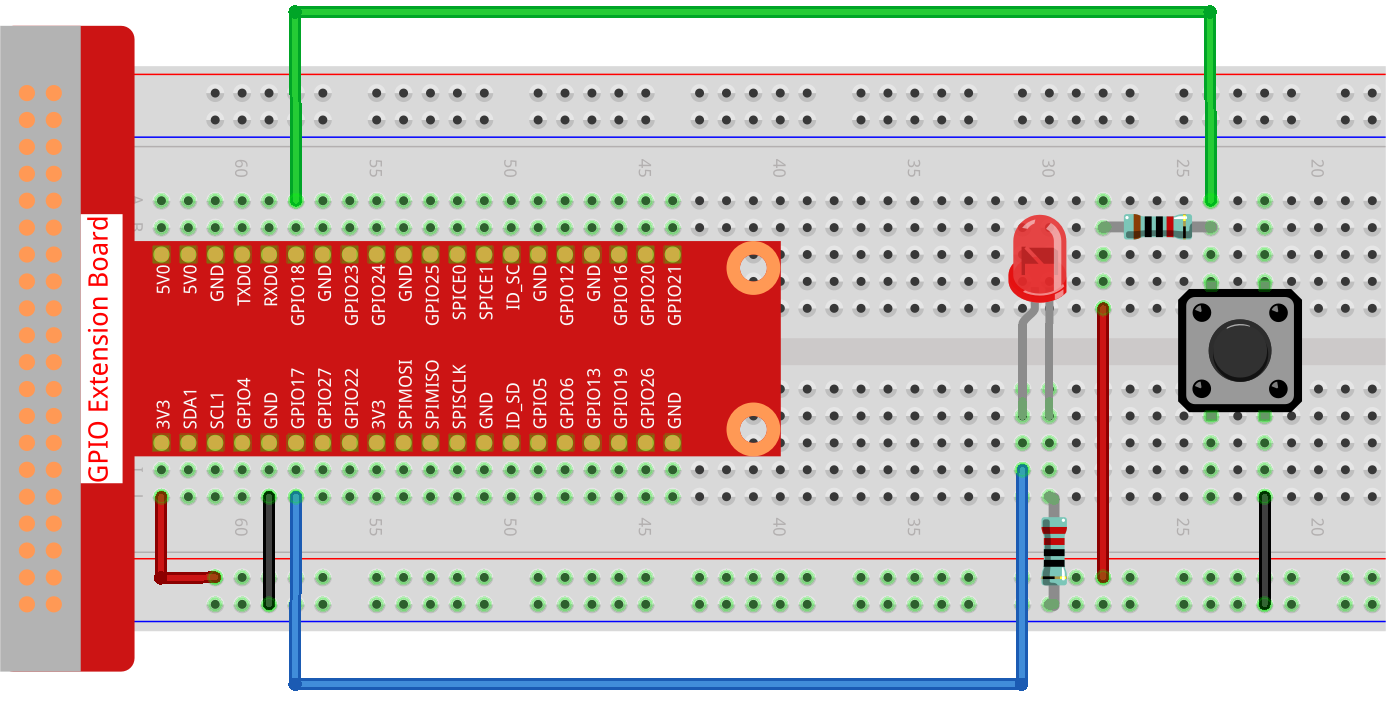
Step 1: Build the circuit.
Step 2: Open the code file.
cd ~/raphael-kit/python-pi5
Step 3: Run the code.
sudo python3 2.1.1_Button_zero.py
Now, press the button and the LED will light up; release the button and the LED will go off.
Warning
If there is an error prompt RuntimeError: Cannot determine SOC peripheral base address, please refer to If gpiozero doesn’t work.
Code
Note
You can Modify/Reset/Copy/Run/Stop the code below. But before that, you need to go to source code path like raphael-kit/python-pi5. After modifying the code, you can run it directly to see the effect.
#!/usr/bin/env python3
from gpiozero import LED, Button  # Import LED and Button classes from gpiozero
from signal import pause  # Import pause function from signal module

# Initialize an LED object on GPIO pin 17
led = LED(17)
# Initialize a Button object on GPIO pin 18
button = Button(18)

# Link the button's "when_pressed" event to the LED's on() method
button.when_pressed = led.on
# Link the button's "when_released" event to the LED's off() method
button.when_released = led.off

# Run an event loop that waits for button events and keeps the script running
pause()
Code Explanation
The script is written in Python3 and it imports
LEDandButtonclasses from thegpiozerolibrary, andpausefrom thesignalmodule.#!/usr/bin/env python3 from gpiozero import LED, Button # Import LED and Button classes from gpiozero from signal import pause # Import pause function from signal module
Initializes an
LEDobject on GPIO pin 17 and aButtonobject on GPIO pin 18.# Initialize an LED object on GPIO pin 17 led = LED(17) # Initialize a Button object on GPIO pin 18 button = Button(18)
Sets up event handlers so that the LED turns on when the button is pressed and turns off when the button is released.
# Link the button's "when_pressed" event to the LED's on() method
button.when_pressed = led.on
# Link the button's "when_released" event to the LED's off() method
button.when_released = led.off
This keeps the script running in an event loop, waiting for the button press and release events.
# Run an event loop that waits for button events and keeps the script running
pause()