Note
Hello, welcome to the SunFounder Raspberry Pi & Arduino & ESP32 Enthusiasts Community on Facebook! Dive deeper into Raspberry Pi, Arduino, and ESP32 with fellow enthusiasts.
Why Join?
Expert Support: Solve post-sale issues and technical challenges with help from our community and team.
Learn & Share: Exchange tips and tutorials to enhance your skills.
Exclusive Previews: Get early access to new product announcements and sneak peeks.
Special Discounts: Enjoy exclusive discounts on our newest products.
Festive Promotions and Giveaways: Take part in giveaways and holiday promotions.
👉 Ready to explore and create with us? Click [here] and join today!
2.1.3 Touch Switch Module
Introduction
In this project, you will learn about touch switch module. It can replace the traditional kinds of switch with these advantages: convenient operation, fine touch sense, precise control and least mechanical wear.
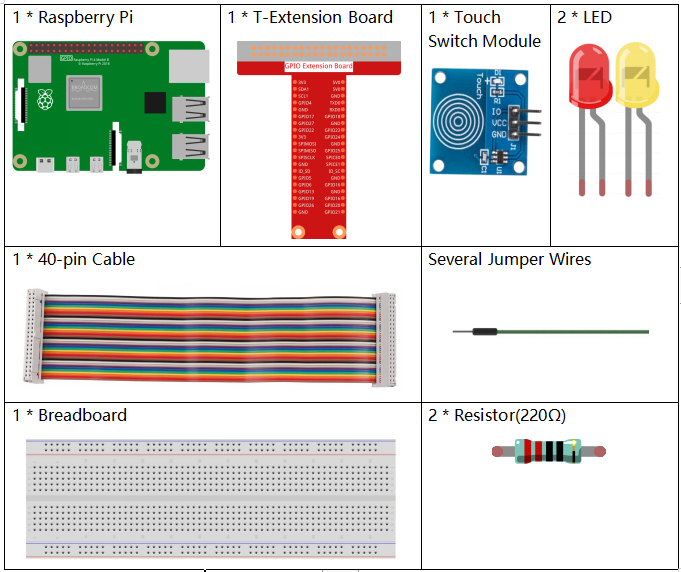
Required Components
In this project, we need the following components.
It’s definitely convenient to buy a whole kit, here’s the link:
Name |
ITEMS IN THIS KIT |
LINK |
|---|---|---|
Raphael Kit |
337 |
You can also buy them separately from the links below.
COMPONENT INTRODUCTION |
PURCHASE LINK |
|---|---|
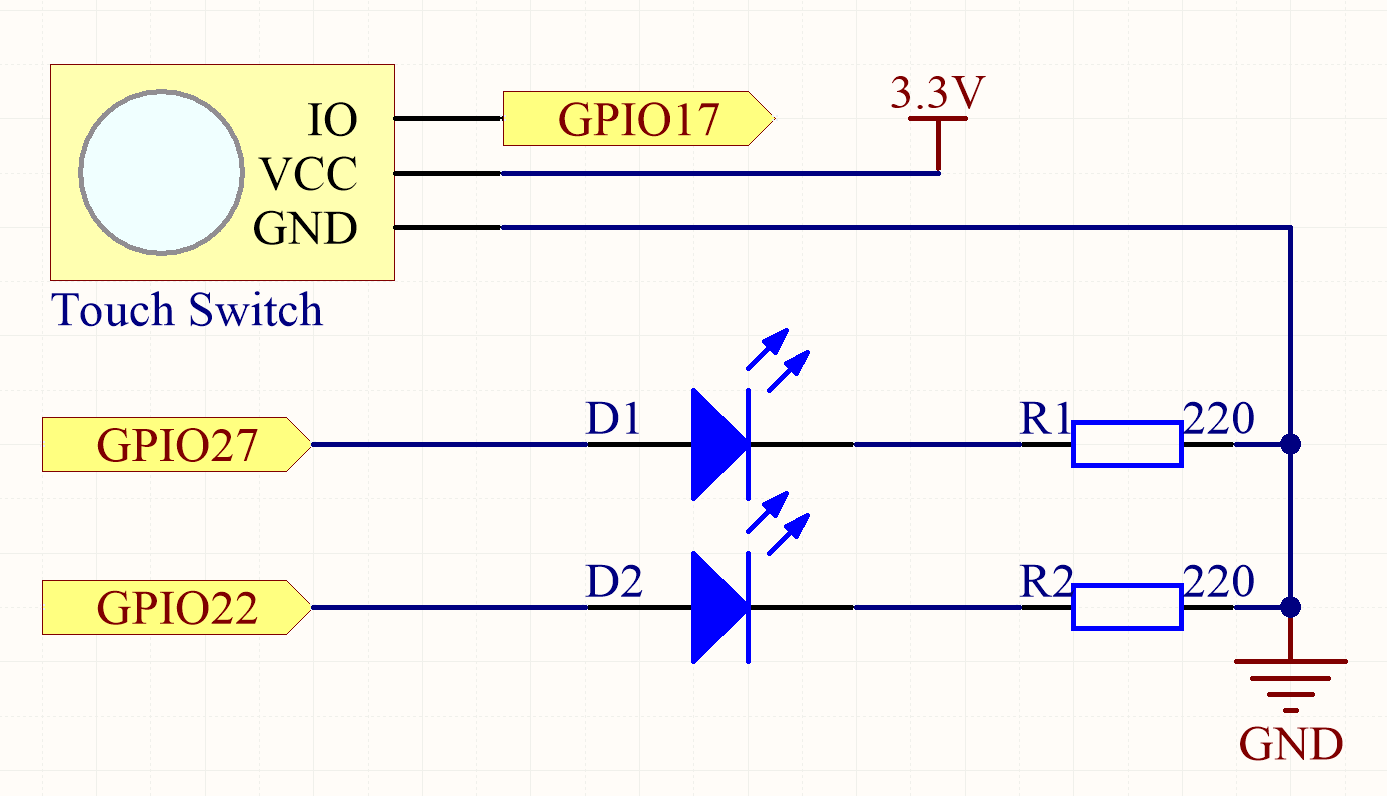
Schematic Diagram
Experimental Procedures
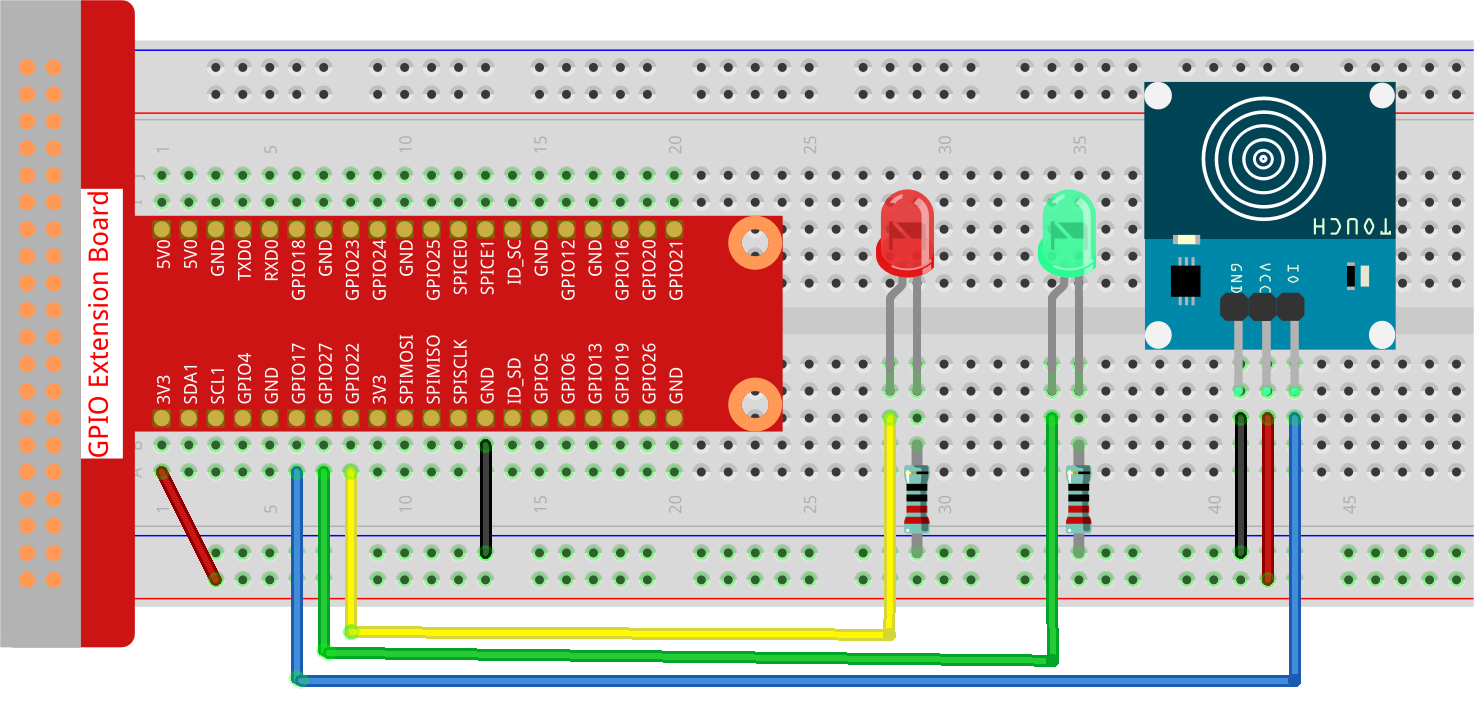
Step 1: Build the circuit.
Step 2: Change directory.
cd ~/raphael-kit/python-pi5
Step 3: Run.
sudo python3 2.1.3_TouchSwitch_zero.py
While the code is running, the red LED lights up; when you tap on the touch switch module, the yellow LED turns on.
Warning
If there is an error prompt RuntimeError: Cannot determine SOC peripheral base address, please refer to If gpiozero doesn’t work.
Code
Note
You can Modify/Reset/Copy/Run/Stop the code below. But before that, you need to go to source code path like raphael-kit/python-pi5. After modifying the code, you can run it directly to see the effect.
#!/usr/bin/env python3
from gpiozero import LED, Button  # Import LED and Button classes from gpiozero
from time import sleep  # Import sleep for delay

# Initialize touch sensor (Button) on GPIO pin 17, pull-up resistor disabled
touch_sensor = Button(17, pull_up=False)  # Suitable for sensors that pull the pin low when pressed

# Initialize LED1 and LED2 connected to GPIO pins 22 and 27 respectively
led1 = LED(22)  # LED1 connected to GPIO pin 22
led2 = LED(27)  # LED2 connected to GPIO pin 27

try:
    # Continuously monitor the state of the touch sensor and control LEDs accordingly
    while True:
        if touch_sensor.is_pressed:  # Check if the touch sensor is pressed
            print('You touch it!')  # Output message indicating sensor activation
            led1.off()  # Turn off LED1
            led2.on()   # Turn on LED2
        else:  # If the sensor is not pressed
            led1.on()   # Turn on LED1
            led2.off()  # Turn off LED2

        sleep(0.5)  # Pause for 0.5 seconds before rechecking the sensor state

except KeyboardInterrupt:
    # Handle a keyboard interrupt (Ctrl+C) for a clean exit from the loop
    pass
Code Explanation
This line sets the script to run with Python 3. It imports
LEDandButtonfromgpiozerofor controlling GPIO devices, andsleepfromtimefor delays.#!/usr/bin/env python3 from gpiozero import LED, Button # Import LED and Button classes from gpiozero from time import sleep # Import sleep for delay
Initializes a touch sensor (as a Button) on GPIO pin 17 with pull-up disabled, and two LEDs on GPIO pins 22 and 27.
# Initialize touch sensor (Button) on GPIO pin 17, pull-up resistor disabled
touch_sensor = Button(17, pull_up=False)  # Suitable for sensors that pull the pin low when pressed

# Initialize LED1 and LED2 connected to GPIO pins 22 and 27 respectively
led1 = LED(22)  # LED1 connected to GPIO pin 22
led2 = LED(27)  # LED2 connected to GPIO pin 27
The main loop checks the state of the touch sensor. When touched, LED2 turns on and LED1 off; when not touched, LED1 is on and LED2 off. The loop repeats every 0.5 seconds. Catches a KeyboardInterrupt (like Ctrl+C) to allow for graceful script termination.
try:
    # Continuously monitor the state of the touch sensor and control LEDs accordingly
    while True:
        if touch_sensor.is_pressed:  # Check if the touch sensor is pressed
            print('You touch it!')  # Output message indicating sensor activation
            led1.off()  # Turn off LED1
            led2.on()   # Turn on LED2
        else:  # If the sensor is not pressed
            led1.on()   # Turn on LED1
            led2.off()  # Turn off LED2

        sleep(0.5)  # Pause for 0.5 seconds before rechecking the sensor state

except KeyboardInterrupt:
    # Handle a keyboard interrupt (Ctrl+C) for a clean exit from the loop
    pass