Note
Hello, welcome to the SunFounder Raspberry Pi & Arduino & ESP32 Enthusiasts Community on Facebook! Dive deeper into Raspberry Pi, Arduino, and ESP32 with fellow enthusiasts.
Why Join?
Expert Support: Solve post-sale issues and technical challenges with help from our community and team.
Learn & Share: Exchange tips and tutorials to enhance your skills.
Exclusive Previews: Get early access to new product announcements and sneak peeks.
Special Discounts: Enjoy exclusive discounts on our newest products.
Festive Promotions and Giveaways: Take part in giveaways and holiday promotions.
👉 Ready to explore and create with us? Click [here] and join today!
NeoPixel LED Strip
Introduction
In this project, we will learn how to control an addressable RGB LED strip (NeoPixel) using SPI communication on a Raspberry Pi. NeoPixels are intelligent RGB LEDs that contain their own drivers, allowing individual control of each LED in a chain. This project demonstrates basic color control and filling the entire strip with different colors.
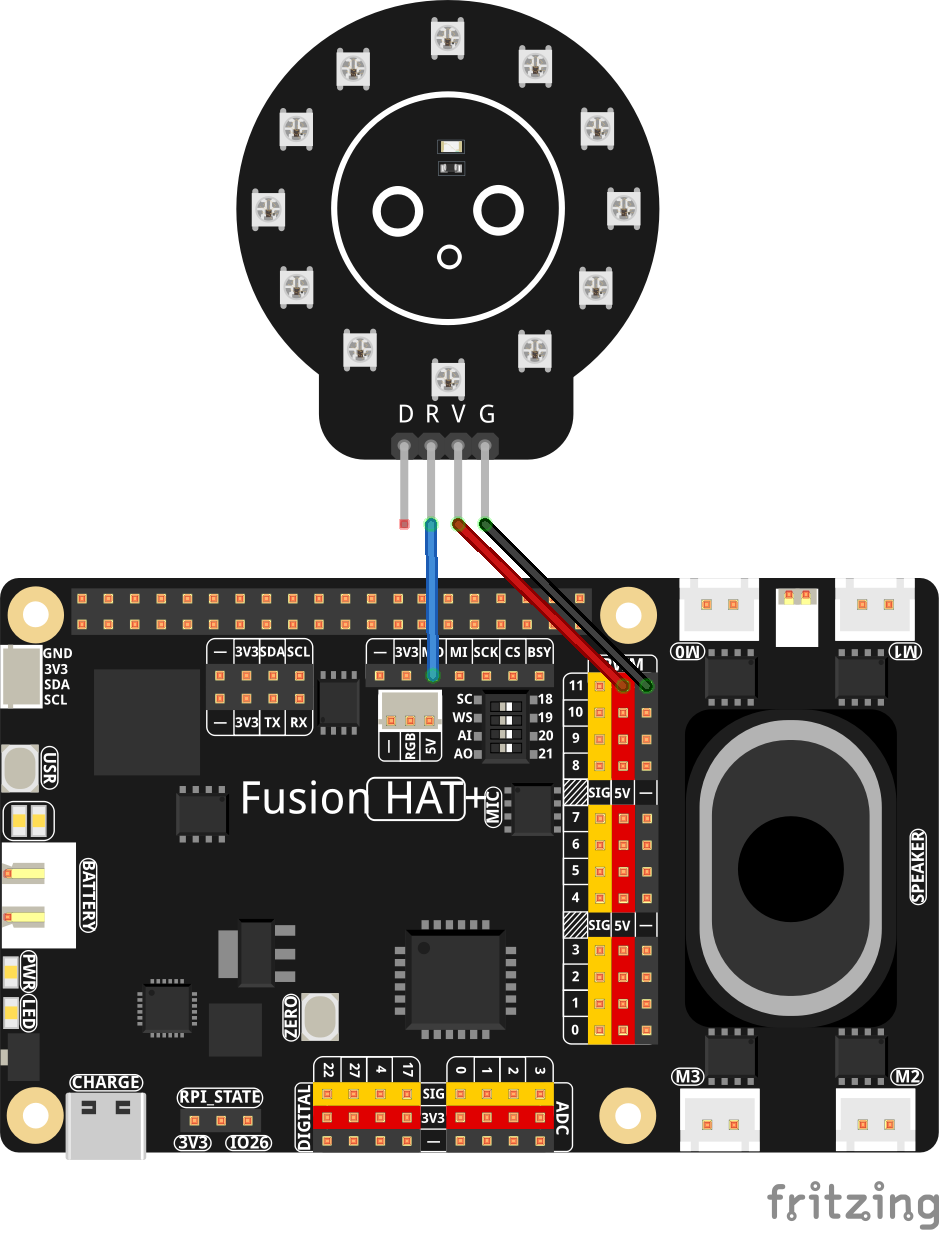
Wiring Diagram
Setup
Before running the code, you need to install the required library:
This library provides the necessary functions to control NeoPixel LEDs using SPI communication.
sudo pip install git+https://github.com/sunfounder/sunfounder-imu-python.git --break-system-packages
Code
The following Python code controls a NeoPixel LED strip, cycling through different colors:
import time               # Used for delays
import board              # Provides board-specific pin definitions
import neopixel_spi as neopixel   # NeoPixel SPI driver

# Create an SPI object using the default SPI bus of the board
spi = board.SPI()

LED_COUNT = 12  # Number of LED pixels in the strip
PIXEL_ORDER = neopixel.GRB  # Color order used by the LEDs (Green, Red, Blue)

# Create a NeoPixel strip object over SPI
# auto_write=False means we must call strip.show() to update the LEDs
strip = neopixel.NeoPixel_SPI(spi, LED_COUNT, pixel_order=PIXEL_ORDER, auto_write=False)

time.sleep(0.01)   # Short delay to ensure the strip is ready

strip.fill(0)      # Turn all pixels off (color value 0 = off)
strip.show()       # Send the data to the LED strip

try:
   while True:
      print("RGB test")

      # Display red on all LEDs
      print("Red")
      strip.fill((255, 0, 0))  # Full red, no green, no blue
      strip.show()
      time.sleep(1)

      # Display green on all LEDs
      print("Green")
      strip.fill((0, 255, 0))  # Full green
      strip.show()
      time.sleep(1)

      # Display blue on all LEDs
      print("Blue")
      strip.fill((0, 0, 255))  # Full blue
      strip.show()
      time.sleep(1)

      # Turn all LEDs off
      # print("Off for 10 seconds")
      strip.fill((0, 0, 0))    # All channels 0 = off
      strip.show()
      time.sleep(1)

# Gracefully handle script termination (e.g., via KeyboardInterrupt)
except KeyboardInterrupt:
   pass
This Python script demonstrates basic control of a 12-LED WS2812 ring using the NeoPixel SPI driver. When executed:
The script initializes the SPI interface and prepares the WS2812 LED ring.
All LEDs cycle through red, green, and blue with 1-second intervals.
Each color change is printed to the console for debugging.
The LEDs briefly turn off between cycles.
The program loops continuously until interrupted with Ctrl+C.
Troubleshooting
LED Ring Not Lighting Correctly
Cause: Wrong wiring or insufficient power
Solution: Ensure VCC is 5V, GND is shared, and the data line is connected to DIN (sometimes labeled RGB)
Incorrect Colors
Cause: LED color order mismatch
Solution: Try different pixel orders such as
neopixel.RGBorneopixel.GRBW
SPI Not Working
Cause: SPI disabled or hardware conflict
Solution: Enable SPI via
sudo raspi-config
Library Import Fails
Cause: Missing dependency
Solution:
sudo pip3 install adafruit-circuitpython-neopixel-spi --break