Note
Hello, welcome to the SunFounder Raspberry Pi & Arduino & ESP32 Enthusiasts Community on Facebook! Dive deeper into Raspberry Pi, Arduino, and ESP32 with fellow enthusiasts.
Why Join?
Expert Support: Solve post-sale issues and technical challenges with help from our community and team.
Learn & Share: Exchange tips and tutorials to enhance your skills.
Exclusive Previews: Get early access to new product announcements and sneak peeks.
Special Discounts: Enjoy exclusive discounts on our newest products.
Festive Promotions and Giveaways: Take part in giveaways and holiday promotions.
👉 Ready to explore and create with us? Click [here] and join today!
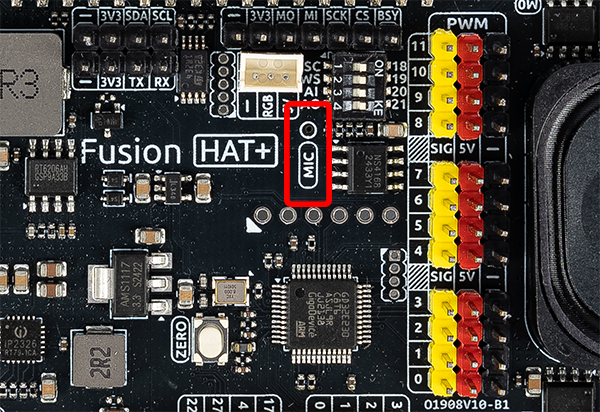
Funsion HAT+ Microphone
Introduction
The Fusion HAT+ includes a built-in microphone, making it ideal for audio input applications such as voice recognition, sound detection, or recording logs in AI/IoT projects.
This guide will help you check if the microphone is recognized by the system and show you how to perform a basic recording test.
Check if the Microphone is Recognized
Use the following command to check whether the system has detected the microphone:
arecord -l
This will list all audio capture devices available on your Raspberry Pi. Sample output:
**** List of CAPTURE Hardware Devices ****
card 0: sndrpigooglevoi [snd_rpi_googlevoicehat_soundcar], device 0: Google voiceHAT SoundCard HiFi voicehat-hifi-0 [Google voiceHAT SoundCard HiFi voicehat-hifi-0]
  Subdevices: 1/1
  Subdevice #0: subdevice #0
If you see the voicehat-hifi listed, it means the microphone hardware is detected correctly.
Test the Microphone
Once the microphone is enabled, you can perform a basic recording test:
Record a short audio sample:
rec -c 1 test.wav
Parameter Explanation:
rec: Command for recording (from the sox package)-c 1: Record in mono (1 channel)test.wav: Output file name
Playback the recorded file:
aplay test.wavIf you hear your recorded voice, the microphone is working properly.
If the recorded volume is too low, you can amplify it using sox:
sox input.wav output.wav gain 5
input.wav: The original recordingoutput.wav: The amplified versiongain 5: Increase the volume by 5 dB (you can adjust this value as needed)
Adjust Microphone Volume
If the recording volume is too low or muted, you can manually adjust the microphone gain:
Launch the ALSA mixer:
alsamixer
Press
F6to select the correct sound card (e.g., USB or voiceHAT audio)Use the arrow keys to increase the microphone level. If the mic is muted, unmute it (look for MM at the bottom—press
Mto toggle).
Tip
If rec or sox is not installed, you can install them using:
sudo apt update
sudo apt install sox
Troubleshooting
No input detected:
Verify that
arecord -llists the correct deviceTry using
arecordinstead ofrecto test manually
Audio is distorted or noisy:
Reduce the microphone gain in
alsamixerAvoid recording in noisy environments
`rec` command not found:
Install
soxwithsudo apt install sox