注釈
こんにちは、SunFounder Raspberry Pi & Arduino & ESP32 愛好者コミュニティ (Facebook) へようこそ! Raspberry Pi、Arduino、ESP32 を仲間と一緒にさらに深く学びましょう。
参加する理由
専門的なサポート: 販売後の問題や技術的な課題をコミュニティとチームで解決。
学びと共有: 技術やチュートリアルを交換し、スキルを向上。
限定プレビュー: 新製品発表や先行情報に早期アクセス。
特別割引: 新製品を特別価格で購入可能。
イベント・プレゼント企画: プレゼントや季節キャンペーンに参加。
👉 一緒に探求し、創造しましょう。今すぐ [ここ] をクリックして参加!
3.1.4 スマートファン (MCP3008)
注釈

キットのバージョンによって ADC0834 または MCP3008 が含まれています。 該当するセクションを選択してください。
はじめに
このプロジェクトでは、モーター・ボタン・サーミスタを使用して、手動と自動の両方で風量を調節できるスマートファンを作成します。
必要な部品
このプロジェクトには以下の部品が必要です。
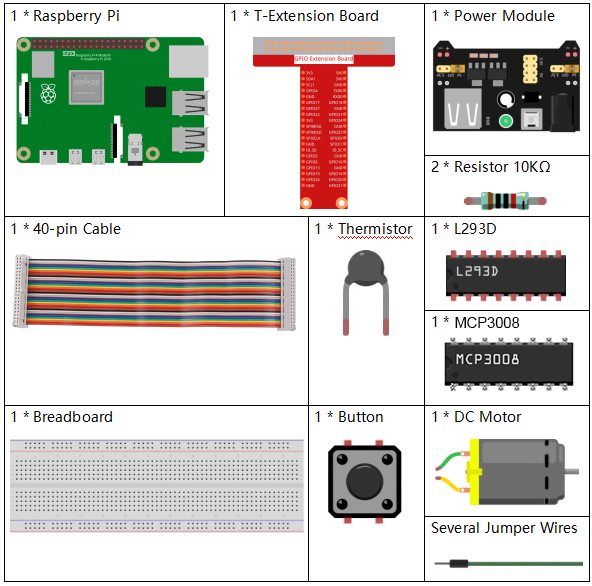
部品をまとめて購入するのが便利です。リンクはこちら:
名前 |
キット内数量 |
リンク |
|---|---|---|
Raphael Kit |
337 |
以下から個別に購入することもできます。
部品紹介 |
購入リンク |
|---|---|
- |
|
- |
|
- |
|
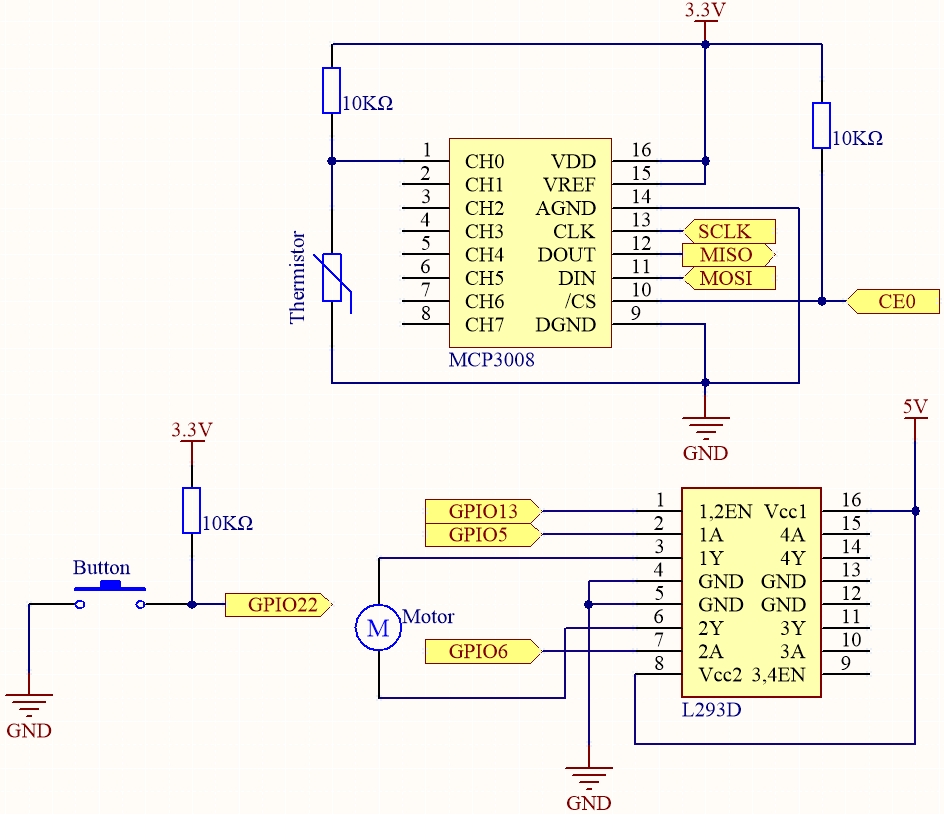
回路図
T-Board 名 |
physical |
wiringPi |
BCM |
SPICE0 |
Pin 24 |
10 |
8 |
SPIMOSI |
Pin 19 |
12 |
10 |
SPIMISO |
Pin 21 |
13 |
9 |
SPISCLK |
Pin 23 |
14 |
11 |
GPIO22 |
Pin 15 |
3 |
22 |
GPIO5 |
Pin 29 |
21 |
5 |
GPIO6 |
Pin 31 |
22 |
6 |
GPIO13 |
Pin 33 |
23 |
13 |
実験手順
ステップ 1: 回路を組み立てます。
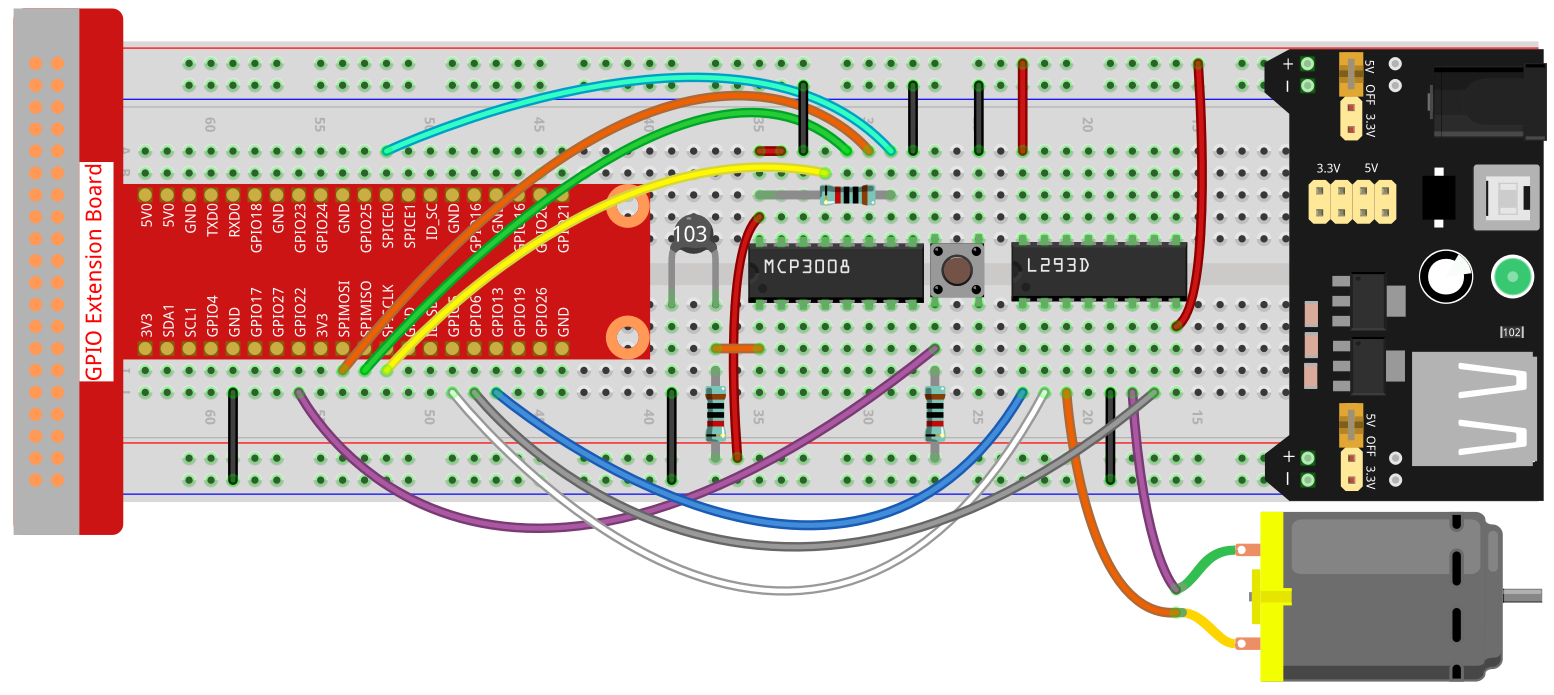
注釈
電源モジュールにはキット内の 9V 電池スナップ付き 9V 電池を使用できます。 電源モジュールのジャンパキャップをブレッドボードの 5V バスストリップに接続します。

ステップ 2: コードのあるフォルダに移動します。
cd ~/raphael-kit/c/3.1.4-2/
ステップ 3: コンパイルします。
gcc 3.1.4_SmartFan.c -o SmartFan -lwiringPi -lm
ステップ 4: 実行ファイルを実行します。
./SmartFan
コードを実行すると、ボタンを押してファンを起動します。 ボタンを押すたびに風量が 1 段階ずつ変わります。 風量は 0~4 の 5 段階**で、4 段階目で再度押すと風量 **0 で停止します。
温度が 2℃ 以上上下すると、風量が自動で 1 段階上がるか下がります。
注釈
実行しても動作しない、または「wiringPi.h: No such file or directory」というエラーが出た場合は WiringPiのインストールと確認 を参照してください。
コード
#include <wiringPi.h>
#include <wiringPiSPI.h>
#include <stdio.h>
#include <softPwm.h>
#include <math.h>

#define SPI_CHANNEL 0
#define SPI_SPEED   1000000
#define MotorPin1   21
#define MotorPin2   22
#define MotorEnable 23
#define BtnPin      3

int read_ADC(int channel)
{
    if (channel < 0 || channel > 7) return -1;

    unsigned char buffer[3];
    buffer[0] = 1;                      // 開始ビット
    buffer[1] = (8 + channel) << 4;     // シングルエンドモード + チャンネル
    buffer[2] = 0;

    wiringPiSPIDataRW(SPI_CHANNEL, buffer, 3);

    int result = ((buffer[1] & 3) << 8) | buffer[2];
    return result;
}

int temperture()
{
    int analogVal = read_ADC(0);
    double Vr = 3.3 * analogVal / 1023.0;  // MCP3008 の Vref=3.3V
    double Rt = 10000.0 * Vr / (3.3 - Vr);
    double temp = 1 / (((log(Rt / 10000.0)) / 3950.0) + (1 / (273.15 + 25.0)));
    double cel = temp - 273.15;
    double Fah = cel * 1.8 + 32;
    printf("Celsius: %.2f C  Fahrenheit: %.2f F\n", cel, Fah);
    return (int)cel;
}

int motor(int level)
{
    if (level == 0) {
        digitalWrite(MotorEnable, LOW);
        return 0;
    }
    if (level >= 4) {
        level = 4;
    }
    digitalWrite(MotorEnable, HIGH);
    softPwmWrite(MotorPin1, level * 25);
    return level;
}

void setup()
{
    if (wiringPiSetup() == -1) {
        printf("wiringPi setup failed!\n");
        return;
    }

    if (wiringPiSPISetup(SPI_CHANNEL, SPI_SPEED) == -1) {
        printf("SPI setup failed!\n");
        return;
    }

    softPwmCreate(MotorPin1, 0, 100);
    softPwmCreate(MotorPin2, 0, 100);
    pinMode(MotorEnable, OUTPUT);
    pinMode(BtnPin, INPUT);
}

int main(void)
{
    setup();
    int currentState, lastState = 0;
    int level = 0;
    int currentTemp, markTemp = 0;

    while (1) {
        currentState = digitalRead(BtnPin);
        currentTemp = temperture();

        if (currentTemp <= 0) continue;

        if (currentState == 1 && lastState == 0) {
            level = (level + 1) % 5;
            markTemp = currentTemp;
            delay(500);
        }

        lastState = currentState;

        if (level != 0) {
            if (currentTemp - markTemp <= -2) {
                level = level - 1;
                markTemp = currentTemp;
            }
            if (currentTemp - markTemp >= 2) {
                level = level + 1;
                markTemp = currentTemp;
            }
        }

        level = motor(level);
    }

    return 0;
}
コード解説
int read_ADC(int channel) { ... }
指定した MCP3008 チャンネルからアナログ入力を読み取ります。 3 バイトの SPI コマンドを送信し、0~1023 の 10 ビットデジタル値を返します。
int temperture() { ... }
temperture() 関数はサーミスタのアナログ信号を読み取り、電圧・抵抗を計算し、
サーミスタ式 (Steinhart–Hart 近似式) を用いて摂氏と華氏に変換します。
int motor(int level) { ... }
motor() 関数は PWM を使ってファン速度を制御します。
レベルは 0~4 の範囲で、0 で停止し、1 段階ごとにデューティ比が 25% ずつ増えます。
void setup() { ... }
setup() 関数は WiringPi の初期化、SPI 設定、PWM の初期化、モーターとボタン用 GPIO の設定を行います。
int main(void) { ... }
main() 関数はプログラムのメインループです:
ボタン状態を常時確認し、温度を取得します。
ボタンを押すと風量が (0~4) で切り替わり、現在温度を保存します。
温度変化が ±2℃ 以上の場合、風量が自動で 1 段階上下します。
motor(level)を呼び出し PWM 出力を更新します。