Note
Hello, welcome to the SunFounder Raspberry Pi & Arduino & ESP32 Enthusiasts Community on Facebook! Dive deeper into Raspberry Pi, Arduino, and ESP32 with fellow enthusiasts.
Why Join?
Expert Support: Solve post-sale issues and technical challenges with help from our community and team.
Learn & Share: Exchange tips and tutorials to enhance your skills.
Exclusive Previews: Get early access to new product announcements and sneak peeks.
Special Discounts: Enjoy exclusive discounts on our newest products.
Festive Promotions and Giveaways: Take part in giveaways and holiday promotions.
👉 Ready to explore and create with us? Click [here] and join today!
9. Green Screen
1. Overview
This chapter uses the person segmentation capability of MediaPipe Pose to implement a simple green screen effect.
By separating the person from the background, we can replace the original background with a solid green color. This enables:
Virtual background applications
Chroma key compositing (OBS / NLE)
Live streaming effects
AR-style scene replacement
2. How It Works
The green screen effect is implemented using the following steps:
Initialize the Pose model with
enable_segmentation=True.For each frame, obtain
results.segmentation_mask.The mask is a single-channel probability map (range 0–1).
Apply a threshold (e.g., 0.5) to separate foreground and background.
Replace background pixels with solid green.
Optionally apply blur or morphological filtering to smooth edges.
This method is lightweight and runs in real time on Raspberry Pi, while providing a practical example of human segmentation.
3. Run the Code
Important
Before you start, make sure:
The pan-tilt is assembled
You can access the Raspberry Pi desktop
The code package is installed
Fusion HAT+ is installed and configured
OpenCV is installed
For detailed instructions, see 0. Setup OpenCV.
Open the terminal and enter the following command:
sudo python3 ~/ai-lab-kit/mediapipe/mp_pose_segmentation.py
If you want to use MediaPipe Pose with a recorded video, you can run the following command:
sudo python3 ~/ai-lab-kit/mediapipe/mp_pose_segmentation_video.py
After running the program, a window titled “Show Video” opens and displays the live camera feed.
A trackbar named
Maskappears in the same window. It controls the segmentation threshold (0–100), with the default value set to 50 (0.5).When a person appears in front of the camera:
MediaPipe Pose generates a
segmentation_maskfor each frame.Pixels with mask values above the threshold are treated as the foreground (person).
All other pixels are replaced with a solid green background (green screen effect).
As you move the
Masktrackbar:Increasing the threshold keeps only the most confident foreground area (less background leak, but may cut off some body parts).
Decreasing the threshold includes more pixels as foreground (more complete silhouette, but may include background noise).
If no segmentation mask is available, the program simply shows the normal camera feed without background replacement.
Press
qto exit the program. The camera stops and the OpenCV window closes automatically.
4. Complete Code
from picamera2 import Picamera2, Preview
import cv2
import mediapipe.python.solutions.pose as mp_pose
import mediapipe.python.solutions.drawing_utils as drawing
import mediapipe.python.solutions.drawing_styles as drawing_styles

import numpy as np
GREEN = (0, 255, 0)  # Green color (BGR)

# Initialize the Pose model
pose = mp_pose.Pose(
   static_image_mode=False,  # Set to False for processing video frames
   model_complexity=1,
   enable_segmentation=True,
)

# Open the camera
picam2 = Picamera2()
config = picam2.create_preview_configuration(
   main={"size": (640, 480), "format": "XRGB8888"} ,
)

picam2.configure(config)
#picam2.start_preview(Preview.QTGL)
picam2.start()

print("Streaming... press 'q' to quit")


# --- Utility: empty callback for trackbars ---
def _noop(x):
   pass

# Create Window
cv2.namedWindow('Show Video')
# Create a trackbar for threshold, default value is 50
cv2.createTrackbar('Mask', 'Show Video', 50, 100, _noop)


while True:
   frame_bgra = picam2.capture_array()               # XRGB8888 to BGRA
   frame_bgr  = cv2.cvtColor(frame_bgra, cv2.COLOR_BGRA2BGR)

   # Convert the frame from BGR to RGB (required by MediaPipe)
   frame = cv2.cvtColor(frame_bgr, cv2.COLOR_BGR2RGB)

   # Process the frame for pose detection and tracking
   results = pose.process(frame)

   # Convert the frame back from RGB to BGR (required by OpenCV)
   frame = cv2.cvtColor(frame, cv2.COLOR_RGB2BGR)

   # Read the trackbar value
   threshold = cv2.getTrackbarPos('Mask', 'Show Video')

   # Cutout the green background
   if results.segmentation_mask is not None:
      # segmentation_mask is a single-channel [H, W] probability map.
      mask = results.segmentation_mask
      # Use 0.5 as the hard threshold; you can adjust it to 0.3-0.7 based on the effect.
      condition = (mask > threshold/100.0)[..., None]  # [H, W, 1]

      # Create a green background
      bg = np.full_like(frame, GREEN, dtype=np.uint8)

      # Use mask to keep the character and replace the background with green
      frame = np.where(condition, frame, bg)

   # Display the frame with annotations
   cv2.imshow("Show Video", frame)

   # Exit the loop if 'q' key is pressed
   if cv2.waitKey(1) & 0xff == ord('q'):
      break

# Release the camera
picam2.stop_preview()
picam2.stop()
cv2.destroyAllWindows()
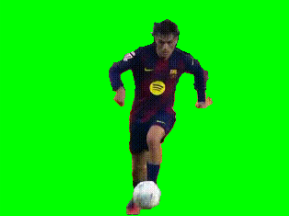
After running the script, the person (foreground) is preserved, and the background is replaced with solid green. It can be directly used for subsequent keying with Chroma Key in OBS, Premiere, DaVinci Resolve, etc.
5. Key Points Explanation
segmentation_mask is a single-channel float image (range 0~1) with the same size as the input frame:
Value close to 1: High probability of being foreground (person);
Value close to 0: High probability of being background.
The usual approach is to set a threshold T (e.g., 0.5) and create a condition mask:
condition = (mask > T)[..., None]
Here we set up a trackbar to adjust the threshold in real-time:
# Create a trackbar for threshold, default value is 50
cv2.createTrackbar('Mask', 'Show Video', 50, 100, _noop)

while True:

   ...
   # Read the trackbar value
   threshold = cv2.getTrackbarPos('Mask', 'Show Video')

   # Create a condition mask
   condition = (mask > threshold/100.0)[..., None]  # [H, W, 1]
Then we can use np.where(condition, frame, background) to replace the background; here we replace it with green:
# Create a green background
bg = np.full_like(frame, GREEN, dtype=np.uint8)

# Use mask to keep the character and replace the background with green
frame = np.where(condition, frame, bg)
6. Effect and Edge Optimization
Direct binarization can cause jagged edges or small holes around hair and clothing edges. Light post-processing can improve edges:
# Slight blur (soften edges)
mask_blur = cv2.GaussianBlur(mask, (5, 5), 0)

# Re-threshold (smoother foreground boundary)
condition = (mask_blur > 0.5)[..., None]

# Or perform morphological closing to fill small holes
bin_mask = (mask > 0.5).astype(np.uint8) * 255
kernel = cv2.getStructuringElement(cv2.MORPH_ELLIPSE, (3,3))
bin_mask = cv2.morphologyEx(bin_mask, cv2.MORPH_CLOSE, kernel, iterations=1)
condition = (bin_mask > 127)[..., None]
Tip
Recommended T value range 0.3~0.7: Can be appropriately lowered in dark environments/conservative models; can be raised with more noise.
Don’t make the blur kernel too large, otherwise the person’s boundary will “leak green”.
7. Using Custom Background (Image/Video)
Replace solid green with a custom background image:
bg_img = cv2.imread("background.jpg")
bg_img = cv2.resize(bg_img, (frame.shape[1], frame.shape[0]))
frame = np.where(condition, frame, bg_img)
Or use another video as the background (read the next frame bg_frame, resize to the same dimensions, then replace).
8. Performance and Quality Balance
Item |
Impact |
Suggestion |
|---|---|---|
Resolution |
Higher resolution gives finer edges but slower speed |
Start with 640×480; increase if clearer image needed |
model_complexity |
Higher is more precise but slower |
Recommended 1~2 on Raspberry Pi |
Post-processing strength |
Too much blur/morphology can “swallow edges/leak green” |
Small kernel + few iterations, observe edge effect |
9. Troubleshooting
Jagged edges or visible seams around the person
This usually happens because the mask is applied with a hard threshold, which creates sharp boundaries.
Try adjusting the threshold using the
Masktrackbar. For smoother edges, apply a small blur to the segmentation mask or use a simple morphological closing operation before compositing.Missing parts of the person
If parts of the body are cut out, the lighting may be too weak, or the clothing color may blend into the background.
Improve lighting, adjust the threshold, and try using a simpler background with higher contrast against the subject.
Low frame rate
If the video feels slow, the resolution may be too high or the model may be too complex.
Reduce the camera resolution (for example, 640×480 or 320×240) and keep
model_complexityat 1 for better performance.Green spills onto the subject
If the green background appears on the subject, the segmentation boundary may be inaccurate, or the subject color may cause visual confusion.
Try switching to a different replacement color (blue or gray), or replace the background with an image instead of a solid color for a more natural result.
10. Summary
Using
segmentation_mask, we can quickly achieve “person cutout + background replacement”;Obtain more natural edges through thresholds and lightweight post-processing;
Suitable for virtual backgrounds, live streaming keying, remote teaching, etc.;
Next steps could combine pose skeleton and segmentation for more interactive effects (e.g., only replace background, don’t replace foreground overlay skeleton).