Note
Hello, welcome to the SunFounder Raspberry Pi & Arduino & ESP32 Enthusiasts Community on Facebook! Dive deeper into Raspberry Pi, Arduino, and ESP32 with fellow enthusiasts.
Why Join?
Expert Support: Solve post-sale issues and technical challenges with help from our community and team.
Learn & Share: Exchange tips and tutorials to enhance your skills.
Exclusive Previews: Get early access to new product announcements and sneak peeks.
Special Discounts: Enjoy exclusive discounts on our newest products.
Festive Promotions and Giveaways: Take part in giveaways and holiday promotions.
👉 Ready to explore and create with us? Click [here] and join today!
1. Face Detection
This section introduces how to use the MediaPipe Face Mesh module on a Raspberry Pi for real-time face detection and facial landmark mesh drawing.
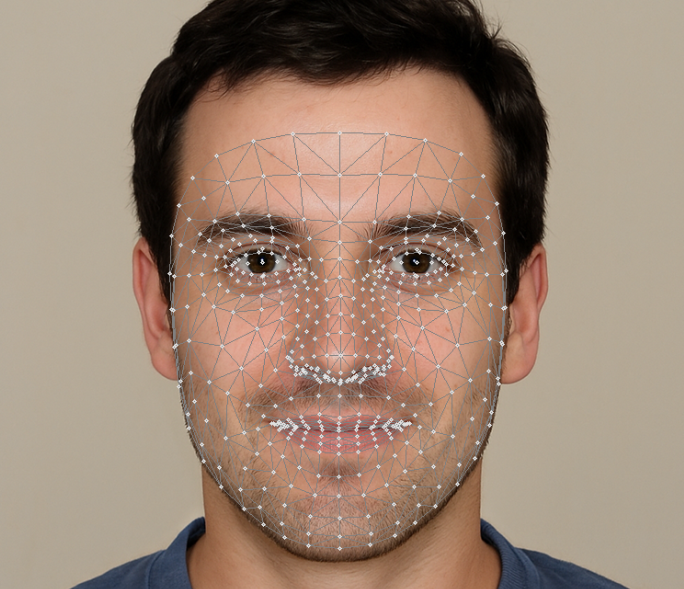
MediaPipe is a cross-platform machine learning pipeline framework developed by Google, supporting real-time processing of video streams and images. The Face Mesh module is a model provided by MediaPipe for real-time face detection and landmark tracking, which can be used to build various facial recognition and interaction applications.
Compared to OpenCV’s Haar detection, MediaPipe uses a deep learning model for detection, offering:
Higher accuracy
Better robustness to lighting and angles
Supports facial landmark tracking (468 points)
Seamless integration with OpenCV, allowing direct drawing of detection results on video streams.
1. Run the Code
Important
Before you start, make sure:
The pan-tilt is assembled
You can access the Raspberry Pi desktop
The code package is installed
Fusion HAT+ is installed and configured
OpenCV is installed
For detailed instructions, see 0. Setup OpenCV.
Open the terminal and enter the following command:
sudo python3 ~/ai-lab-kit/mediapipe/mp_face.py
After running the script, OpenCV opens a window titled “Show Video” and displays the live video stream captured from the Raspberry Pi camera.
If a face appears in front of the camera, the program detects it and draws a detailed facial landmark mesh on the face in real time. The mesh tracks facial movements smoothly as the person moves, blinks, or changes expressions.
If no face is detected, the window continues displaying the normal camera feed without any landmarks.
The video stream keeps running continuously until the user quits the program. To exit the program, press q on the keyboard. The camera will stop and all OpenCV resources will be released automatically.
2. Code Example
The complete code is shown below:
from picamera2 import Picamera2
import cv2
import mediapipe.python.solutions.face_mesh as mp_face_mesh
import mediapipe.python.solutions.drawing_utils as drawing
import mediapipe.python.solutions.drawing_styles as drawing_styles

# Initialize the mp_face_mesh model
face = mp_face_mesh.FaceMesh(
    static_image_mode=False,          # Set to False for video streams
    max_num_faces=1,                  # Maximum number of faces to detect
    refine_landmarks=True,           # Whether to refine landmarks
    min_detection_confidence=0.5     # Detection confidence threshold
)

# Open Raspberry Pi camera
picam2 = Picamera2()
config = picam2.create_preview_configuration(
    main={"size": (640, 480), "format": "XRGB8888"},
)
picam2.configure(config)
picam2.start()

print("Streaming... press 'q' to quit")

while True:
    frame_bgra = picam2.capture_array()               # XRGB8888 → BGRA
    frame_bgr  = cv2.cvtColor(frame_bgra, cv2.COLOR_BGRA2BGR)

    # Convert BGR to RGB (MediaPipe requires RGB)
    frame = cv2.cvtColor(frame_bgr, cv2.COLOR_BGR2RGB)

    # Face detection and landmark tracking
    results = face.process(frame)

    # Convert RGB back to BGR (for OpenCV display)
    frame = cv2.cvtColor(frame, cv2.COLOR_RGB2BGR)

    # Draw detected facial landmarks
    if results.multi_face_landmarks:
        for face_landmarks in results.multi_face_landmarks:
            drawing.draw_landmarks(
                image=frame,
                landmark_list=face_landmarks,
                connections=mp_face_mesh.FACEMESH_TESSELATION,
                landmark_drawing_spec=drawing.DrawingSpec(thickness=1, circle_radius=1),
                connection_drawing_spec=drawing_styles.get_default_face_mesh_tesselation_style()
            )

    cv2.imshow("Show Video", frame)
    if cv2.waitKey(1) & 0xff == ord('q'):
        break

picam2.stop_preview()
picam2.stop()
cv2.destroyAllWindows()
After running the program, you will see the live camera feed, and a facial mesh will be automatically drawn when a face is detected.
3. Key Steps Explanation
Import libraries
from picamera2 import Picamera2
import cv2
import mediapipe.python.solutions.face_mesh as mp_face_mesh
import mediapipe.python.solutions.drawing_utils as drawing
import mediapipe.python.solutions.drawing_styles as drawing_styles
These libraries are used to:
Control the Raspberry Pi camera
Process and display images
Detect facial landmarks
Initialize FaceMesh
face = mp_face_mesh.FaceMesh(
    static_image_mode=False,
    max_num_faces=1,
    refine_landmarks=True,
    min_detection_confidence=0.5
)
This creates the face detection model. It tracks one face continuously in video mode.
Start the camera
picam2 = Picamera2()
config = picam2.create_preview_configuration(
    main={"size": (640, 480), "format": "XRGB8888"},
)
picam2.configure(config)
picam2.start()
The camera starts streaming at 640×480 resolution.
Capture frames in a loop
while True:
    frame_bgra = picam2.capture_array()
    frame_bgr  = cv2.cvtColor(frame_bgra, cv2.COLOR_BGRA2BGR)
Each loop captures one frame and converts the format for OpenCV.
Detect face landmarks
frame = cv2.cvtColor(frame_bgr, cv2.COLOR_BGR2RGB)
results = face.process(frame)
The frame is converted to RGB. MediaPipe analyzes the image and detects facial landmarks.
Draw the face mesh
if results.multi_face_landmarks:
    drawing.draw_landmarks(
        image=frame,
        landmark_list=results.multi_face_landmarks[0],
        connections=mp_face_mesh.FACEMESH_TESSELATION
    )
If a face is detected, a mesh is drawn on it.
Display the result and exit
cv2.imshow("Show Video", frame)
if cv2.waitKey(1) & 0xff == ord('q'):
    break
Press
qto stop the program. The camera will close automatically.
4. Common Issues and Troubleshooting
Camera cannot open
Make sure the CSI camera cable is inserted correctly
Enable the camera interface:
sudo raspi-config→ Interface Options → CameraRestart the Raspberry Pi after enabling
Program starts slowly
The first run loads the MediaPipe model, which may take a few seconds. This is normal. Subsequent runs will be faster.
Unstable detection / Lagging
Reduce camera resolution (e.g., 320×240)
Disable
refine_landmarksto reduce CPU usageClose other running programs
No module named
mediapipeInstall MediaPipe:
pip install mediapipe
Make sure you are using a 64-bit Raspberry Pi OS system.
5. Summary
MediaPipe FaceMesh uses a deep learning model to achieve high-precision face detection on Raspberry Pi
Integrates very closely with OpenCV
Suitable for scenarios like expression recognition, avatar tracking, AR applications
More robust and easier to extend compared to traditional Haar features
The next section will further introduce how to use Face Mesh landmarks for simple facial feature analysis and interaction.