Note
Hello, welcome to the SunFounder Raspberry Pi & Arduino & ESP32 Enthusiasts Community on Facebook! Dive deeper into Raspberry Pi, Arduino, and ESP32 with fellow enthusiasts.
Why Join?
Expert Support: Solve post-sale issues and technical challenges with help from our community and team.
Learn & Share: Exchange tips and tutorials to enhance your skills.
Exclusive Previews: Get early access to new product announcements and sneak peeks.
Special Discounts: Enjoy exclusive discounts on our newest products.
Festive Promotions and Giveaways: Take part in giveaways and holiday promotions.
👉 Ready to explore and create with us? Click [here] and join today!
8. Squat Counter
1. Overview
In the previous chapter, we implemented basic human pose estimation. This chapter builds on that foundation to implement a simple Squat Counter using MediaPipe Pose.
This is a practical example of combining:
Pose detection
Action recognition
Real-time counting
It can be used in smart fitness systems, home workout assistants, or motion analysis applications.
2. How It Works
The squat counter is implemented using the following logic:
Use MediaPipe Pose to detect 33 body keypoints.
Select key joints (Shoulder, Hip, Ankle).
Use the normalized y-coordinates to estimate hip height.
Define upper and lower thresholds (e.g., 0.55 and 0.45).
Use a simple state machine to detect the transition: “standing → squatting → standing”.
Increase the counter when a full squat cycle is completed.
Display the squat count and current hip value on the screen.
Note
This example does not use joint angle calculation.
It relies on normalized coordinates to reduce computation.
The method is lightweight and suitable for Raspberry Pi.
3. Run the Code
Important
Before you start, make sure:
The pan-tilt is assembled
You can access the Raspberry Pi desktop
The code package is installed
Fusion HAT+ is installed and configured
OpenCV is installed
For detailed instructions, see 0. Setup OpenCV.
Open the terminal and enter the following command:
sudo python3 ~/ai-lab-kit/mediapipe/mp_pose_squat.py
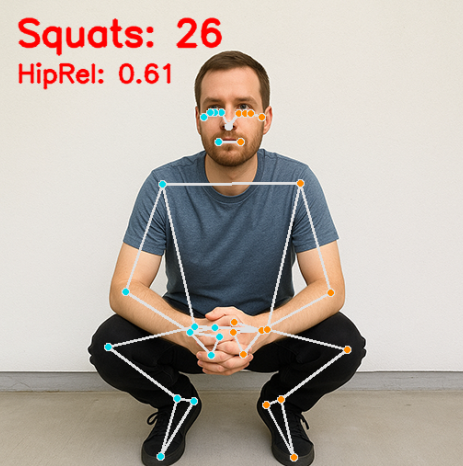
After running the program, a window titled “Show Video” opens and displays the live camera feed.
When a person stands in front of the camera:
MediaPipe Pose detects 33 body landmarks in real time.
A full-body skeleton is drawn on the screen.
The system continuously calculates the relative hip position (HipRel).
As you perform squats:
When you move down and your hip passes the lower threshold (DOWN_TH), the system marks that you are in the “bottom” position.
When you stand back up and the hip passes the upper threshold (UP_TH), the squat counter increases by 1.
The screen displays:
Squats: N— the total number of completed squats.HipRel: value— the current normalized hip position used for detection.
The counter only increases after a full movement cycle (stand → squat → stand), preventing duplicate counting.
Press
qto exit the program. The camera stops and the OpenCV window closes automatically.
4. Complete Code
Here is the complete squat counter implementation:
from picamera2 import Picamera2, Preview
import cv2
import mediapipe.python.solutions.pose as mp_pose
import mediapipe.python.solutions.drawing_utils as drawing
import mediapipe.python.solutions.drawing_styles as drawing_styles

# Initialize the Pose model
pose = mp_pose.Pose(
   static_image_mode=False,
   model_complexity=1,
   enable_segmentation=True,
)

# ---- Count and threshold ----
squat_count = 0
in_bottom = False
DOWN_TH = 0.55   # Hip relative position > 0.55 is considered "full squat"
UP_TH   = 0.45   # Hip relative position < 0.45 is considered "stand up"

# Open the camera
picam2 = Picamera2()
config = picam2.create_preview_configuration(
   main={"size": (640, 480), "format": "XRGB8888"} ,
)
picam2.configure(config)
picam2.start()

print("Streaming... press 'q' to quit")

while True:
   frame_bgra = picam2.capture_array()               # XRGB8888 to BGRA
   frame_bgr  = cv2.cvtColor(frame_bgra, cv2.COLOR_BGRA2BGR)

   # Convert the frame from BGR to RGB (required by MediaPipe)
   frame_rgb = cv2.cvtColor(frame_bgr, cv2.COLOR_BGR2RGB)

   # Process the frame for pose detection and tracking
   results = pose.process(frame_rgb)

   # Convert the frame back from RGB to BGR (required by OpenCV)
   frame = cv2.cvtColor(frame_rgb, cv2.COLOR_RGB2BGR)

   # If pose is detected, draw landmarks and connections on the frame
   if results.pose_landmarks:
      drawing.draw_landmarks(
            frame,
            results.pose_landmarks,
            mp_pose.POSE_CONNECTIONS,
            landmark_drawing_spec=drawing_styles.get_default_pose_landmarks_style(),
      )

      # Count squat without using hip angle
      lms = results.pose_landmarks.landmark
      # left 11-23-27 (shoulder, hip, ankle)
      # right 12-24-28 (shoulder, hip, ankle)
      idx_sets = [(11,23,27), (12,24,28)]
      hip_rel_list = []

      for sh, hp, an in idx_sets:
            try:
               y_sh, y_hp, y_an = lms[sh].y, lms[hp].y, lms[an].y
               base = abs(y_an - y_sh)  # Distance between shoulder and ankle
               if base > 1e-6:
                  hip_rel = (y_hp - y_sh) / base  # Position of hip relative to shoulder, 0.5 means hip is in the middle, 0 means hip is at the top, 1 means hip is at the bottom
                  hip_rel_list.append(hip_rel)
            except IndexError:
               pass

      if hip_rel_list:
            hip_rel = min(hip_rel_list)  # Choose the smaller one, which is more stable
            # State machine:
            # from low -> mark "in_bottom";
            # from back to high -> count +1
            if not in_bottom and hip_rel >= DOWN_TH:
               in_bottom = True
            elif in_bottom and hip_rel <= UP_TH:
               squat_count += 1
               in_bottom = False

            # Display
            cv2.putText(frame, f"Squats: {squat_count}", (20, 50),
                        cv2.FONT_HERSHEY_SIMPLEX, 1.3, (0, 0, 255), 3, cv2.LINE_AA)
            cv2.putText(frame, f"HipRel: {hip_rel:.2f}", (20, 90),
                        cv2.FONT_HERSHEY_SIMPLEX, 0.9, (0, 0, 255), 2, cv2.LINE_AA)

   # Display the frame with annotations
   cv2.imshow("Show Video", frame)

   # Exit the loop if 'q' key is pressed
   if cv2.waitKey(1) & 0xff == ord('q'):
      break

# Release the camera
picam2.stop_preview()
picam2.stop()
cv2.destroyAllWindows()
After executing the script, the system will:
Detect the human skeleton;
Calculate the relative hip position;
Count +1 when a complete cycle from “squat down” to “stand up” is finished;
Display Squats: N and the current HipRel value on the screen in real-time.
5. Coordinate and State Design
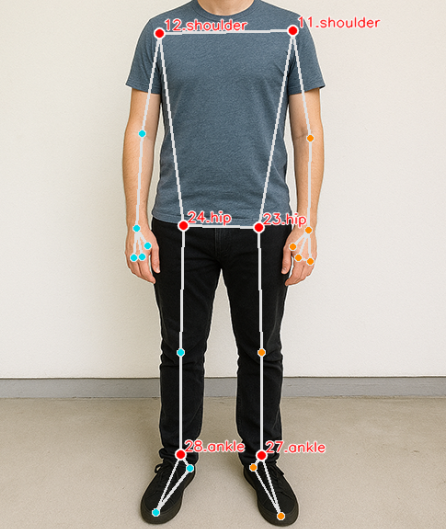
We use the following 6 keypoints (3 on each side):
Keypoint |
Index |
Description |
|---|---|---|
Shoulder |
11 (Left) / 12 (Right) |
Upper reference |
Hip |
23 (Left) / 24 (Right) |
Core for calculating squat position |
Ankle |
27 (Left) / 28 (Right) |
Lower reference |
Hip Relative value calculation formula:
Larger hip_rel means closer to the ground (i.e., squatting down).
Smaller hip_rel means standing upright.
We define two thresholds:
DOWN_TH = 0.55: Considered entering the bottom of the squat
UP_TH = 0.45: Considered returning to standing
Use a simple state machine for reliable counting:
if hip_rel >= DOWN_TH:
    in_bottom = True
if in_bottom and hip_rel <= UP_TH:
    squat_count += 1
    in_bottom = False
6. Parameter Tuning and Optimization
Parameter |
Description |
Adjustment Suggestion |
|---|---|---|
DOWN_TH |
Squat action threshold |
Higher value requires deeper squat to count |
UP_TH |
Stand up action threshold |
Lower value requires standing more upright |
model_complexity |
Pose model complexity |
Use 1 for faster speed |
Resolution |
Affects frame rate and accuracy |
Recommended 640×480 |
Tip
For people of different heights, adaptive thresholds or personalized calibration can be used for more accurate counting.
5. Troubleshooting
Inaccurate counting
If the squat count is not accurate, the threshold values may not match your body position or camera angle.
Try printing
hip_relin real time and adjustDOWN_THandUP_THaccordingly. Also make sure your squat form is consistent and clearly visible.Person not detected
If the body is not detected, improve lighting conditions and avoid complex backgrounds.
Make sure you are standing fully inside the frame and facing the camera directly.
High latency
If the video response is slow, reduce
model_complexityto 1 and lower the camera resolution (for example, 640×480 or 320×240).Close unnecessary background programs to improve performance.
6. Summary
Implemented a real-time squat counter using Pose keypoints + state machine;
No complex angle calculations required, high operational efficiency;
Suitable for Raspberry Pi or other edge device applications;
Future extensions possible:
Push-up/Sit-up detection
Data recording and visualization
Automatic rhythm guidance and training feedback