Note
Hello, welcome to the SunFounder Raspberry Pi & Arduino & ESP32 Enthusiasts Community on Facebook! Dive deeper into Raspberry Pi, Arduino, and ESP32 with fellow enthusiasts.
Why Join?
Expert Support: Solve post-sale issues and technical challenges with help from our community and team.
Learn & Share: Exchange tips and tutorials to enhance your skills.
Exclusive Previews: Get early access to new product announcements and sneak peeks.
Special Discounts: Enjoy exclusive discounts on our newest products.
Festive Promotions and Giveaways: Take part in giveaways and holiday promotions.
👉 Ready to explore and create with us? Click [here] and join today!
2. Emotion Detection
1. Overview
In this section, we extend Face Mesh detection to perform basic emotion recognition.
Instead of using deep learning models, this method uses facial landmark geometry (eyes and mouth ratios) to classify expressions in real time.
Recognizable emotions:
😮 Surprised
😀 Happy
😢 Sad
😠 Angry
😐 Neutral
2. How it Works
The program follows these steps:
Use
Picamera2+MediaPipe FaceMeshto obtain 468 landmarks.Select key feature points around the eyes and mouth.
Calculate normalized ratios:
Eye openness
Mouth width
Mouth openness
Compare values with preset thresholds.
Display the detected emotion using OpenCV.
Advantages of this approach:
Fast and lightweight (suitable for Raspberry Pi)
No neural network required
Easy to adjust thresholds
3. Run the Code
Important
Before you start, make sure:
The pan-tilt is assembled
You can access the Raspberry Pi desktop
The code package is installed
Fusion HAT+ is installed and configured
OpenCV is installed
For detailed instructions, see 0. Setup OpenCV.
Open the terminal and enter the following command:
sudo python3 ~/ai-lab-kit/mediapipe/mp_face_emotion.py
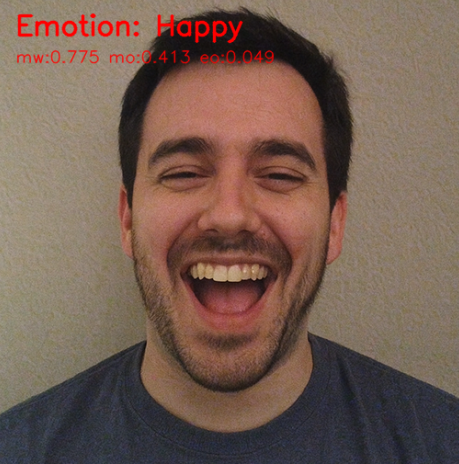
After running the program, a video window opens and displays the live camera feed.
When a face appears in front of the camera, the system:
Detects 468 facial landmarks in real time
Calculates eye openness and mouth openness ratios
Classifies the current facial expression
The detected emotion label (such as
Happy,Surprised,Sad,AngryorNeutral) is displayed on the video screen.As the user changes facial expressions, the emotion label updates instantly.
If no face is detected, the program continues showing the normal camera feed without an emotion label.
Press
qto exit the program. The camera will stop and the OpenCV window will close automatically.
4. Complete Code
from picamera2 import Picamera2, Preview
import cv2
import mediapipe.python.solutions.face_mesh as mp_face_mesh
import mediapipe.python.solutions.drawing_utils as drawing
import mediapipe.python.solutions.drawing_styles as drawing_styles
import numpy as np

# --------- Emotion judgment auxiliary function ---------
def euclidean(p1, p2):
    return np.linalg.norm(np.array([p1.x, p1.y]) - np.array([p2.x, p2.y]))

def classify_emotion(landmarks):
    """
    landmarks: results.multi_face_landmarks[0].landmark (length ~468)
    Returns (label, details_dict)
    """
    # Keypoint Index (MediaPipe 468 points)
    L_EYE_TOP, L_EYE_BOT = 159, 145
    R_EYE_TOP, R_EYE_BOT = 386, 374
    L_EYE_CENTER, R_EYE_CENTER = 33, 263
    MOUTH_LEFT, MOUTH_RIGHT = 61, 291
    LIP_UP, LIP_DOWN = 13, 14

    # Normalization scale: distance between left and right eye centers
    io = euclidean(landmarks[L_EYE_CENTER], landmarks[R_EYE_CENTER])
    if io < 1e-6:
        return "Neutral", {}

    mouth_width = euclidean(landmarks[MOUTH_LEFT], landmarks[MOUTH_RIGHT]) / io
    mouth_open  = euclidean(landmarks[LIP_UP], landmarks[LIP_DOWN]) / io
    eye_open_L  = euclidean(landmarks[L_EYE_TOP], landmarks[L_EYE_BOT]) / io
    eye_open_R  = euclidean(landmarks[R_EYE_TOP], landmarks[R_EYE_BOT]) / io
    eye_open    = 0.5 * (eye_open_L + eye_open_R)

    # --------- Simple threshold rules (adjustable) ---------
    if mouth_open > 0.08 and eye_open > 0.055:
        label = "Surprised"
    elif mouth_width > 0.48 and mouth_open > 0.035:
        label = "Happy"
    elif mouth_open < 0.018 and mouth_width < 0.36 and eye_open < 0.03:
        label = "Sad"
    elif mouth_open < 0.02 and eye_open < 0.028:
        label = "Angry"
    else:
        label = "Neutral"

    details = {
        "mouth_width": round(mouth_width, 3),
        "mouth_open": round(mouth_open, 3),
        "eye_open": round(eye_open, 3),
    }
    return label, details

# Initialize FaceMesh
face = mp_face_mesh.FaceMesh(
    static_image_mode=False,
    max_num_faces=1,
    refine_landmarks=True,
    min_detection_confidence=0.5
)

# Open camera
picam2 = Picamera2()
config = picam2.create_preview_configuration(
   main={"size": (640, 480), "format": "XRGB8888"} ,
)
picam2.configure(config)
picam2.start()

print("Streaming... press 'q' to quit")

while True:
    frame_bgra = picam2.capture_array()
    frame_bgr  = cv2.cvtColor(frame_bgra, cv2.COLOR_BGRA2BGR)

    frame = cv2.cvtColor(frame_bgr, cv2.COLOR_BGR2RGB)
    results = face.process(frame)
    frame = cv2.cvtColor(frame, cv2.COLOR_RGB2BGR)

    if results.multi_face_landmarks:
        for face_landmarks in results.multi_face_landmarks:
            drawing.draw_landmarks(
                image=frame,
                landmark_list=face_landmarks,
                connections=mp_face_mesh.FACEMESH_TESSELATION,
                landmark_drawing_spec=drawing.DrawingSpec(thickness=1, circle_radius=1),
                connection_drawing_spec=drawing_styles.get_default_face_mesh_tesselation_style()
            )

            # --------- Emotion detection ---------
            label, metrics = classify_emotion(face_landmarks.landmark)

            # Draw emotion label on the frame
            cv2.putText(frame, f"Emotion: {label}", (20, 40),
                        cv2.FONT_HERSHEY_SIMPLEX, 1.0, (0, 0, 255), 2, cv2.LINE_AA)

            # Debug information
            dbg = f"mw:{metrics.get('mouth_width',0)} mo:{metrics.get('mouth_open',0)} eo:{metrics.get('eye_open',0)}"
            cv2.putText(frame, dbg, (20, 70),
                        cv2.FONT_HERSHEY_SIMPLEX, 0.6, (0, 0, 255), 1, cv2.LINE_AA)

    cv2.imshow("Show Video", frame)
    if cv2.waitKey(1) & 0xff == ord('q'):
        break

picam2.stop_preview()
picam2.stop()
cv2.destroyAllWindows()
After running, the recognized emotion category will be displayed in real-time on the camera feed, along with debug information including mouth width, mouth openness, eye openness, etc.
5. Key Steps Explanation
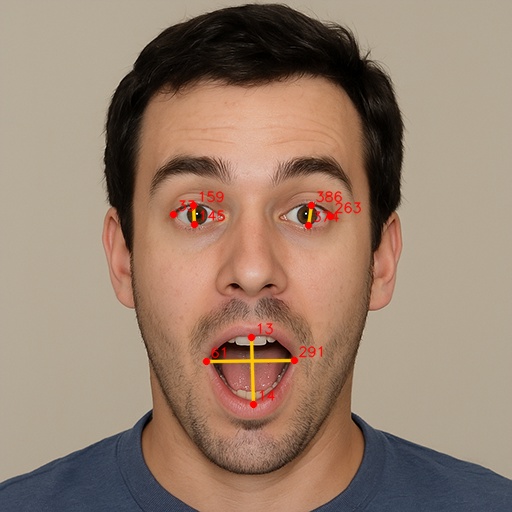
Select key points
# Keypoint Index (MediaPipe 468 points)
L_EYE_TOP, L_EYE_BOT = 159, 145
R_EYE_TOP, R_EYE_BOT = 386, 374
L_EYE_CENTER, R_EYE_CENTER = 33, 263
MOUTH_LEFT, MOUTH_RIGHT = 61, 291
LIP_UP, LIP_DOWN = 13, 14
These indices correspond to:
159, 145 → Upper and lower edges of the left eye
386, 374 → Upper and lower edges of the right eye
33, 263 → Eye centers (used for normalization)
61, 291 → Mouth corners
13, 14 → Upper and lower lip midpoints
Normalize distances
To reduce the influence of camera distance, use the distance between the two eye centers as the normalization scale.
def euclidean(p1, p2):
    return np.linalg.norm(
        np.array([p1.x, p1.y]) -
        np.array([p2.x, p2.y])
    )

io = euclidean(
    landmarks[L_EYE_CENTER],
    landmarks[R_EYE_CENTER]
)
Calculate geometric features
mouth_width = euclidean(
    landmarks[MOUTH_LEFT],
    landmarks[MOUTH_RIGHT]
) / io

mouth_open = euclidean(
    landmarks[LIP_UP],
    landmarks[LIP_DOWN]
) / io

eye_open_L = euclidean(
    landmarks[L_EYE_TOP],
    landmarks[L_EYE_BOT]
) / io

eye_open_R = euclidean(
    landmarks[R_EYE_TOP],
    landmarks[R_EYE_BOT]
) / io

eye_open = 0.5 * (eye_open_L + eye_open_R)
Calculated features:
mouth_width→ Horizontal mouth widthmouth_open→ Vertical mouth openingeye_open→ Average eye openness
Classify emotion using thresholds
if mouth_open > 0.08 and eye_open > 0.055:
    label = "Surprised"
elif mouth_width > 0.48 and mouth_open > 0.035:
    label = "Happy"
elif mouth_open < 0.018 and mouth_width < 0.36 and eye_open < 0.03:
    label = "Sad"
elif mouth_open < 0.02 and eye_open < 0.028:
    label = "Angry"
else:
    label = "Neutral"
Emotion rules (empirical thresholds):
Surprised → Mouth and eyes are wide open
Happy → Mouth wide, eyes normal
Sad / Angry → Mouth and eyes mostly closed
Neutral → Does not match other conditions
6. Threshold and Robustness Adjustment
Thresholds like
0.08,0.035,0.018are based on empirical values at 640×480 resolution.If the camera is closer or the resolution is different, adjust the thresholds using the debug information (mw/mo/eo).
Emotion judgment logic can be modified to be more complex or use trained models for higher accuracy, such as calculating the relative position of mouth corners, mouth shape, and other features.
7. Troubleshooting
Emotion recognition not sensitive
Thresholds may not match the current camera distance. Adjust
mouth_openandeye_openvalues.Detection latency
Resolution may be too high. Reduce resolution or disable
refine_landmarks.Cannot recognize emotion
Lighting may be insufficient or the face angle is skewed. Improve lighting and face the camera directly.
8. Summary
This chapter implemented lightweight emotion recognition based on geometric features + FaceMesh landmarks.
Offers advantages of high real-time performance and adjustable thresholds.
Can be used in projects like interactive art, HCI, classroom/meeting state detection.