Note
Hello, welcome to the SunFounder Raspberry Pi & Arduino & ESP32 Enthusiasts Community on Facebook! Dive deeper into Raspberry Pi, Arduino, and ESP32 with fellow enthusiasts.
Why Join?
Expert Support: Solve post-sale issues and technical challenges with help from our community and team.
Learn & Share: Exchange tips and tutorials to enhance your skills.
Exclusive Previews: Get early access to new product announcements and sneak peeks.
Special Discounts: Enjoy exclusive discounts on our newest products.
Festive Promotions and Giveaways: Take part in giveaways and holiday promotions.
👉 Ready to explore and create with us? Click [here] and join today!
12. Adding TTS Voice Broadcast to MediaPipe Projects
1. Overview
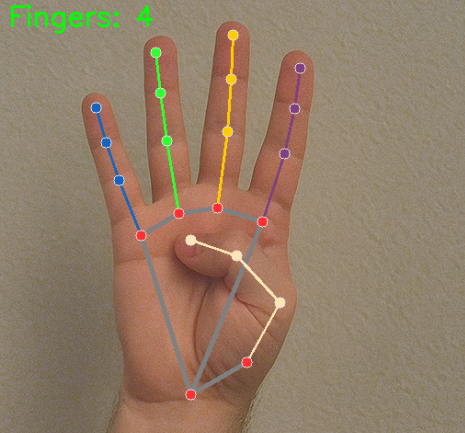
In 5. Hand Gesture Counting (Section 5), we built a hand gesture counting program that displays the number of raised fingers on screen.
In this section, we will go one step further: add Text-to-Speech (TTS) voice broadcast so the Raspberry Pi can speak the detected finger count out loud — making the project more interactive and accessible.
This lesson is not just about finger counting — it teaches a general pattern for adding TTS to any MediaPipe or OpenCV project.
By the end of this lesson, you will know how to:
Initialize and configure the Fusion HAT+ TTS engine
Trigger TTS on a key press with debounce protection
Add visual feedback while the system is speaking
Apply this pattern to your own computer vision projects
2. How It Works
The program builds on the hand-counting pipeline and adds a TTS layer that is activated by a key press:
Initialize MediaPipe Hands for real-time hand detection.
Initialize the Fusion HAT+ TTS engine (Espeak).
Capture video frames and detect fingers (same as before).
Wait for the user to press the
tkey.On key press, convert the current finger count into a spoken message.
Use debounce logic to prevent rapid repeated triggers.
Show a visual flash on screen while TTS is speaking.
The speech plays through the Fusion HAT+ speaker.
The key design idea is:
TTS is added as a non-blocking layer — detection runs continuously, and speech is only triggered when the user requests it.
This pattern keeps the video pipeline smooth while adding voice output on demand.
3. The Fusion HAT+ TTS Module
The fusion_hat library provides a simple, unified interface
for several TTS engines. In this project, we use Espeak —
a lightweight offline engine that works well on Raspberry Pi.
Basic usage:
from fusion_hat.tts import Espeak

# Create TTS instance
tts = Espeak()

# Configure voice
tts.set_amp(200)       # volume: 0-200 (default 100)
tts.set_speed(150)     # speed: 80-260 (default 150)
tts.set_pitch(80)      # pitch: 0-99 (default 80)

# Speak
tts.say("Hello!")
Three parameters let you customize the voice:
amp (amplitude) — controls volume. Higher = louder.
speed — speaking rate in words per minute. 150 is normal.
pitch — voice pitch. 80 is the default; lower values sound deeper.
Note
Fusion HAT+ also supports Piper (neural, offline) and OpenAI TTS (online, natural voices). See 2. TTS with Piper and OpenAI for more advanced options.
4. Key Design: Adding TTS to a Video Loop
When adding TTS to a real-time video pipeline, there are a few important design considerations. Let’s walk through each one.
4.1 Trigger by Key Press
Rather than speaking on every frame (which would be chaotic), we use a keyboard key as the trigger:
key = cv2.waitKey(1) & 0xff
if key == ord('t'):
    tts.say(message)
The t key is chosen because it’s easy to remember
(t for talk). You can use any key — space for
hands-free floor control, or a GPIO button for physical input.
4.2 Debounce Protection
Without protection, holding down the t key would trigger
TTs dozens of times per second, overlapping speech and
making it unintelligible.
Solution: time-based debounce.
DEBOUNCE_INTERVAL = 1.5  # seconds
last_tts_time = 0

# In the loop:
if key == ord('t'):
    now = time.time()
    if now - last_tts_time > DEBOUNCE_INTERVAL:
        last_tts_time = now
        tts.say(message)
After each TTS trigger, further triggers are ignored for 1.5 seconds. This gives the speech enough time to finish before the next one starts.
4.3 Building the Message
The finger count (an integer) must be converted into a natural-sounding sentence:
if total_fingers == 0:
    message = "no fingers detected"
elif total_fingers == 1:
    message = "one finger detected"
else:
    message = f"{total_fingers} fingers detected"
Using "one" instead of "1" ensures Espeak pronounces
it naturally. For numbers greater than one, the digit form
works fine with Espeak.
4.4 Visual Feedback (Green Border Flash)
While the system is speaking, we add a visual indicator so the user knows speech is in progress:
tts_flash_until = now + 1.0   # flash for 1 second

# Later in the loop:
if tts_triggered and time.time() < tts_flash_until:
    cv2.rectangle(frame, (0, 0), (w-1, h-1), (0, 255, 0), 8)
    cv2.putText(frame, "Speaking...", (10, 75),
                cv2.FONT_HERSHEY_SIMPLEX, 0.8, (0, 255, 255), 2)
A green border appears around the frame and a “Speaking…” label is shown. Both disappear automatically after 1 second.
This feedback loop is important because:
TTS takes a moment to complete — the user needs to know the system heard their command.
The border disappears when done, so it does not interfere with normal use.
5. Run the Code
Important
Before you start, make sure:
The Fusion HAT+ is assembled and the speaker is connected
You can access the Raspberry Pi desktop
The code package is installed
MediaPipe and OpenCV are installed
For detailed instructions, see 0. Setup MediaPipe and 0. Setup OpenCV.
Open the terminal and enter the following command:
sudo python3 ~/ai-lab-kit/mediapipe/mp_hand_count_tts.py
After running the program:
A window titled “MediaPipe Hand Count + TTS” opens, showing the live camera feed.
Hold your hand up to the camera — the finger count appears in the top-left corner.
Press the
tkey — the system speaks the current finger count through the Fusion HAT+ speaker.A green border flashes on screen while speaking.
Hint
Try showing different numbers of fingers and pressing
teach time. You should hear: “one finger detected”, “three fingers detected”, etc.Press
qto exit the program.
6. Complete Code
"""
MediaPipe Hand Detection + TTS Demo
====================================
Detects fingers via webcam in real time. Press the 't' key to speak the
current finger count using TTS.

Usage:
    python mp_hand_count_tts.py

Controls:
    't'  - speak the detected finger count via TTS
    'q'  - quit
"""

from picamera2 import Picamera2
import cv2
import mediapipe.python.solutions.hands as mp_hands
import mediapipe.python.solutions.drawing_utils as drawing
import mediapipe.python.solutions.drawing_styles as drawing_styles
from fusion_hat.tts import Espeak
import time


# ======================== Init TTS ========================
tts = Espeak()
tts.set_amp(200)       # volume 0-200, default 100
tts.set_speed(150)     # speed 80-260, default 150
tts.set_pitch(80)      # pitch 0-99, default 80

# ======================== Init MediaPipe Hands ========================
hands = mp_hands.Hands(
    static_image_mode=False,
    max_num_hands=2,
    min_detection_confidence=0.5
)

# ======================== Init Camera ========================
picam2 = Picamera2()
config = picam2.create_preview_configuration(
    main={"size": (640, 480), "format": "XRGB8888"},
)
picam2.configure(config)
picam2.start()

# ======================== Constants ========================
# Finger tip and dip landmark indices
FINGER_TIPS = [4, 8, 12, 16, 20]   # thumb, index, middle, ring, pinky tips
FINGER_DIPS = [2, 6, 10, 14, 18]   # corresponding middle joints

# Minimum interval (seconds) between TTS triggers to avoid spamming
DEBOUNCE_INTERVAL = 1.5

print("=" * 55)
print("  MediaPipe Hand Count + TTS")
print("  Press 't' to speak count | 'q' to quit")
print("=" * 55)

# ======================== Main Loop ========================
last_tts_time = 0          # timestamp of last TTS trigger
tts_triggered = False      # whether TTS was just fired (for visual flash)
tts_flash_until = 0        # how long the flash should last

while True:
    # ---- 1. Capture frame ----
    frame_bgra = picam2.capture_array()
    frame_bgr = cv2.cvtColor(frame_bgra, cv2.COLOR_BGRA2BGR)

    # ---- 2. Convert to RGB for MediaPipe ----
    frame_rgb = cv2.cvtColor(frame_bgr, cv2.COLOR_BGR2RGB)
    hands_detected = hands.process(frame_rgb)

    # ---- 3. Convert back to BGR for OpenCV display ----
    frame = cv2.cvtColor(frame_rgb, cv2.COLOR_RGB2BGR)

    # ---- 4. Count fingers (right hand only) ----
    total_fingers = 0

    if hands_detected.multi_hand_landmarks:
        for hand_landmarks in hands_detected.multi_hand_landmarks:
            # Draw hand skeleton
            drawing.draw_landmarks(
                frame,
                hand_landmarks,
                mp_hands.HAND_CONNECTIONS,
                drawing_styles.get_default_hand_landmarks_style(),
                drawing_styles.get_default_hand_connections_style(),
            )

            landmarks = hand_landmarks.landmark
            finger_count = 0

            # Thumb: extended when x_tip > x_dip (right hand)
            if landmarks[FINGER_TIPS[0]].x > landmarks[FINGER_DIPS[0]].x:
                finger_count += 1

            # Other four fingers: tip is above dip when extended (smaller y)
            for i in range(1, 5):
                if landmarks[FINGER_TIPS[i]].y < landmarks[FINGER_DIPS[i]].y:
                    finger_count += 1

            total_fingers += finger_count

    # ---- 5. Display finger count on screen ----
    display_text = f"Fingers: {total_fingers}"
    cv2.putText(frame, display_text, (10, 40),
                cv2.FONT_HERSHEY_SIMPLEX, 1.2, (0, 255, 0), 2)

    # ---- 6. Key handling ----
    key = cv2.waitKey(1) & 0xff

    # 't' key: trigger TTS (with debounce)
    if key == ord('t'):
        now = time.time()
        if now - last_tts_time > DEBOUNCE_INTERVAL:
            last_tts_time = now
            tts_triggered = True
            tts_flash_until = now + 1.0  # flash for 1 second

            if total_fingers == 0:
                message = "no fingers detected"
            elif total_fingers == 1:
                message = "one finger detected"
            else:
                message = f"{total_fingers} fingers detected"

            print(f"[TTS] {message}")
            tts.say(message)

    # 'q' key: quit
    if key == ord('q'):
        break

    # ---- 7. Visual feedback while speaking (green border flash) ----
    if tts_triggered and time.time() < tts_flash_until:
        h, w = frame.shape[:2]
        thickness = 8
        cv2.rectangle(frame, (0, 0), (w - 1, h - 1), (0, 255, 0), thickness)
        cv2.putText(frame, "Speaking...", (10, 75),
                    cv2.FONT_HERSHEY_SIMPLEX, 0.8, (0, 255, 255), 2)
    else:
        tts_triggered = False

    # ---- 8. Show controls hint at bottom ----
    cv2.putText(frame, "Press 't' to speak count | 'q' to quit",
                (10, frame.shape[0] - 15),
                cv2.FONT_HERSHEY_SIMPLEX, 0.5, (180, 180, 180), 1)

    # ---- 9. Show frame ----
    cv2.imshow("MediaPipe Hand Count + TTS", frame)

# ======================== Cleanup ========================
picam2.stop_preview()
picam2.stop()
cv2.destroyAllWindows()
print("Exited.")
7. Code Explanation
Let’s walk through the code section by section, focusing on what’s new compared to the basic hand-counting program.
7.1 Imports and Initialization
from fusion_hat.tts import Espeak
import time

tts = Espeak()
tts.set_amp(200)
tts.set_speed(150)
tts.set_pitch(80)
Two new imports and a TTS initialization block are the first
additions. Espeak() creates the TTS engine, and the three
set_* calls configure the voice.
The import time is needed for debounce timing.
7.2 Debounce Constants and State Variables
DEBOUNCE_INTERVAL = 1.5

last_tts_time = 0
tts_triggered = False
tts_flash_until = 0
Four new variables are introduced:
DEBOUNCE_INTERVAL— prevents TTS spam (seconds).last_tts_time— records when TTS was last triggered.tts_triggered— flag for the visual flash effect.tts_flash_until— timestamp when the flash should end.
7.3 Key Handling with Debounce
key = cv2.waitKey(1) & 0xff

if key == ord('t'):
    now = time.time()
    if now - last_tts_time > DEBOUNCE_INTERVAL:
        last_tts_time = now
        tts_triggered = True
        tts_flash_until = now + 1.0

        if total_fingers == 0:
            message = "no fingers detected"
        elif total_fingers == 1:
            message = "one finger detected"
        else:
            message = f"{total_fingers} fingers detected"

        tts.say(message)
This is the core TTS addition. Let’s break it down:
Key detection —
ord('t')checks iftwas pressed.Debounce gate —
time.time() - last_tts_time > DEBOUNCE_INTERVALensures at least 1.5 seconds have passed since the last trigger. If not enough time has passed, the key press is ignored.Update state — When the gate passes, we record the current time and set the flash timer.
Build message — The finger count is converted into a human-readable sentence.
Speak —
tts.say(message)sends the text to the speaker.
Note
tts.say() is non-blocking — the program continues
processing video frames while speech plays in the background.
7.4 Visual Feedback
if tts_triggered and time.time() < tts_flash_until:
    h, w = frame.shape[:2]
    thickness = 8
    cv2.rectangle(frame, (0, 0), (w - 1, h - 1), (0, 255, 0), thickness)
    cv2.putText(frame, "Speaking...", (10, 75),
                cv2.FONT_HERSHEY_SIMPLEX, 0.8, (0, 255, 255), 2)
else:
    tts_triggered = False
A green border (8 pixels thick) is drawn around the entire frame.
A yellow “Speaking…” label appears below the finger count.
Both persist for 1 second, then disappear automatically.
When the flash timer expires,
tts_triggeredresets toFalse, ready for the next trigger.
This pattern is reusable — you can add the same feedback to any project that triggers TTS.
8. Extension Ideas: Applying This Pattern to Other Projects
The TTS integration pattern you learned here is generic. You can add voice broadcast to any MediaPipe, OpenCV, or YOLO project by following these steps:
Step 1: Import and initialize TTS
from fusion_hat.tts import Espeak
tts = Espeak()
tts.set_amp(200)
Step 2: Add debounce variables (before the loop)
DEBOUNCE_INTERVAL = 1.5
last_tts_time = 0
Step 3: Add key-triggered TTS (inside the loop)
if key == ord('t'):
    now = time.time()
    if now - last_tts_time > DEBOUNCE_INTERVAL:
        last_tts_time = now
        # Build your message from detection results
        tts.say(your_message)
Here are some ideas for applying this pattern:
MediaPipe Face Detection (1. Face Detection) → “Face detected at center of frame”
MediaPipe Pose (7. Human Pose Estimation) → “Both arms raised” or “Squat detected — good form!”
OpenCV Color Tracking (Play with OpenCV (Computer Vision Basics)) → “Red object moving left” or “Target locked”
YOLO Object Detection (Play with YOLO (Object Detection & Training)) → “Person detected” or “Two cars in view”
Hardware Integration → Replace the
tkey with a GPIO button press viafusion_hatfor a completely hands-free experience.
9. Troubleshooting
No sound from the speaker
Make sure the Fusion HAT+ speaker is properly connected and the volume is not muted. Try running a simple TTS test:
sudo python3 -c "from fusion_hat.tts import Espeak; Espeak().say('test')"
If you hear “test”, the TTS engine is working.
TTS triggers too many times when holding the key
Increase
DEBOUNCE_INTERVALto a larger value, for example2.0or2.5seconds.If you want only a single trigger per key press (no repeat when held), track the key state across frames and only fire on the rising edge (key transition from not-pressed to pressed).
Speech sounds too fast or unclear
Lower the speed:
tts.set_speed(120).Adjust the pitch for clarity:
tts.set_pitch(70).Speech overlaps with previous speech
Espeak on Fusion HAT+ queues speech by default. If you want to cancel ongoing speech before starting new speech, you can add a small delay or use a different TTS engine.
Visual flash does not appear
Check that
tts_triggeredis set toTrueinside the debounce block and thattts_flash_untilis set totime.time() + 1.0.
10. Summary
This lesson demonstrated how to add TTS voice broadcast to a MediaPipe computer vision project.
The Fusion HAT+
Espeakengine provides a simple, offline TTS solution on Raspberry Pi.Key design patterns covered:
Triggering TTS by key press (not on every frame)
Debounce protection to prevent speech overlap
Visual feedback (green border flash) for user awareness
Converting detection results into natural spoken messages
These patterns are project-agnostic — you can apply them to any OpenCV, MediaPipe, or YOLO project to add voice output.
Adding voice makes your projects more accessible and hands-free, opening the door to assistive technology applications and interactive installations.