Note
Hello, welcome to the SunFounder Raspberry Pi & Arduino & ESP32 Enthusiasts Community on Facebook! Dive deeper into Raspberry Pi, Arduino, and ESP32 with fellow enthusiasts.
Why Join?
Expert Support: Solve post-sale issues and technical challenges with help from our community and team.
Learn & Share: Exchange tips and tutorials to enhance your skills.
Exclusive Previews: Get early access to new product announcements and sneak peeks.
Special Discounts: Enjoy exclusive discounts on our newest products.
Festive Promotions and Giveaways: Take part in giveaways and holiday promotions.
👉 Ready to explore and create with us? Click [here] and join today!
3. Facial Contours and Iris Detection
1. Overview
In the previous sections, we implemented basic face mesh detection and simple emotion recognition.
This section focuses on the detailed feature connection methods provided by MediaPipe FaceMesh:
FACEMESH_CONTOURS— Draws facial contour lines (face edges and outer feature boundaries)FACEMESH_IRISES— Draws iris regions of both eyes
By drawing only contours and iris regions, the visualization becomes cleaner and more lightweight. This is useful for:
Facial feature extraction
Eye tracking
Pupil tracking
Gaze interaction
2. How it Works
The program performs the following steps:
Initialize the MediaPipe FaceMesh model.
Capture video frames from the Raspberry Pi camera.
Convert the image to RGB format (required by MediaPipe).
Draw facial contour lines using
FACEMESH_CONTOURS.Draw iris landmarks using
FACEMESH_IRISES.Display only key areas for clearer visualization.
3. Run the Code
Important
Before you start, make sure:
The pan-tilt is assembled
You can access the Raspberry Pi desktop
The code package is installed
Fusion HAT+ is installed and configured
OpenCV is installed
For detailed instructions, see 0. Setup OpenCV.
Open the terminal and enter the following command:
sudo python3 ~/ai-lab-kit/mediapipe/mp_face_iris.py
After running the program, a video window titled “Show Video” opens and displays the live camera feed.
When a face appears in front of the camera:
MediaPipe detects facial landmarks in real time.
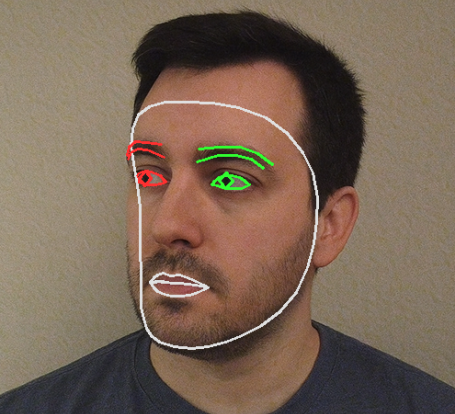
Only the facial contour lines are drawn (face outline, eyebrows, lips, etc.).
The iris regions of both eyes are highlighted with circular landmark connections.
Unlike the full face mesh, the screen shows only key contours and iris features, making the visualization cleaner and less crowded.
As the user moves their head or eyes:
The contour lines follow the face smoothly.
The iris landmarks track eye movement in real time.
If no face is detected, the window continues displaying the normal camera feed without annotations.
Press
qto exit the program. The camera stops and the OpenCV window closes automatically.
4. Complete Code
from picamera2 import Picamera2, Preview
import cv2
import mediapipe.python.solutions.face_mesh as mp_face_mesh
import mediapipe.python.solutions.drawing_utils as drawing
import mediapipe.python.solutions.drawing_styles as drawing_styles

# Initialize FaceMesh model
face = mp_face_mesh.FaceMesh(
    static_image_mode=False,
    max_num_faces=1,
    refine_landmarks=True,
    min_detection_confidence=0.5
)

# Open camera
picam2 = Picamera2()
config = picam2.create_preview_configuration(
   main={"size": (640, 480), "format": "XRGB8888"} ,
)
picam2.configure(config)
# picam2.start_preview(Preview.QTGL) # Enable if hardware preview is needed
picam2.start()

print("Streaming... press 'q' to quit")

while True:
   frame_bgra = picam2.capture_array()
   frame_bgr  = cv2.cvtColor(frame_bgra, cv2.COLOR_BGRA2BGR)

   frame = cv2.cvtColor(frame_bgr, cv2.COLOR_BGR2RGB)
   results = face.process(frame)
   frame = cv2.cvtColor(frame, cv2.COLOR_RGB2BGR)

   if results.multi_face_landmarks:
      for face_landmarks in results.multi_face_landmarks:
         # Draw facial contours
         drawing.draw_landmarks(
               image=frame,
               landmark_list=face_landmarks,
               connections=mp_face_mesh.FACEMESH_CONTOURS,
               landmark_drawing_spec=None,
               connection_drawing_spec=drawing_styles.get_default_face_mesh_contours_style()
         )
         # Draw iris features
         drawing.draw_landmarks(
               image=frame,
               landmark_list=face_landmarks,
               connections=mp_face_mesh.FACEMESH_IRISES,
               landmark_drawing_spec=None,
               connection_drawing_spec=drawing_styles.get_default_face_mesh_iris_connections_style()
         )

   cv2.imshow("Show Video", frame)
   if cv2.waitKey(1) & 0xff == ord('q'):
      break

picam2.stop_preview()
picam2.stop()
cv2.destroyAllWindows()
After running the program, only facial contours and iris regions of both eyes will be displayed on the screen.
5. Key Steps Explanation
The code in this section is almost the same as 1. Face Detection.
The main difference is the drawing method used
inside the main loop. The function draw_landmarks()
is called twice:
Once with
FACEMESH_CONTOURSOnce with
FACEMESH_IRISES
You can comment out either drawing block to observe the difference in visual effect.
FACEMESH_CONTOURS
A connection set provided by MediaPipe.
Mainly draws:
Outer facial contour
Edges of eyes
Nose outline
Lip contours
This method produces a simplified visualization, making it easier to observe facial contour changes.
FACEMESH_IRISES
Draws the iris regions of both eyes.
Includes iris keypoints and circular connection lines.
Useful for:
Eye tracking
Pupil tracking
Gaze detection
landmark_drawing_spec=None
Disables drawing individual landmark points.
Only connection lines are displayed, resulting in a cleaner visual effect.
If you want to display both points and lines,
define a custom DrawingSpec.
drawing_styles.get_default_face_mesh_contours_style()
Returns the default contour drawing style.
drawing_styles.get_default_face_mesh_iris_connections_style()
Returns the default iris connection line style.
6. Troubleshooting
Iris not detected
If the iris is not detected, the lighting may be insufficient, the face may be too far from the camera, or
refine_landmarksmay not be enabled.Improve the lighting, move closer to the camera, and make sure
refine_landmarks=Trueis set when initializing FaceMesh.Contour lines jittery
If the contour lines appear unstable, the detection confidence may be too low, or lighting and head movement may be affecting tracking.
Try increasing
min_detection_confidence, improving lighting, and keeping head movements slower and smoother.High latency
If the video response feels slow, the resolution may be too high or
refine_landmarksmay be consuming additional resources.Reduce the resolution (for example, 320×240), or disable
refine_landmarksif iris detection is not required.
7. Summary
FACEMESH_CONTOURSandFACEMESH_IRISESare two important connection methods provided by MediaPipe.Compared to full mesh drawing, they are more lightweight and intuitive, suitable for practical interaction scenarios.
The next chapter will introduce how to use these features for gaze tracking and blink detection.