Bemerkung
Hallo, willkommen in der SunFounder Raspberry Pi & Arduino & ESP32 Enthusiasten-Community auf Facebook! Tauchen Sie mit anderen Enthusiasten tiefer in Raspberry Pi, Arduino und ESP32 ein.
Warum beitreten?
Expertenunterstützung: Lösen Sie Probleme nach dem Kauf und technische Herausforderungen mit Hilfe unserer Community und unseres Teams.
Lernen & Teilen: Tauschen Sie Tipps und Tutorials aus, um Ihre Fähigkeiten zu verbessern.
Exklusive Vorschauen: Erhalten Sie frühzeitigen Zugang zu neuen Produktankündigungen und Sneak Peeks.
Sonderrabatte: Genießen Sie exklusive Rabatte auf unsere neuesten Produkte.
Festliche Aktionen und Gewinnspiele: Nehmen Sie an Gewinnspielen und Feiertagsaktionen teil.
👉 Bereit, mit uns zu entdecken und zu gestalten? Klicken Sie auf [here] und treten Sie noch heute bei!
2. Emotionserkennung
1. Überblick
In diesem Abschnitt erweitern wir die Face-Mesh-Erkennung, um eine grundlegende Emotionserkennung durchzuführen.
Anstatt Deep-Learning-Modelle zu verwenden, nutzt diese Methode die Geometrie von Gesichts-Landmarks (Augen- und Mundverhältnisse), um Gesichtsausdrücke in Echtzeit zu klassifizieren.
Erkennbare Emotionen:
😮 Überrascht
😀 Glücklich
😢 Traurig
😠 Wütend
😐 Neutral
2. Funktionsweise
Das Programm folgt diesen Schritten:
Verwendung von
Picamera2+MediaPipe FaceMesh, um 468 Landmarks zu erfassen.Auswahl wichtiger Merkmalspunkte rund um Augen und Mund.
Berechnung normalisierter Verhältnisse:
Augenöffnung
Mundbreite
Mundöffnung
Vergleich der Werte mit vordefinierten Schwellenwerten.
Anzeige der erkannten Emotion mit OpenCV.
Vorteile dieses Ansatzes:
Schnell und ressourcenschonend (geeignet für Raspberry Pi)
Kein neuronales Netzwerk erforderlich
Schwellenwerte lassen sich leicht anpassen
3. Code ausführen
Wichtig
Stellen Sie vor dem Start sicher, dass:
das Pan-Tilt-Modul montiert ist
Sie Zugriff auf den Raspberry Pi Desktop haben
das Codepaket installiert ist
das Fusion HAT+ installiert und konfiguriert ist
OpenCV installiert ist
Detaillierte Anweisungen finden Sie unter 0. OpenCV einrichten.
Öffnen Sie das Terminal und geben Sie den folgenden Befehl ein:
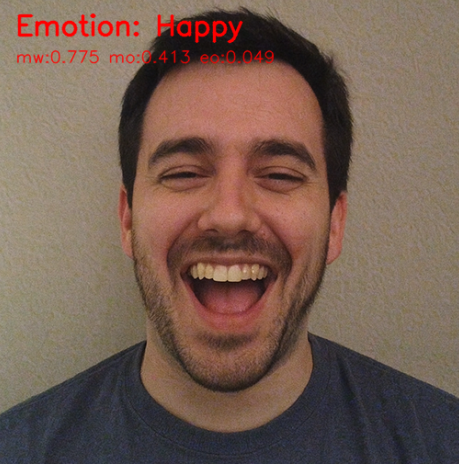
sudo python3 ~/ai-lab-kit/mediapipe/mp_face_emotion.py
Nach dem Start des Programms öffnet sich ein Videofenster und zeigt den Live-Kamerastream an.
Sobald ein Gesicht vor der Kamera erscheint, führt das System folgende Schritte aus:
Erkennt in Echtzeit 468 Gesichts-Landmarks
Berechnet Verhältnisse für Augenöffnung und Mundöffnung
Klassifiziert den aktuellen Gesichtsausdruck
Die erkannte Emotion (z. B.
Happy,Surprised,Sad,AngryoderNeutral) wird im Videofenster angezeigt.Wenn der Benutzer seinen Gesichtsausdruck verändert, wird die Emotionsanzeige sofort aktualisiert.
Wird kein Gesicht erkannt, zeigt das Programm weiterhin den normalen Kamerastream ohne Emotionsanzeige an.
Drücken Sie
q, um das Programm zu beenden. Die Kamera stoppt und das OpenCV-Fenster wird automatisch geschlossen.
4. Vollständiger Code
from picamera2 import Picamera2, Preview
import cv2
import mediapipe.python.solutions.face_mesh as mp_face_mesh
import mediapipe.python.solutions.drawing_utils as drawing
import mediapipe.python.solutions.drawing_styles as drawing_styles
import numpy as np
# --------- Emotion judgment auxiliary function ---------
def euclidean(p1, p2):
return np.linalg.norm(np.array([p1.x, p1.y]) - np.array([p2.x, p2.y]))
def classify_emotion(landmarks):
"""
landmarks: results.multi_face_landmarks[0].landmark (length ~468)
Returns (label, details_dict)
"""
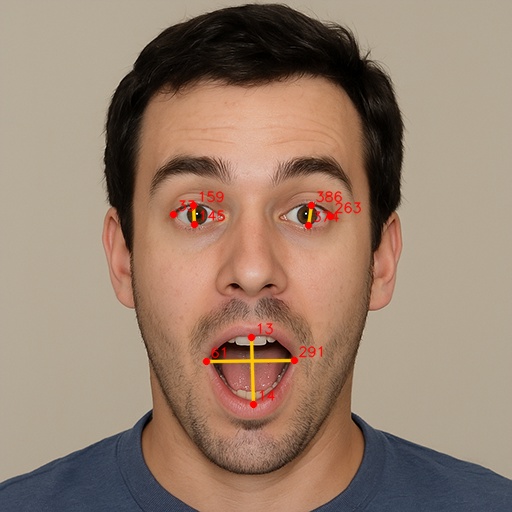
# Keypoint Index (MediaPipe 468 points)
L_EYE_TOP, L_EYE_BOT = 159, 145
R_EYE_TOP, R_EYE_BOT = 386, 374
L_EYE_CENTER, R_EYE_CENTER = 33, 263
MOUTH_LEFT, MOUTH_RIGHT = 61, 291
LIP_UP, LIP_DOWN = 13, 14
# Normalization scale: distance between left and right eye centers
io = euclidean(landmarks[L_EYE_CENTER], landmarks[R_EYE_CENTER])
if io < 1e-6:
return "Neutral", {}
mouth_width = euclidean(landmarks[MOUTH_LEFT], landmarks[MOUTH_RIGHT]) / io
mouth_open = euclidean(landmarks[LIP_UP], landmarks[LIP_DOWN]) / io
eye_open_L = euclidean(landmarks[L_EYE_TOP], landmarks[L_EYE_BOT]) / io
eye_open_R = euclidean(landmarks[R_EYE_TOP], landmarks[R_EYE_BOT]) / io
eye_open = 0.5 * (eye_open_L + eye_open_R)
# --------- Simple threshold rules (adjustable) ---------
if mouth_open > 0.08 and eye_open > 0.055:
label = "Surprised"
elif mouth_width > 0.48 and mouth_open > 0.035:
label = "Happy"
elif mouth_open < 0.018 and mouth_width < 0.36 and eye_open < 0.03:
label = "Sad"
elif mouth_open < 0.02 and eye_open < 0.028:
label = "Angry"
else:
label = "Neutral"
details = {
"mouth_width": round(mouth_width, 3),
"mouth_open": round(mouth_open, 3),
"eye_open": round(eye_open, 3),
}
return label, details
# Initialize FaceMesh
face = mp_face_mesh.FaceMesh(
static_image_mode=False,
max_num_faces=1,
refine_landmarks=True,
min_detection_confidence=0.5
)
# Open camera
picam2 = Picamera2()
config = picam2.create_preview_configuration(
main={"size": (640, 480), "format": "XRGB8888"} ,
)
picam2.configure(config)
picam2.start()
print("Streaming... press 'q' to quit")
while True:
frame_bgra = picam2.capture_array()
frame_bgr = cv2.cvtColor(frame_bgra, cv2.COLOR_BGRA2BGR)
frame = cv2.cvtColor(frame_bgr, cv2.COLOR_BGR2RGB)
results = face.process(frame)
frame = cv2.cvtColor(frame, cv2.COLOR_RGB2BGR)
if results.multi_face_landmarks:
for face_landmarks in results.multi_face_landmarks:
drawing.draw_landmarks(
image=frame,
landmark_list=face_landmarks,
connections=mp_face_mesh.FACEMESH_TESSELATION,
landmark_drawing_spec=drawing.DrawingSpec(thickness=1, circle_radius=1),
connection_drawing_spec=drawing_styles.get_default_face_mesh_tesselation_style()
)
# --------- Emotion detection ---------
label, metrics = classify_emotion(face_landmarks.landmark)
# Draw emotion label on the frame
cv2.putText(frame, f"Emotion: {label}", (20, 40),
cv2.FONT_HERSHEY_SIMPLEX, 1.0, (0, 0, 255), 2, cv2.LINE_AA)
# Debug information
dbg = f"mw:{metrics.get('mouth_width',0)} mo:{metrics.get('mouth_open',0)} eo:{metrics.get('eye_open',0)}"
cv2.putText(frame, dbg, (20, 70),
cv2.FONT_HERSHEY_SIMPLEX, 0.6, (0, 0, 255), 1, cv2.LINE_AA)
cv2.imshow("Show Video", frame)
if cv2.waitKey(1) & 0xff == ord('q'):
break
picam2.stop_preview()
picam2.stop()
cv2.destroyAllWindows()
After running, the recognized emotion category will be displayed in real-time on the camera feed, along with debug information including mouth width, mouth openness, eye openness, etc.
5. Key Steps Explanation
Select key points
# Keypoint Index (MediaPipe 468 points)
L_EYE_TOP, L_EYE_BOT = 159, 145
R_EYE_TOP, R_EYE_BOT = 386, 374
L_EYE_CENTER, R_EYE_CENTER = 33, 263
MOUTH_LEFT, MOUTH_RIGHT = 61, 291
LIP_UP, LIP_DOWN = 13, 14
These indices correspond to:
159, 145 → Upper and lower edges of the left eye
386, 374 → Upper and lower edges of the right eye
33, 263 → Eye centers (used for normalization)
61, 291 → Mouth corners
13, 14 → Upper and lower lip midpoints
Normalize distances
To reduce the influence of camera distance, use the distance between the two eye centers as the normalization scale.
def euclidean(p1, p2):
    return np.linalg.norm(
        np.array([p1.x, p1.y]) -
        np.array([p2.x, p2.y])
    )

io = euclidean(
    landmarks[L_EYE_CENTER],
    landmarks[R_EYE_CENTER]
)
Calculate geometric features
mouth_width = euclidean(
    landmarks[MOUTH_LEFT],
    landmarks[MOUTH_RIGHT]
) / io

mouth_open = euclidean(
    landmarks[LIP_UP],
    landmarks[LIP_DOWN]
) / io

eye_open_L = euclidean(
    landmarks[L_EYE_TOP],
    landmarks[L_EYE_BOT]
) / io

eye_open_R = euclidean(
    landmarks[R_EYE_TOP],
    landmarks[R_EYE_BOT]
) / io

eye_open = 0.5 * (eye_open_L + eye_open_R)
Calculated features:
mouth_width→ Horizontal mouth widthmouth_open→ Vertical mouth openingeye_open→ Average eye openness
Classify emotion using thresholds
if mouth_open > 0.08 and eye_open > 0.055:
    label = "Surprised"
elif mouth_width > 0.48 and mouth_open > 0.035:
    label = "Happy"
elif mouth_open < 0.018 and mouth_width < 0.36 and eye_open < 0.03:
    label = "Sad"
elif mouth_open < 0.02 and eye_open < 0.028:
    label = "Angry"
else:
    label = "Neutral"
Emotion rules (empirical thresholds):
Surprised → Mouth and eyes are wide open
Happy → Mouth wide, eyes normal
Sad / Angry → Mouth and eyes mostly closed
Neutral → Does not match other conditions
6. Threshold and Robustness Adjustment
Thresholds like
0.08,0.035,0.018are based on empirical values at 640×480 resolution.If the camera is closer or the resolution is different, adjust the thresholds using the debug information (mw/mo/eo).
Emotion judgment logic can be modified to be more complex or use trained models for higher accuracy, such as calculating the relative position of mouth corners, mouth shape, and other features.
7. Troubleshooting
Emotion recognition not sensitive
Thresholds may not match the current camera distance. Adjust
mouth_openandeye_openvalues.Detection latency
Resolution may be too high. Reduce resolution or disable
refine_landmarks.Cannot recognize emotion
Lighting may be insufficient or the face angle is skewed. Improve lighting and face the camera directly.
8. Summary
This chapter implemented lightweight emotion recognition based on geometric features + FaceMesh landmarks.
Offers advantages of high real-time performance and adjustable thresholds.
Can be used in projects like interactive art, HCI, classroom/meeting state detection.