注釈
こんにちは、SunFounderのRaspberry Pi & Arduino & ESP32愛好家コミュニティへようこそ!Facebook上でRaspberry Pi、Arduino、ESP32についてもっと深く掘り下げ、他の愛好家と交流しましょう。
参加する理由は?
エキスパートサポート:コミュニティやチームの助けを借りて、販売後の問題や技術的な課題を解決します。
学び&共有:ヒントやチュートリアルを交換してスキルを向上させましょう。
独占的なプレビュー:新製品の発表や先行プレビューに早期アクセスしましょう。
特別割引:最新製品の独占割引をお楽しみください。
祭りのプロモーションとギフト:ギフトや祝日のプロモーションに参加しましょう。
👉 私たちと一緒に探索し、創造する準備はできていますか?[ここ]をクリックして今すぐ参加しましょう!
1.1.5 4桁 7セグメントディスプレイ
概要
次に、4桁の7セグメントディスプレイを制御してみましょう。
必要な部品
このプロジェクトには、次のコンポーネントが必要です。

一式を購入するのが便利です、こちらがリンクです:
名前 |
このキットのアイテム |
リンク |
|---|---|---|
Raphael Kit |
337 |
以下のリンクから別々に購入することもできます。
コンポーネントの紹介 |
購入リンク |
|---|---|
- |
|
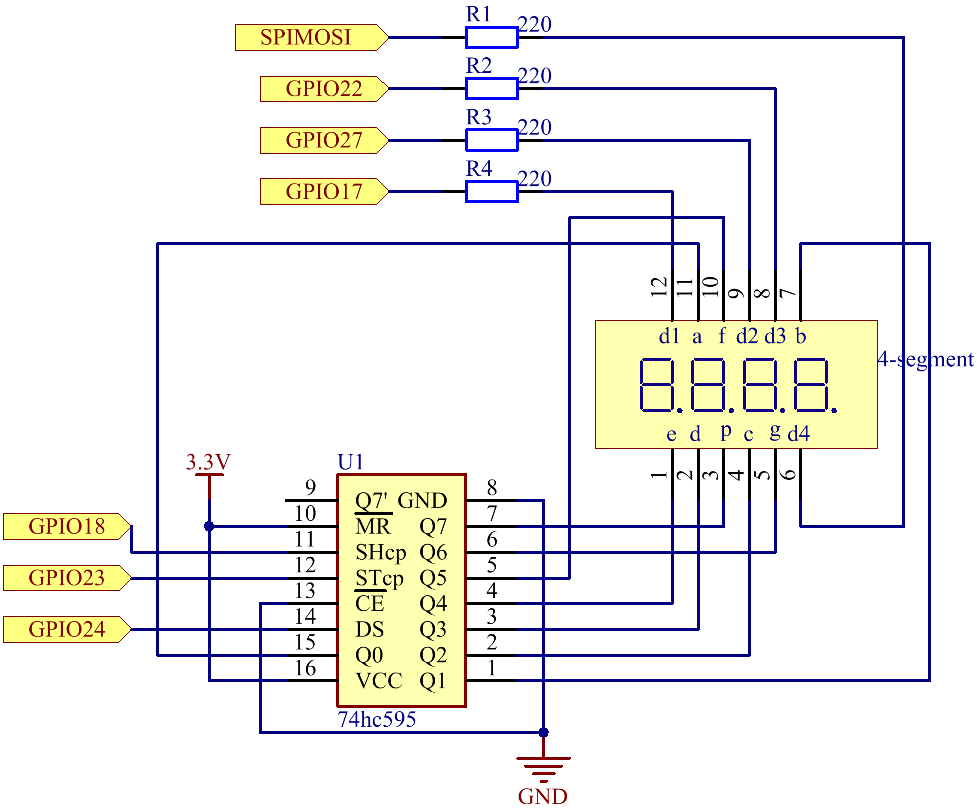
回路図
T-Board Name |
physical |
BCM |
GPIO17 |
Pin 11 |
17 |
GPIO27 |
Pin 13 |
27 |
GPIO22 |
Pin 15 |
22 |
SPIMOSI |
Pin 19 |
10 |
GPIO18 |
Pin 12 |
18 |
GPIO23 |
Pin 16 |
23 |
GPIO24 |
Pin 18 |
24 |
実験手順
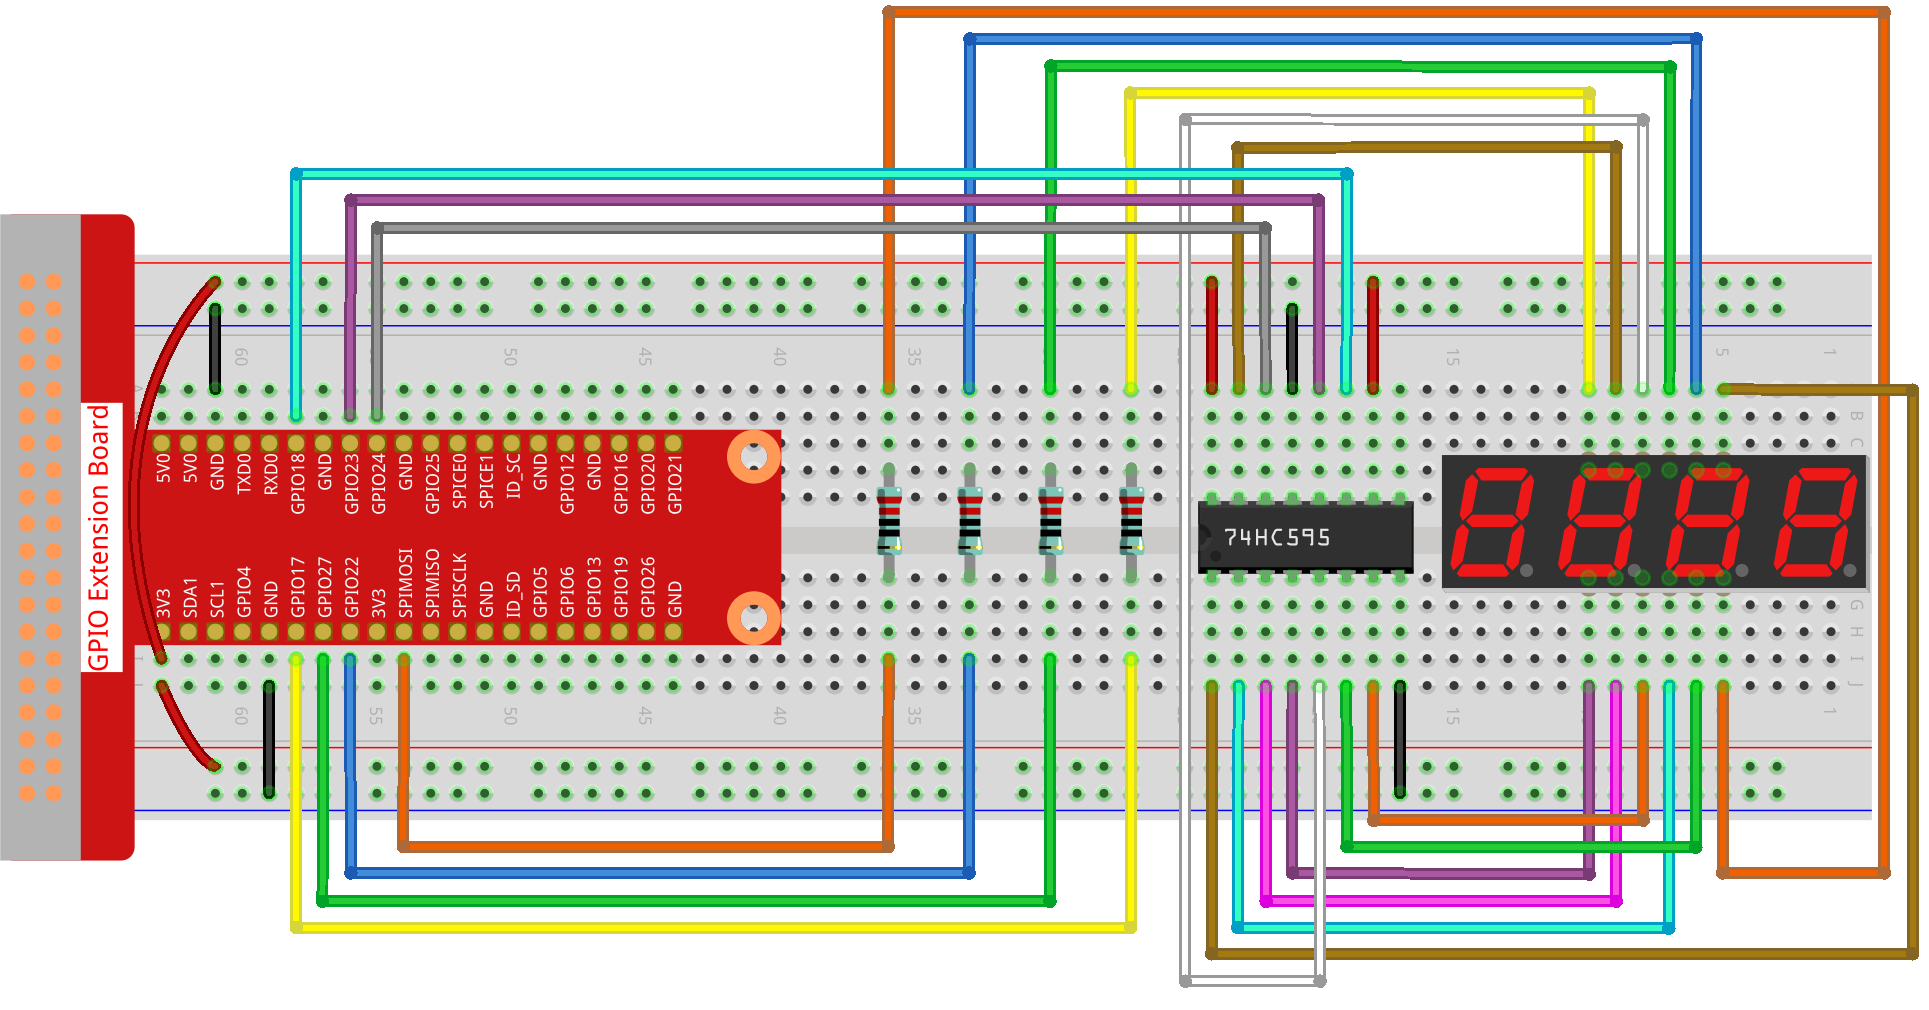
ステップ1: 回路を組み立てます。
ステップ2: コードのフォルダに移動します。
cd ~/raphael-kit/python-pi5
ステップ3: 実行します。
sudo python3 1.1.5_4-Digit_zero.py
コードを実行した後、プログラムはカウントを1秒ごとに増やし、4桁のディスプレイにカウントを表示します。
警告
エラー メッセージ RuntimeError: Cannot determine SOC peripheral base address が表示された場合は、 「gpiozero」が動作しない場合。 を参照してください。
コード
注釈
以下のコードは 変更/リセット/コピー/実行/停止 することができます。ただし、それを行う前に「raphael-kit/python_5」というソースコードのパスに移動する必要があります。コードを変更した後、そのまま実行して効果を確認できます。問題がないことを確認したら、修正されたコードをコピーするためのCopyボタンを使用し、ターミナルで「nano」コマンドを使用してソースコードを開き、コードを貼り付けることができます。
#!/usr/bin/env python3
from gpiozero import OutputDevice
import time
import threading

# Define GPIO pins for the 74HC595 shift register
SDI = OutputDevice(24)   # Serial Data Input
RCLK = OutputDevice(23)  # Register Clock
SRCLK = OutputDevice(18) # Shift Register Clock

# Define GPIO pins for digit selection on the 7-segment display
placePin = [OutputDevice(pin) for pin in (10, 22, 27, 17)]

# Define segment codes for numbers 0-9 for the 7-segment display
number = (0xc0, 0xf9, 0xa4, 0xb0, 0x99, 0x92, 0x82, 0xf8, 0x80, 0x90)

counter = 0  # Initialize counter for display
timer1 = 0   # Initialize timer for counter increment

def clearDisplay():
    """ Clear the 7-segment display. """
    for _ in range(8):
        SDI.on()
        SRCLK.on()
        SRCLK.off()
    RCLK.on()
    RCLK.off()

def hc595_shift(data):
    """ Shift a byte of data to the 74HC595 shift register. """
    for i in range(8):
        SDI.value = 0x80 & (data << i)  # Set SDI high/low based on data bit
        SRCLK.on()  # Pulse the Shift Register Clock
        SRCLK.off()
    RCLK.on()  # Latch data on the output by pulsing Register Clock
    RCLK.off()

def pickDigit(digit):
    """ Select a digit for display on the 7-segment display. """
    for pin in placePin:
        pin.off()  # Turn off all digit selection pins
    placePin[digit].on()  # Turn on the selected digit

def timer():
    """ Timer function to increment the counter every second. """
    global counter, timer1
    timer1 = threading.Timer(1.0, timer)  # Reset timer for next increment
    timer1.start()
    counter += 1  # Increment counter
    print("%d" % counter)  # Print current counter value

def setup():
    """ Setup initial state and start the timer. """
    global timer1
    timer1 = threading.Timer(1.0, timer)  # Initialize and start the timer
    timer1.start()

def loop():
    """ Main loop to update the 7-segment display with counter value. """
    global counter
    while True:
        for i in range(4):  # Loop through each digit
            clearDisplay()  # Clear display before setting new digit
            pickDigit(i)    # Select digit for display

            # Choose the digit of counter to display
            digit = (counter // (10 ** i)) % 10

            hc595_shift(number[digit])  # Shift digit value to 74HC595
            time.sleep(0.001)  # Short delay for display stability

def destroy():
    """ Cleanup GPIO resources and stop timer on exit. """
    global timer1
    timer1.cancel()  # Stop the timer
    for device in [SDI, RCLK, SRCLK] + placePin:
        device.close()  # Close GPIO devices

try:
    setup()  # Initialize the setup
    while True:
        loop()  # Start the main loop

except KeyboardInterrupt:
    # Handle script interruption (e.g., Ctrl+C)
    destroy()  # Cleanup resources on exit
コードの説明
これら4つのピンは、4桁7セグメント表示器の共通アノードピンを制御します。
# Define GPIO pins for digit selection on the 7-segment display
placePin = [OutputDevice(pin) for pin in (10, 22, 27, 17)]
0から9までのセグメントコード配列(共通アノード)を16進数で。
# Define segment codes for numbers 0-9 for the 7-segment display
number = (0xc0, 0xf9, 0xa4, 0xb0, 0x99, 0x92, 0x82, 0xf8, 0x80, 0x90)
毎秒`timer`関数をトリガーするタイマーを初期化します。これにより、繰り返しカウンターの増分が設定されます。
def setup():
    """ Setup initial state and start the timer. """
    global timer1
    timer1 = threading.Timer(1.0, timer)  # Initialize and start the timer
    timer1.start()
タイマーが1.0秒に達すると、タイマー関数が呼び出されます。カウンターに1を加え、タイマーは自身を再度毎秒実行するために使用されます。
def timer():
    """ Timer function to increment the counter every second. """
    global counter, timer1
    timer1 = threading.Timer(1.0, timer)  # Reset timer for next increment
    timer1.start()
    counter += 1  # Increment counter
    print("%d" % counter)  # Print current counter value
74HC595シフトレジスタに1バイトのデータをシフトし、表示セグメントを制御します。
def hc595_shift(data):
    """ Shift a byte of data to the 74HC595 shift register. """
    for i in range(8):
        SDI.value = 0x80 & (data << i)  # Set SDI high/low based on data bit
        SRCLK.on()  # Pulse the Shift Register Clock
        SRCLK.off()
    RCLK.on()  # Latch data on the output by pulsing Register Clock
    RCLK.off()
現在のカウンター値を表示し、各桁を順番に表示することでディスプレイを連続的に更新します。
def loop():
    """ Main loop to update the 7-segment display with counter value. """
    global counter
    while True:
        for i in range(4):  # Loop through each digit
            clearDisplay()  # Clear display before setting new digit
            pickDigit(i)    # Select digit for display
            digit = (counter // (10 ** i)) % 10
            hc595_shift(number[digit])  # Shift digit value to 74HC595
            time.sleep(0.001)  # Short delay for display stability
次の桁を表示する前に、すべてのセグメントをオフにして7セグメント表示をクリアします。
def clearDisplay():
    """ Clear the 7-segment display. """
    for _ in range(8):
        SDI.on()
        SRCLK.on()
        SRCLK.off()
    RCLK.on()
    RCLK.off()
7セグメント表示のどの桁をアクティブにするかを選択します。各桁は別々のGPIOピンによって制御されます。
def pickDigit(digit):
    """ Select a digit for display on the 7-segment display. """
    for pin in placePin:
        pin.off()  # Turn off all digit selection pins
    placePin[digit].on()  # Turn on the selected digit
プログラムが中断されたときに、GPIOリソースを適切に解放し、タイマーを停止します。
except KeyboardInterrupt:
    # Handle script interruption (e.g., Ctrl+C)
    destroy()  # Cleanup resources on exit