注釈
こんにちは、SunFounderのRaspberry Pi & Arduino & ESP32愛好家コミュニティへようこそ!Facebook上でRaspberry Pi、Arduino、ESP32についてもっと深く掘り下げ、他の愛好家と交流しましょう。
参加する理由は?
エキスパートサポート:コミュニティやチームの助けを借りて、販売後の問題や技術的な課題を解決します。
学び&共有:ヒントやチュートリアルを交換してスキルを向上させましょう。
独占的なプレビュー:新製品の発表や先行プレビューに早期アクセスしましょう。
特別割引:最新製品の独占割引をお楽しみください。
祭りのプロモーションとギフト:ギフトや祝日のプロモーションに参加しましょう。
👉 私たちと一緒に探索し、創造する準備はできていますか?[ここ]をクリックして今すぐ参加しましょう!
1.1.2 RGB LED
概要
このプロジェクトでは、RGB LEDを制御してさまざまな色を点滅させます。
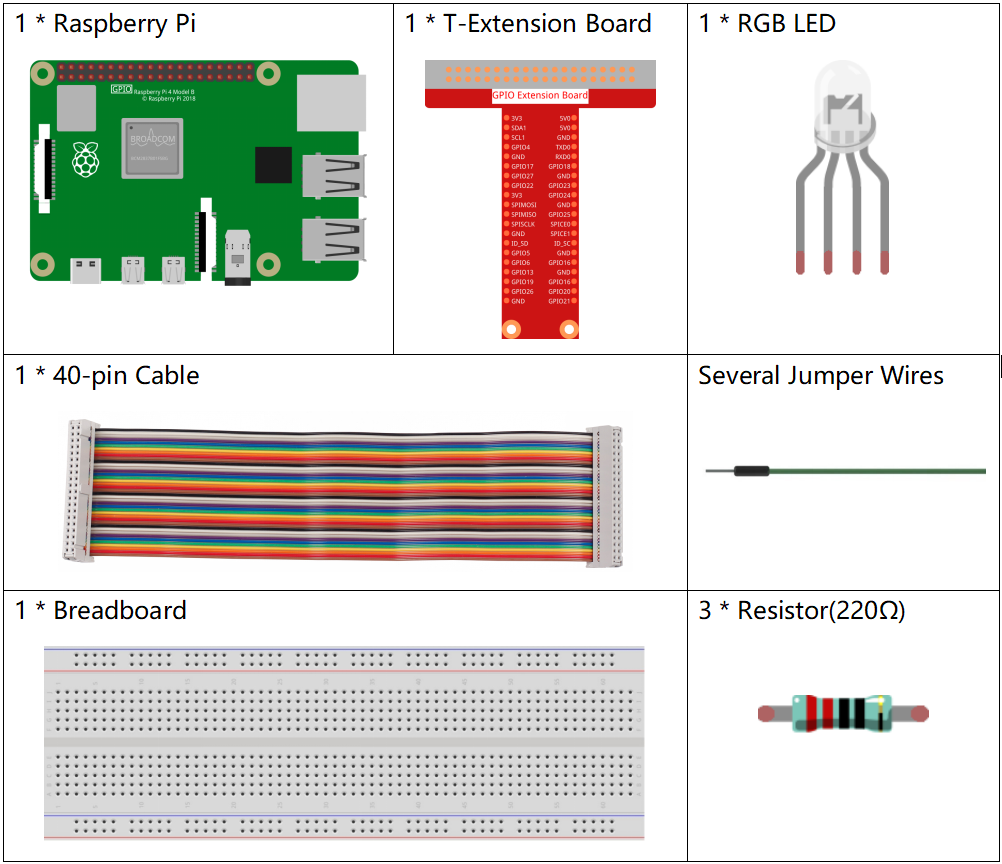
必要な部品
このプロジェクトには、次のコンポーネントが必要です。
一式を購入するのが便利です、こちらがリンクです:
名前 |
このキットのアイテム |
リンク |
|---|---|---|
Raphael Kit |
337 |
以下のリンクから別々に購入することもできます。
コンポーネントの紹介 |
購入リンク |
|---|---|
回路図
R、G、およびBのピンを電流制限抵抗に接続した後、それぞれをGPIO17、GPIO18、GPIO27に接続します。LEDの最長のピン(GND)をRaspberry PiのGNDに接続します。これらの3つのピンに異なるPWM値を与えると、RGB LEDは異なる色を表示します。
T-Board Name |
physical |
BCM |
GPIO17 |
Pin 11 |
17 |
GPIO18 |
Pin 12 |
18 |
GPIO27 |
Pin 13 |
27 |

実験手順
ステップ1: 回路を組み立てます。

ステップ2: コードファイルを開きます。
cd ~/raphael-kit/python-pi5
ステップ3: 実行します。
sudo python3 1.1.2_rgbLed_zero.py
コードを実行した後、RGB LEDが赤、緑、青、黄、ピンク、シアンを表示するのを確認できます。
警告
エラー メッセージ RuntimeError: Cannot determine SOC peripheral base address が表示された場合は、 「gpiozero」が動作しない場合。 を参照してください。
コード
注釈
下記のコードは 変更/リセット/コピー/実行/停止 が可能です。ただし、それを行う前に、ソースコードのパス、例えば raphael-kit/python_5 に移動する必要があります。コードを変更した後、その効果を直接確認することができます。
#!/usr/bin/env python3
from gpiozero import RGBLED
from time import sleep

# Define a list of colors for the RGB LED in RGB format (Red, Green, Blue).
# Each color component ranges from 0 (off) to 1 (full intensity).
COLORS = [(1, 0, 0), (0, 1, 0), (0, 0, 1), (1, 1, 0), (1, 0, 1), (0, 1, 1)]

# Initialize an RGB LED. Connect the red component to GPIO 17, green to GPIO 18, and blue to GPIO 27.
rgb_led = RGBLED(red=17, green=18, blue=27)

try:
    # Continuously cycle through the defined colors.
    while True:
        for color in COLORS:
            # Set the RGB LED to the current color.
            rgb_led.color = color
            # Output the current color to the console.
            print(f"Color set to: {color}")
            # Wait for 1 second before switching to the next color.
            sleep(1)

except KeyboardInterrupt:
    # Handle a KeyboardInterrupt (Ctrl+C) to exit the loop gracefully.
    # GPIO cleanup will be managed automatically by GPIO Zero on script termination.
    pass
コードの説明
これはRGB LEDを制御するための
gpiozeroライブラリからRGBLEDクラスをインポートし、コード内で遅延を実装するためのtimeライブラリをインポートしています。#!/usr/bin/env python3 from gpiozero import RGBLED from time import sleep # Define a list of colors for the RGB LED in RGB format (Red, Green, Blue). # Each color component ranges from 0 (off) to 1 (full intensity).
COLORSリストにはRGB形式で異なる色を表すタプルが含まれています。R、G、Bピンに異なるパルス幅変調(PWM)値をrgb_led.color属性を介して割り当てることにより、LEDはさまざまな色を生成できます。PWM値は0から1までの範囲で、0は無強度(オフ)を表し、各色成分のフル強度を表すのは1です。例えば、
rgb_led.color = (1, 0, 0)を設定すると、LEDは赤に点灯します。これは赤成分にフル強度を設定し、緑と青をオフにしています。同様に、これらの値の異なる組み合わせによって異なる色が表示されます。PWMを介した色の混合は、RGB LEDで幅広い色の範囲を作成するための技術です。COLORS = [(1, 0, 0), (0, 1, 0), (0, 0, 1), (1, 1, 0), (1, 0, 1), (0, 1, 1)]
RGB LEDは、その赤、緑、青の成分をそれぞれGPIOピン17、18、27に接続して初期化されます。
# Initialize an RGB LED. Connect the red component to GPIO 17, green to GPIO 18, and blue to GPIO 27.
rgb_led = RGBLED(red=17, green=18, blue=27)
while True:ループはCOLORSで定義された色を連続してサイクルします。各色に対して、rgb_led.color = colorはLEDをその色に設定し、sleep(1)は1秒間の一時停止を行います。try: # Continuously cycle through the defined colors. while True: for color in COLORS: # Set the RGB LED to the current color. rgb_led.color = color # Output the current color to the console. print(f"Color set to: {color}") # Wait for 1 second before switching to the next color. sleep(1)
このセクションは
KeyboardInterrupt(Ctrl+Cを押すなど)を優雅に処理します。passステートメントは、中断時に特定のアクションを指定しないことを示すプレースホルダとして使用され、GPIO ZeroはGPIOのクリーンアップを自動的に処理します。except KeyboardInterrupt: # Handle a KeyboardInterrupt (Ctrl+C) to exit the loop gracefully. # GPIO cleanup will be managed automatically by GPIO Zero on script termination. pass