Note
Hello, welcome to the SunFounder Raspberry Pi & Arduino & ESP32 Enthusiasts Community on Facebook! Dive deeper into Raspberry Pi, Arduino, and ESP32 with fellow enthusiasts.
Why Join?
Expert Support: Solve post-sale issues and technical challenges with help from our community and team.
Learn & Share: Exchange tips and tutorials to enhance your skills.
Exclusive Previews: Get early access to new product announcements and sneak peeks.
Special Discounts: Enjoy exclusive discounts on our newest products.
Festive Promotions and Giveaways: Take part in giveaways and holiday promotions.
👉 Ready to explore and create with us? Click [here] and join today!
Test Grayscale Module
PiCar-X includes a Grayscale module for implementing line-following, cliff detection, and other fun experiments. The Grayscale module has three detection sensors that will each report a value according to the shade of color detected by the sensor. For example, a sensor reading the shade of pure black will return a value of “0”.
TIPS

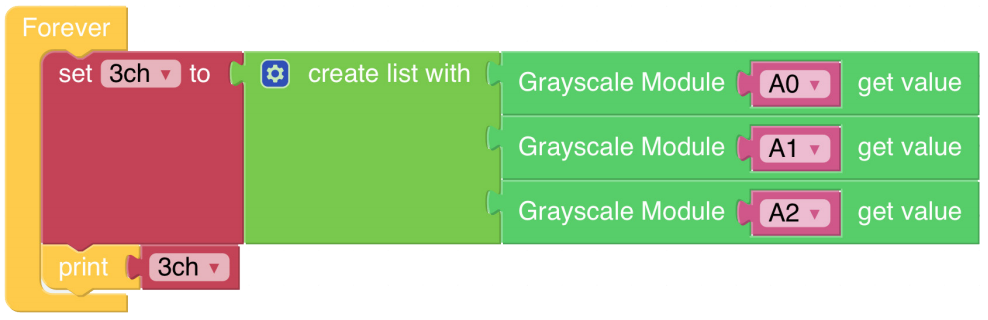
Use the Grayscale module block to read the value of one of the sensors. In the example above, the “A0” sensor is the sensor on the far left of the PiCar-X. Use the drop-down arrow to change the sensor to “A1” (center sensor), or “A2” (far right sensor).

The program is simplified with a create list with block. A List is used in the same way as a single Variable, but in this case a List is more efficient than a single Variable because the Grayscale module will be reporting more than one sensor value. The create list with block will create separate Variables for each sensor, and put them into a List.
EXAMPLE
Note
You can write the program according to the following picture, please refer to the tutorial: How to Create a New Project?.
Or find the code with the same name on the Examples page of the EzBlock Studio and click Run or Edit directly.