注釈
こんにちは、SunFounderのRaspberry Pi & Arduino & ESP32愛好家コミュニティへようこそ!Facebook上でRaspberry Pi、Arduino、ESP32についてもっと深く掘り下げ、他の愛好家と交流しましょう。
参加する理由は?
エキスパートサポート:コミュニティやチームの助けを借りて、販売後の問題や技術的な課題を解決します。
学び&共有:ヒントやチュートリアルを交換してスキルを向上させましょう。
独占的なプレビュー:新製品の発表や先行プレビューに早期アクセスしましょう。
特別割引:最新製品の独占割引をお楽しみください。
祭りのプロモーションとギフト:ギフトや祝日のプロモーションに参加しましょう。
👉 私たちと一緒に探索し、創造する準備はできていますか?[ ここ]をクリックして今すぐ参加しましょう!
WeatherTime スクリーン
このスケッチはWi-Fiネットワークに接続し、毎分OpenWeatherMapから天気データを取得し、NTPサーバーから現在時刻を取得し、OLEDスクリーンに日付、時刻、天気情報を表示します。
必要なコンポーネント
このプロジェクトには以下のコンポーネントが必要です。
全体のキットを購入すると便利です。こちらがリンクです:
名称 |
このキットのアイテム数 |
リンク |
|---|---|---|
Elite Explorer Kit |
300+ |
以下のリンクから別々に購入することもできます。
コンポーネント紹介 |
購入リンク |
|---|---|
- |
|
配線図

回路図

OpenWeather
OpenWeather APIキーの取得
OpenWeather は、OpenWeather Ltdが所有するオンラインサービスで、API経由でグローバルな天気データを提供しています。これには、現在の天気データ、予報、ナウキャスト、歴史的天気データが任意の地理的位置に含まれます。
OpenWeatherにログインするか、アカウントを作成します。
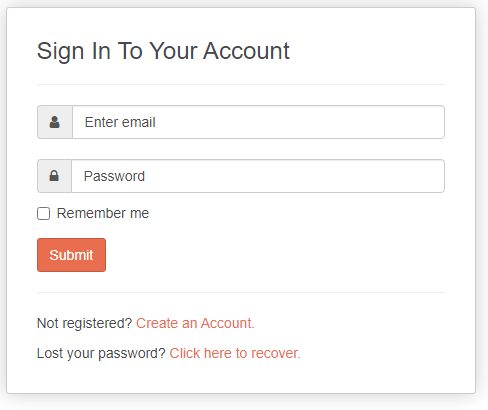
ナビゲーションバーからAPIページに移動します。

Current Weather Data を見つけて、サブスクライブをクリックします。

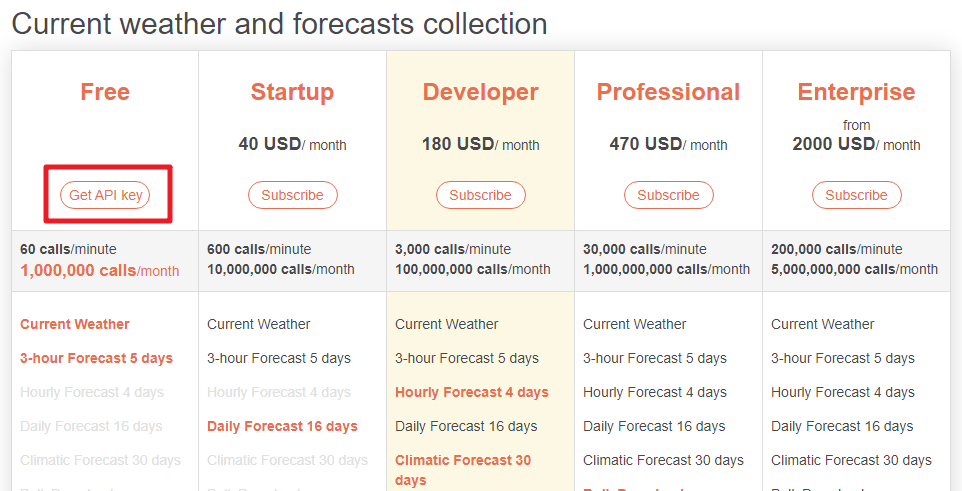
Current weather and forecasts collection の下で、適切なサービスにサブスクライブします。私たちのプロジェクトでは、Freeで十分です。
API keys ページからキーをコピーします。
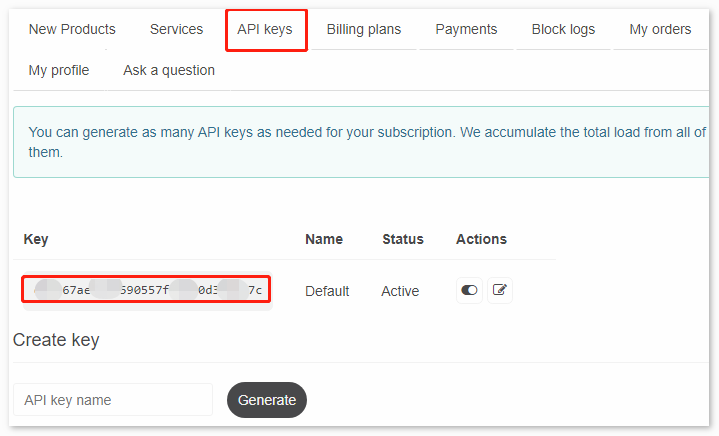
それを
arduino_secrets.hにコピーします。#define SECRET_SSID "<SSID>" // your network SSID (name) #define SECRET_PASS "<PASSWORD>" // your network password #define API_KEY "<OpenWeather_API_KEY>" #define LOCATION "<YOUR CITY>"
あなたの場所のタイムゾーンを設定します。
スウェーデンの首都ストックホルムを例に取ります。Googleで「stockholm timezone」と検索します。

検索結果で、「GMT+1」を見ることができますので、以下の関数のパラメータを
3600 * 1秒に設定します。timeClient.setTimeOffset(3600 * 1); // Adjust for your time zone (this is +1 hour)
ライブラリのインストール
ライブラリをインストールするには、Arduinoライブラリマネージャーを使用し、「ArduinoMqttClient」、「FastLED」、「Adafruit GFX」、「Adafruit SSD1306」を検索してインストールします。
ArduinoJson.h:JSONデータ(openweathermapから取得されたデータ)を扱うために使用します。
NTPClient.h:リアルタイムの時間を取得するために使用します。
Adafruit_GFX.h、 Adafruit_SSD1306.h:OLEDモジュール用に使用します。
コードの実行
注釈
ファイル
06_weather_oled.inoをelite-explorer-kit-main\iot_project\06_weather_oledのパスから直接開くことができます。または、このコードをArduino IDEにコピーしてください。
注釈
コード内で、SSIDとパスワードは arduino_secrets.h に格納されています。この例をアップロードする前に、自分のWiFiの認証情報でそれらを修正する必要があります。さらに、コードを共有または保存する際には、この情報を機密に保つためのセキュリティ対策を講じてください。
#define SECRET_SSID "your_ssid"        // your network SSID (name)
#define SECRET_PASS "your_password"        // your network password (use for WPA, or use as key for WEP)
#define API_KEY "your_key"
#define LOCATION "your_location"
  1/*
  2  The code fetches and shows weather information such as temperature, humidity, pressure,
  3  and wind details. This information is obtained from the OpenWeatherMap API through a WiFi
  4  connection. The program initially connects to the WiFi network and retrieves the current
  5  time from an NTP server. It then regularly sends HTTP requests to retrieve weather data
  6  from the OpenWeatherMap API. Upon receiving a JSON response, it parses the data and displays
  7  both the weather information and current time on the OLED screen.
  8
  9  Board: Arduino Uno R4 WiFi
 10  Component: OLED
 11  Library: https://github.com/bblanchon/ArduinoJson (ArduinoJson by Benoit Blanchon)
 12           https://github.com/adafruit/Adafruit_SSD1306 (Adafruit SSD1306 by Adafruit)
 13           https://github.com/adafruit/Adafruit-GFX-Library (Adafruit GFX Library by Adafruit)
 14           https://github.com/arduino-libraries/NTPClient (NTPClient by Fabrice Weinberg)
 15
 16*/
 17
 18#include "WiFiS3.h"
 19#include <ArduinoJson.h>  // JSON decoding library
 20#include "arduino_secrets.h"
 21
 22// NTP client setup to get real-time data
 23#include <NTPClient.h>
 24#include <WiFiUdp.h>
 25WiFiUDP ntpUDP;
 26NTPClient timeClient(ntpUDP, "pool.ntp.org");  // NTP server
 27
 28// Declaration for an SSD1306 display connected to I2C (SDA, SCL pins)
 29#include <SPI.h>
 30#include <Wire.h>
 31#include <Adafruit_GFX.h>
 32#include <Adafruit_SSD1306.h>
 33#define SCREEN_WIDTH 128  // OLED display width, in pixels
 34#define SCREEN_HEIGHT 64  // OLED display height, in pixels
 35#define OLED_RESET 4      // Reset pin # (or -1 if sharing Arduino reset pin)
 36Adafruit_SSD1306 display(SCREEN_WIDTH, SCREEN_HEIGHT, &Wire, OLED_RESET);
 37
 38// WiFi credentials and server information
 39char ssid[] = SECRET_SSID;  // your network SSID (name)
 40char pass[] = SECRET_PASS;  // your network password
 41int status = WL_IDLE_STATUS;
 42char server[] = "api.openweathermap.org";  // name address for OWM (using DNS)
 43
 44// Timing variables to manage update intervals
 45unsigned long lastConnectionTime = 0;               // last time you connected to the server, in milliseconds
 46const unsigned long postingInterval = 60L * 1000L;  // delay between updates, in milliseconds
 47
 48// WiFi client for connecting to the API server
 49WiFiClient client;
 50
 51void setup() {
 52  //Initialize serial and wait for port to open:
 53  Serial.begin(9600);
 54  while (!Serial) {
 55    ;  // wait for serial port to connect. Needed for native USB port only
 56  }
 57
 58  // check for the WiFi module:
 59  if (WiFi.status() == WL_NO_MODULE) {
 60    Serial.println("Communication with WiFi module failed!");
 61    // don't continue
 62    while (true)
 63      ;
 64  }
 65
 66  String fv = WiFi.firmwareVersion();
 67  if (fv < WIFI_FIRMWARE_LATEST_VERSION) {
 68    Serial.println("Please upgrade the firmware");
 69  }
 70
 71  // attempt to connect to WiFi network:
 72  while (status != WL_CONNECTED) {
 73    Serial.print("Attempting to connect to SSID: ");
 74    Serial.println(ssid);
 75    status = WiFi.begin(ssid, pass);
 76    delay(5000);  // Wait 5 seconds before retrying
 77  }
 78
 79  printWifiStatus();
 80
 81  // Initialize and clear OLED display
 82  display.begin(SSD1306_SWITCHCAPVCC, 0x3C);
 83  display.display();
 84  display.clearDisplay();
 85
 86  // Initialize and clear OLED display
 87  timeClient.begin();
 88  timeClient.setTimeOffset(3600 * 8);  // Adjust for your time zone (this is +8 hour)
 89}
 90
 91void loop() {
 92
 93  read_response();
 94  timeClient.update();
 95
 96  // Check if it's time to send a new request
 97  if (!lastConnectionTime || millis() - lastConnectionTime > postingInterval) {
 98    httpRequest();
 99  }
100}
101
102
103void read_response() {
104  uint32_t received_data_num = 0;
105  String payload = "";
106  bool jsonDetected = false;
107
108  // Read data from the client connection
109  while (client.available()) {
110    /* actual data reception */
111    char c = client.read();
112
113    // for debug
114    Serial.print(c);
115
116    if ('{' == c) {
117      jsonDetected = true;
118    }
119    if (jsonDetected) {
120      payload += c;
121    }
122    received_data_num++;
123  }
124  if (jsonDetected) {
125    /* print data to serial port */
126    // Serial.print("data num : ");
127    // Serial.println(received_data_num);
128    // Serial.print("data : ");
129    // Serial.println(payload);
130    DynamicJsonDocument root(1024);
131    DeserializationError error = deserializeJson(root, payload);
132    if (error) {
133      Serial.print("Deserialization failed with code: ");
134      Serial.println(error.c_str());
135      return;
136    }
137
138    String weather = (root["weather"][0]["main"]);
139    float temp = (float)(root["main"]["temp"]) - 273.15;        // get temperature in °C
140    int humidity = root["main"]["humidity"];                    // get humidity in %
141    float pressure = (float)(root["main"]["pressure"]) / 1000;  // get pressure in bar
142    float wind_speed = root["wind"]["speed"];                   // get wind speed in m/s
143    int wind_degree = root["wind"]["deg"];                      // get wind degree in °
144
145    // // print data
146    // Serial.println("Temperature= " + String(temp) + " °C");
147    // Serial.println("Humidity = " + String(humidity) + " %");
148    // Serial.println("Pressure = " + String(pressure) + " bar");
149    // Serial.println("Wind speed = " + String(wind_speed) + " m/s");
150    // Serial.println("Wind degree = " + String(wind_degree) + " °");
151    displayWeatherData(weather, temp, humidity, pressure, wind_speed);
152  }
153}
154
155
156void httpRequest() {
157  // close any connection before send a new request.
158  client.stop();
159
160  // Construct HTTP GET request for OpenWeatherMap API
161  String httpRequest = "";
162  httpRequest += "GET /data/2.5/weather?q=" LOCATION "&APPID=" API_KEY " HTTP/1.1";
163
164  // if you get a connection, report back via serial:
165  if (client.connect(server, 80)) {
166    Serial.println("connected");
167    // Make a HTTP request:
168    client.println(httpRequest);
169    client.println("Host: api.openweathermap.org");
170    client.println("Connection: close");
171    client.println();
172    // note the time that the connection was made:
173    lastConnectionTime = millis();
174  } else {
175    // if you couldn't make a connection:
176    Serial.println("connection failed");
177  }
178}
179
180void printWifiStatus() {
181  // print the SSID of the network you're attached to:
182  Serial.print("SSID: ");
183  Serial.println(WiFi.SSID());
184
185  // print your board's IP address:
186  IPAddress ip = WiFi.localIP();
187  Serial.print("IP Address: ");
188  Serial.println(ip);
189
190  // print the received signal strength:
191  long rssi = WiFi.RSSI();
192  Serial.print("signal strength (RSSI):");
193  Serial.print(rssi);
194  Serial.println(" dBm");
195}
196
197void displayWeatherData(String weather, float temp, int humidity, float pressure, float wind_speed) {
198  display.clearDisplay();
199  display.setTextSize(1);               // Normal 1:1 pixel scale
200  display.setTextColor(SSD1306_WHITE);  // Draw white text
201  display.setCursor(0, 0);              // Start at top-left corner
202
203  // Display Day of the Week
204  String daysOfTheWeek[7] = { "Sunday", "Monday", "Tuesday", "Wednesday", "Thursday", "Friday", "Saturday" };
205  display.print(daysOfTheWeek[timeClient.getDay()]);
206
207  display.print(" ");
208  if (timeClient.getHours() < 10) display.print("0");  // Add leading zero for hours < 10
209  display.print(timeClient.getHours());
210  display.print(":");
211  if (timeClient.getMinutes() < 10) display.print("0");  // Add leading zero for minutes < 10
212  display.println(timeClient.getMinutes());
213
214  display.println();
215  display.print(LOCATION);
216  display.println(" " + weather);
217
218  // Display Weather
219  display.print("Temperature: ");
220  display.print(temp);
221  display.println(" C");
222
223  display.print("Humidity: ");
224  display.print(humidity);
225  display.println(" %");
226
227  display.print("Pressure: ");
228  display.print(pressure);
229  display.println(" bar");
230
231  display.print("Wind: ");
232  display.print(wind_speed);
233  display.println(" m/s");
234
235  display.display();
236}
どのように動作するのか?
ライブラリと定義:
WiFiS3.h:これは、特定のWiFiモジュールやボードに特有のライブラリで、WiFi接続を管理します。ArduinoJson.h:このライブラリはJSONデータのデコード(およびエンコード)に使用されます。arduino_secrets.h:機密データ(WiFiの認証情報など)が格納されている別のファイルです。これは、認証情報をメインコードから外しておくための良い習慣です。NTPClient & WiFiUdp:NTP(Network Time Protocol)サーバーから現在時刻を取得するために使用されます。
Adafruitライブラリ:OLEDディスプレイを管理するために使用されます。
さまざまなグローバル変数:これにはWiFiの認証情報、サーバーの詳細などが含まれ、スクリプト全体で使用されます。
setup():シリアル通信を初期化します。
WiFiモジュールのファームウェアバージョンをチェックして印刷します。
提供されたSSIDとパスワードを使用してWiFiネットワークに接続を試みます。
接続されたWiFiのステータス(SSID、IP、信号強度)を印刷します。
OLEDディスプレイを初期化します。
NTPクライアントを開始して現在時刻を取得し、タイムオフセットを設定します(この場合は8時間で、特定のタイムゾーンに対応する可能性があります)。
read_response():サーバーからの応答を読み取り、特にJSONデータ(
{and}で示される)を探します。JSONデータが見つかった場合、データをデコードして、気温、湿度、気圧、風速、風向きなどの天気の詳細を抽出します。
OLEDスクリーンに天気情報を表示する
displayWeatherData関数を呼び出します。
httpRequest():既存の接続を閉じて、WiFiモジュールのソケットが空いていることを確認します。
OpenWeatherMapサーバーに接続を試みます。
接続された場合、
LOCATIONで定義された特定の場所(おそらくarduino_secrets.hまたは他の場所で定義)の天気データを取得するためにHTTP GETリクエストを送信します。リクエストが行われた時間を記録します。
loop():サーバーからの受信データを処理するために
read_response関数を呼び出します。NTPサーバーから時刻を更新します。
天気サーバーに別のリクエストを行う時刻かどうかをチェックします(
postingIntervalに基づいて)。そうであれば、httpRequest関数を呼び出します。
printWifiStatus():接続されているネットワークのSSID。
ボードのローカルIPアドレス。
信号強度(RSSI)。
displayWeatherData():OLEDスクリーンをクリアします。
現在の曜日を表示します。
現在時刻をHH:MM形式で表示します。
提供された天気データ(気温、湿度、気圧、風速)を表示します。