注釈
こんにちは、SunFounderのRaspberry Pi & Arduino & ESP32愛好家コミュニティへようこそ!Facebook上でRaspberry Pi、Arduino、ESP32についてもっと深く掘り下げ、他の愛好家と交流しましょう。
参加する理由は?
エキスパートサポート:コミュニティやチームの助けを借りて、販売後の問題や技術的な課題を解決します。
学び&共有:ヒントやチュートリアルを交換してスキルを向上させましょう。
独占的なプレビュー:新製品の発表や先行プレビューに早期アクセスしましょう。
特別割引:最新製品の独占割引をお楽しみください。
祭りのプロモーションとギフト:ギフトや祝日のプロモーションに参加しましょう。
👉 私たちと一緒に探索し、創造する準備はできていますか?[ ここ]をクリックして今すぐ参加しましょう!
MQTTを使用したクラウドコールシステム
メッセージキューイングテレメトリートランスポート(MQTT)は、直感的なメッセージングプロトコルです。これは、インターネットオブシングス(IoT)の分野で最も広く使用されているメッセージングプロトコルでもあります。
MQTTプロトコルは、IoTデバイスがデータを交換する方法を定義します。イベント駆動型であり、Publish/Subscribeモデルを使用して相互に接続されます。送信者(パブリッシャー)と受信者(サブスクライバー)はトピックを介して通信します。デバイスは特定のトピックにメッセージを公開し、そのトピックにサブスクライブしているすべてのデバイスがメッセージを受け取ります。
このセクションでは、UNO R4、HiveMQ(無料の公開MQTTブローカーサービス)、および4つのボタンを使用してサービスベルシステムを作成します。4つのボタンのそれぞれがレストランのテーブルに対応し、顧客がボタンを押すと、HiveMQ上でどのテーブルにサービスが必要かを確認できます。
必要なコンポーネント
このプロジェクトには以下のコンポーネントが必要です。
全体のキットを購入すると便利です。こちらがリンクです:
名称 |
このキットのアイテム数 |
リンク |
|---|---|---|
Elite Explorer Kit |
300+ |
以下のリンクから別々に購入することもできます。
コンポーネント紹介 |
購入リンク |
|---|---|
- |
|
配線図
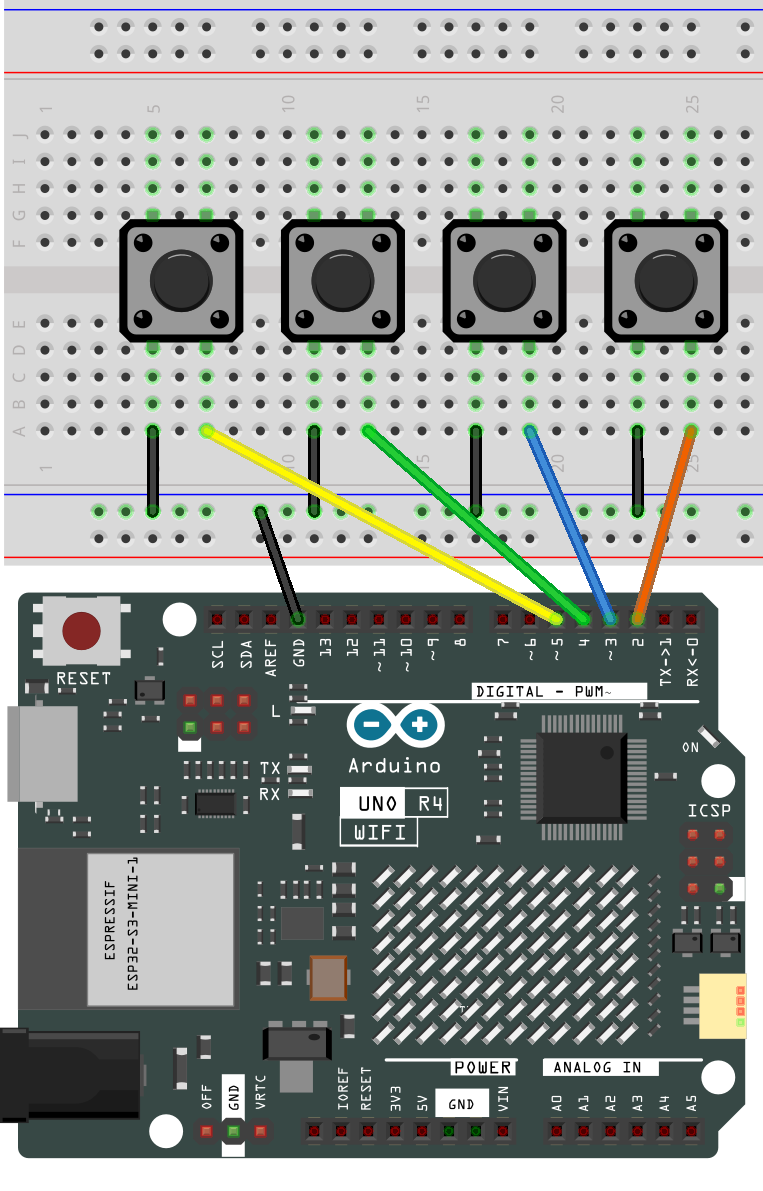
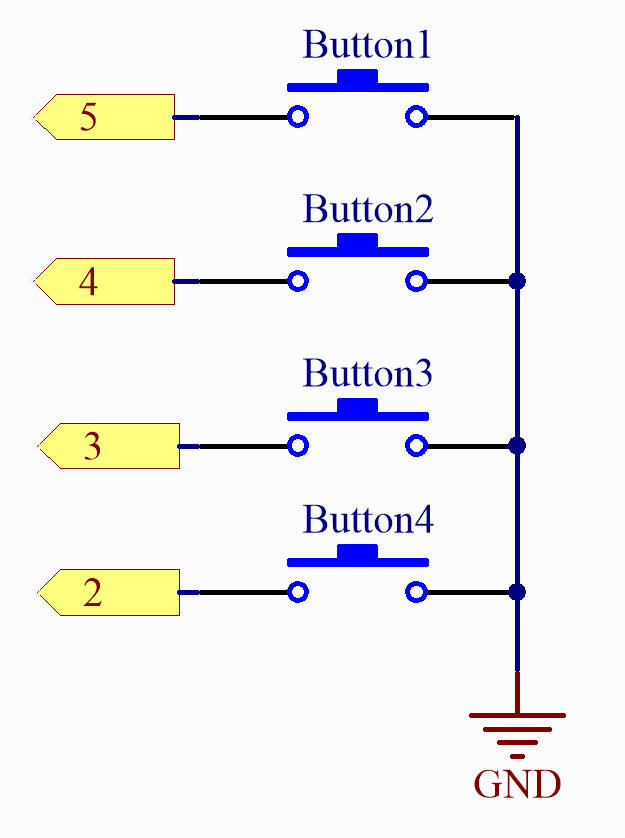
回路図
遊び方は?
HiveMQは、IoTデバイスへの迅速で効率的で信頼性の高いデータ転送を促進するMQTTブローカーおよびクライアントベースのメッセージングプラットフォームです。
Webブラウザで HiveMQ Web Client を開きます。
クライアントをデフォルトの公開プロキシに接続します。

Add New Topic Subscription をクリックします。
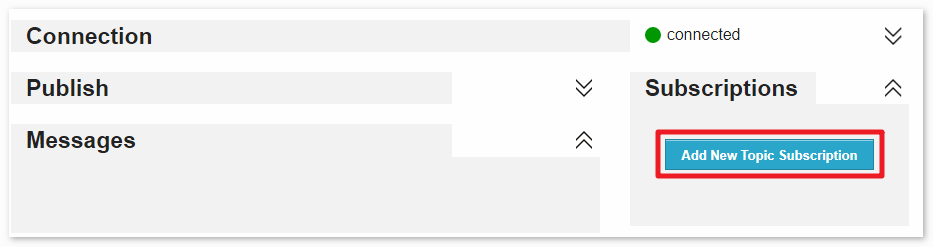
フォローしたいトピックを入力し、 Subscribe をクリックします。他のユーザーからのメッセージを受け取らないように、ここで設定したトピックがユニークであることを確認し、大文字と小文字の区別に注意してください。
この例のコードでは、トピックを
SunFounder MQTT Testと設定しました。変更がある場合は、コード内のトピックがWebページで購読したトピックと一致していることを確認してください。
ライブラリのインストール
ライブラリをインストールするには、Arduinoライブラリマネージャーを使用し、「ArduinoMqttClient」と検索してインストールしてください。
ArduinoMqttClient.h:MQTT通信用に使用します。
コードの実行
注釈
ファイル
04_mqtt_button.inoをelite-explorer-kit-main\iot_project\04_mqtt_buttonのパスから直接開くことができます。または、このコードをArduino IDEにコピーしてください。
注釈
コード内で、SSIDとパスワードは arduino_secrets.h に格納されています。この例をアップロードする前に、自分のWiFiの認証情報でそれらを修正する必要があります。さらに、コードを共有または保存する際には、この情報を機密に保つためのセキュリティ対策を講じてください。
#define SECRET_SSID "your_ssid"        // your network SSID (name)
#define SECRET_PASS "your_password"        // your network password (use for WPA, or use as key for WEP)
  1/*
  2  The code is designed for an Arduino Uno R4 WiFi to establish a connection with
  3  both a Wi-Fi network and an MQTT broker. It constantly monitors the status of
  4  four buttons that are connected to digital inputs. Whenever a button is pressed,
  5  it sends a message to a specific MQTT topic. Additionally, the code incorporates
  6  functions for displaying Wi-Fi network information and managing received MQTT
  7  messages.
  8
  9  Board: Arduino Uno R4 WiFi
 10  Component: Button
 11  Library: https://github.com/arduino-libraries/ArduinoMqttClient (ArduinoMqttClient by Arduino)
 12*/
 13
 14#include <WiFiS3.h>
 15#include <ArduinoMqttClient.h>
 16
 17#include "arduino_secrets.h"
 18///////please enter your sensitive data in the Secret tab/arduino_secrets.h
 19char ssid[] = SECRET_SSID;    // your network SSID (name)
 20char pass[] = SECRET_PASS;    // your network password (use for WPA, or use as key for WEP)
 21int status = WL_IDLE_STATUS;  // the WiFi radio's status
 22
 23WiFiClient wifiClient;
 24MqttClient mqttClient(wifiClient);
 25
 26const char broker[] = "broker.hivemq.com";
 27int port = 1883;
 28const char topic[] = "SunFounder MQTT Test";
 29
 30//init buttons & states
 31const int buttonPins[4] = { 2, 3, 4, 5 };
 32bool previousButtonStates[4] = { false, false, false, false };
 33
 34void setup() {
 35  //Initialize serial and wait for port to open:
 36  Serial.begin(9600);
 37
 38  while (!Serial) {
 39    ;  // wait for serial port to connect. Needed for native USB port only
 40  }
 41
 42  // check for the WiFi module:
 43  if (WiFi.status() == WL_NO_MODULE) {
 44    Serial.println("Communication with WiFi module failed!");
 45    // don't continue
 46    while (true)
 47      ;
 48  }
 49
 50  String fv = WiFi.firmwareVersion();
 51  if (fv < WIFI_FIRMWARE_LATEST_VERSION) {
 52    Serial.println("Please upgrade the firmware");
 53  }
 54
 55  // attempt to connect to WiFi network:
 56  while (status != WL_CONNECTED) {
 57    Serial.print("Attempting to connect to WPA SSID: ");
 58    Serial.println(ssid);
 59    // Connect to WPA/WPA2 network. Change this line if using open or WEP network:
 60    status = WiFi.begin(ssid, pass);
 61
 62    // wait 5 seconds for connection:
 63    delay(5000);
 64  }
 65
 66  // you're connected now, so print out the data:
 67  Serial.print("You're connected to the network");
 68  printCurrentNet();
 69  printWifiData();
 70
 71  // You can provide a unique client ID, if not set the library uses Arduino-millis()
 72  // Each client must have a unique client ID
 73  // mqttClient.setId("clientId");
 74
 75  // You can provide a username and password for authentication
 76  // mqttClient.setUsernamePassword("username", "password");
 77
 78  Serial.print("Attempting to connect to the MQTT broker: ");
 79  Serial.println(broker);
 80
 81  if (!mqttClient.connect(broker, port)) {
 82    Serial.print("MQTT connection failed! Error code = ");
 83    Serial.println(mqttClient.connectError());
 84
 85    while (1)
 86      ;
 87  }
 88
 89  Serial.println("You're connected to the MQTT broker!");
 90  Serial.println();
 91
 92  // set the message receive callback
 93  mqttClient.onMessage(onMqttMessage);
 94
 95  Serial.print("Subscribing to topic: ");
 96  Serial.println(topic);
 97  Serial.println();
 98
 99  // subscribe to a topic
100  mqttClient.subscribe(topic);
101
102  // topics can be unsubscribed using:
103  // mqttClient.unsubscribe(topic);
104
105  Serial.print("Waiting for messages on topic: ");
106  Serial.println(topic);
107  Serial.println();
108
109  // set button pins as INPUT_PULLUP
110  for (int i = 0; i < 4; i++) {
111    pinMode(buttonPins[i], INPUT_PULLUP);
112    previousButtonStates[i] = digitalRead(buttonPins[i]);
113  }
114}
115
116void loop() {
117
118  // call poll() regularly to allow the library to receive MQTT messages and
119  // send MQTT keep alives which avoids being disconnected by the broker
120  mqttClient.poll();
121
122  // Check button status
123  for (int i = 0; i < 4; i++) {
124    bool currentButtonState = digitalRead(buttonPins[i]);
125
126    // If the button is pressed and its previous state was not pressed.
127    if (!currentButtonState && previousButtonStates[i]) {
128      sendButtonMessage(i + 1);  // The message that the send button has been pressed.
129    }
130
131    previousButtonStates[i] = currentButtonState;  // Update button status
132  }
133
134  // Add a delay to avoid constant pinging
135  delay(50);
136}
137
138void printWifiData() {
139  // print your board's IP address:
140  IPAddress ip = WiFi.localIP();
141  Serial.print("IP Address: ");
142
143  Serial.println(ip);
144
145  // print your MAC address:
146  byte mac[6];
147  WiFi.macAddress(mac);
148  Serial.print("MAC address: ");
149  printMacAddress(mac);
150}
151
152void printCurrentNet() {
153  // print the SSID of the network you're attached to:
154  Serial.print("SSID: ");
155  Serial.println(WiFi.SSID());
156
157  // print the MAC address of the router you're attached to:
158  byte bssid[6];
159  WiFi.BSSID(bssid);
160  Serial.print("BSSID: ");
161  printMacAddress(bssid);
162
163  // print the received signal strength:
164  long rssi = WiFi.RSSI();
165  Serial.print("signal strength (RSSI):");
166  Serial.println(rssi);
167
168  // print the encryption type:
169  byte encryption = WiFi.encryptionType();
170  Serial.print("Encryption Type:");
171  Serial.println(encryption, HEX);
172  Serial.println();
173}
174
175void printMacAddress(byte mac[]) {
176  for (int i = 5; i >= 0; i--) {
177    if (mac[i] < 16) {
178      Serial.print("0");
179    }
180    Serial.print(mac[i], HEX);
181    if (i > 0) {
182      Serial.print(":");
183    }
184  }
185  Serial.println();
186}
187
188
189void onMqttMessage(int messageSize) {
190  // we received a message, print out the topic and contents
191  Serial.print("Received a message with topic '");
192  Serial.print(mqttClient.messageTopic());
193  Serial.println("'");
194  Serial.print("Message length: ");
195  Serial.print(messageSize);
196  Serial.println(" bytes:");
197
198  // Read the message contents into a String
199  String message = mqttClient.readString();
200
201  // Convert the received message and comparison strings to lowercase
202  message.toLowerCase();
203
204  Serial.print("Message to me: ");
205  Serial.println(message);
206
207  Serial.println();
208}
209
210void sendButtonMessage(int buttonNumber) {
211  String message = "Button " + String(buttonNumber) + " was pressed.";
212
213  Serial.println(message);
214
215  mqttClient.beginMessage(topic);
216  mqttClient.print(message);
217  mqttClient.endMessage();
218}
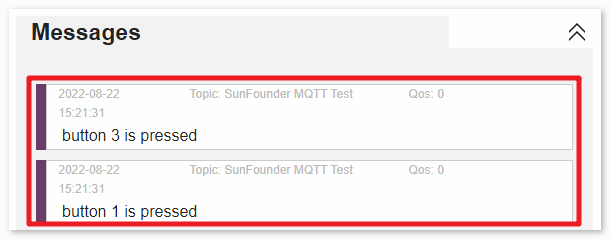
コードを実行した後、 HiveMQ Web Client に戻り、ブレッドボード上のボタンのいずれかを押すと、HiveMQ上でメッセージプロンプトが表示されます。
どのように動作するのか?
このコードは、Wi-Fiに接続し、MQTTプロトコルを使用してMQTTブローカーと通信するArduinoベースのプロジェクト用です。さらに、4つのボタンが押されたかどうかを検出し、対応するメッセージをMQTTブローカーに送信することができます。
コードの詳細な説明は以下の通りです:
関連するライブラリを含む:
#include <WiFiS3.h>
#include <ArduinoMqttClient.h>
機密情報を含む:
arduino_secrets.hファイルにはWi-FiネットワークのSSIDとパスワードが含まれています。
#include "arduino_secrets.h"
char ssid[] = SECRET_SSID;
char pass[] = SECRET_PASS;
変数の初期化:
Wi-FiおよびMQTT接続を管理するための変数。
ボタンピンとボタンの状態を初期化します。
setup():シリアル通信を初期化します。
Wi-Fiモジュールの存在をチェックし、Wi-Fiに接続を試みます。
ネットワークデータを印刷します。
MQTTブローカーへの接続を試みます。
MQTTトピックにサブスクライブします。
ボタンを入力モードに設定します。
loop():MQTT接続をアクティブに保ちます。
各ボタンが押されたかどうかをチェックし、もしそうならMQTTメッセージを送信します。
その他のユーティリティ関数:
printWifiData():現在接続されているWi-Fiネットワークに関する情報を印刷します。printCurrentNet():現在のネットワークに関する関連データを印刷します。printMacAddress(byte mac[]):MACアドレスを印刷します。onMqttMessage(int messageSize):MQTTブローカーからメッセージを受信したときにトリガーされるコールバック関数です。受信したメッセージのトピックと内容を印刷します。sendButtonMessage(int buttonNumber):ボタンが押されたときにMQTTメッセージを送信するためにこの関数を使用します。