注釈
こんにちは、SunFounderのRaspberry Pi & Arduino & ESP32愛好家コミュニティへようこそ!Facebook上でRaspberry Pi、Arduino、ESP32についてもっと深く掘り下げ、他の愛好家と交流しましょう。
参加する理由は?
エキスパートサポート:コミュニティやチームの助けを借りて、販売後の問題や技術的な課題を解決します。
学び&共有:ヒントやチュートリアルを交換してスキルを向上させましょう。
独占的なプレビュー:新製品の発表や先行プレビューに早期アクセスしましょう。
特別割引:最新製品の独占割引をお楽しみください。
祭りのプロモーションとギフト:ギフトや祝日のプロモーションに参加しましょう。
👉 私たちと一緒に探索し、創造する準備はできていますか?[ ここ]をクリックして今すぐ参加しましょう!
CheerLights
CheerLightsは、誰でも制御できるグローバルな同期ライトのネットワークです。 @CheerLights - Twitter のLEDカラーチェンジコミュニティに参加し、世界中のLEDを同時に色を変えられるようにしましょう。オフィスの片隅にLEDを置いて、自分が一人でないことを思い出しましょう。
このケースでは、MQTTを使用しますが、自分のメッセージを公開する代わりに、「cheerlights」というトピックにサブスクライブします。これにより、他の人が「cheerlights」トピックに送信したメッセージを受信し、その情報を使用してLEDストリップの色を変更することができます。
必要なコンポーネント
このプロジェクトには以下のコンポーネントが必要です。
全体のキットを購入すると便利です。こちらがリンクです:
名称 |
このキットのアイテム数 |
リンク |
|---|---|---|
Elite Explorer Kit |
300+ |
以下のリンクから別々に購入することもできます。
コンポーネント紹介 |
購入リンク |
|---|---|
- |
|
配線図

回路図

ライブラリのインストール
ライブラリをインストールするには、Arduinoライブラリマネージャーを使用し、「ArduinoMqttClient」と「FastLED」を検索してインストールしてください。
ArduinoMqttClient.h:MQTT通信用に使用します。
FastLED.h:RGB LEDストリップのドライブに使用します。
コードの実行
注釈
ファイル
05_cheerlight.inoをelite-explorer-kit-main\iot_project\05_cheerlightのパスから直接開くことができます。または、このコードをArduino IDEにコピーしてください。
注釈
コード内で、SSIDとパスワードは arduino_secrets.h に格納されています。この例をアップロードする前に、自分のWiFiの認証情報でそれらを修正する必要があります。さらに、コードを共有または保存する際には、この情報を機密に保つためのセキュリティ対策を講じてください。
#define SECRET_SSID "your_ssid"        // your network SSID (name)
#define SECRET_PASS "your_password"        // your network password (use for WPA, or use as key for WEP)
  1/*
  2  The code is designed for an Arduino Uno R4 WiFi to connect to a Wi-Fi network,
  3  subscribe to an MQTT topic, and control a chain of NeoPixel LEDs based on messages
  4  received from the MQTT broker. It listens for color commands from the cheerlights
  5  topic and updates the LED colors accordingly.
  6
  7  Board: Arduino Uno R4 WiFi
  8  Component: WS2812
  9  Library: https://github.com/arduino-libraries/ArduinoMqttClient (ArduinoMqttClient by Arduino)
 10           https://github.com/FastLED/FastLED (FastLED by Daniel Garcia)
 11
 12*/
 13
 14#include <WiFiS3.h>
 15#include <ArduinoMqttClient.h>
 16#include <FastLED.h>
 17
 18#define NUM_LEDS 8  // Number of LEDs in the chain
 19#define DATA_PIN 6  // Data pin for LED control
 20
 21#include "arduino_secrets.h"
 22///////please enter your sensitive data in the Secret tab/arduino_secrets.h
 23char ssid[] = SECRET_SSID;    // your network SSID (name)
 24char pass[] = SECRET_PASS;    // your network password (use for WPA, or use as key for WEP)
 25int status = WL_IDLE_STATUS;  // the WiFi radio's status
 26
 27WiFiClient wifiClient;
 28MqttClient mqttClient(wifiClient);
 29
 30const char broker[] = "mqtt.cheerlights.com";
 31int port = 1883;
 32const char topic[] = "cheerlights";
 33
 34
 35
 36CRGB leds[NUM_LEDS];  // Array to hold LED color data
 37
 38// Define the supported CheerLights colors and their RGB values
 39String colorName[] = { "red", "pink", "green", "blue", "cyan", "white", "warmwhite", "oldlace", "purple", "magenta", "yellow", "orange" };
 40
 41int colorRGB[][3] = { 255, 0, 0,      // "red"
 42                      255, 192, 203,  // "pink"
 43                      0, 255, 0,      // "green"
 44                      0, 0, 255,      // "blue"
 45                      0, 255, 255,    // "cyan"
 46                      255, 255, 255,  // "white"
 47                      255, 223, 223,  // "warmwhite"
 48                      255, 223, 223,  // "oldlace"
 49                      128, 0, 128,    // "purple"
 50                      255, 0, 255,    // "magenta"
 51                      255, 255, 0,    // "yellow"
 52                      255, 165, 0 };  // "orange"
 53
 54
 55void setup() {
 56  //Initialize serial and wait for port to open:
 57  Serial.begin(9600);
 58
 59  while (!Serial) {
 60    ;  // wait for serial port to connect. Needed for native USB port only
 61  }
 62
 63  // check for the WiFi module:
 64  if (WiFi.status() == WL_NO_MODULE) {
 65    Serial.println("Communication with WiFi module failed!");
 66    // don't continue
 67    while (true)
 68      ;
 69  }
 70
 71  String fv = WiFi.firmwareVersion();
 72  if (fv < WIFI_FIRMWARE_LATEST_VERSION) {
 73    Serial.println("Please upgrade the firmware");
 74  }
 75
 76  // attempt to connect to WiFi network:
 77  while (status != WL_CONNECTED) {
 78    Serial.print("Attempting to connect to WPA SSID: ");
 79    Serial.println(ssid);
 80    // Connect to WPA/WPA2 network. Change this line if using open or WEP network:
 81    status = WiFi.begin(ssid, pass);
 82
 83    // wait 10 seconds for connection:
 84    delay(10000);
 85  }
 86
 87  // you're connected now, so print out the data:
 88  Serial.print("You're connected to the network");
 89  printCurrentNet();
 90  printWifiData();
 91
 92  // You can provide a unique client ID, if not set the library uses Arduino-millis()
 93  // Each client must have a unique client ID
 94  // mqttClient.setId("clientId");
 95
 96  // You can provide a username and password for authentication
 97  // mqttClient.setUsernamePassword("username", "password");
 98
 99  Serial.print("Attempting to connect to the MQTT broker: ");
100  Serial.println(broker);
101
102  if (!mqttClient.connect(broker, port)) {
103    Serial.print("MQTT connection failed! Error code = ");
104    Serial.println(mqttClient.connectError());
105
106    while (1)
107      ;
108  }
109
110  Serial.println("You're connected to the MQTT broker!");
111  Serial.println();
112
113  // set the message receive callback
114  mqttClient.onMessage(onMqttMessage);
115
116  Serial.print("Subscribing to topic: ");
117  Serial.println(topic);
118  Serial.println();
119
120  // subscribe to a topic
121  mqttClient.subscribe(topic);
122
123  // topics can be unsubscribed using:
124  // mqttClient.unsubscribe(topic);
125
126  Serial.print("Waiting for messages on topic: ");
127  Serial.println(topic);
128  Serial.println();
129
130  FastLED.addLeds<NEOPIXEL, DATA_PIN>(leds, NUM_LEDS);  // Initialize LEDs
131}
132
133void loop() {
134
135  // call poll() regularly to allow the library to receive MQTT messages and
136  // send MQTT keep alives which avoids being disconnected by the broker
137  mqttClient.poll();
138
139  // Add a delay to avoid constant pinging
140  delay(5000);
141}
142
143void printWifiData() {
144  // print your board's IP address:
145  IPAddress ip = WiFi.localIP();
146  Serial.print("IP Address: ");
147
148  Serial.println(ip);
149
150  // print your MAC address:
151  byte mac[6];
152  WiFi.macAddress(mac);
153  Serial.print("MAC address: ");
154  printMacAddress(mac);
155}
156
157void printCurrentNet() {
158  // print the SSID of the network you're attached to:
159  Serial.print("SSID: ");
160  Serial.println(WiFi.SSID());
161
162  // print the MAC address of the router you're attached to:
163  byte bssid[6];
164  WiFi.BSSID(bssid);
165  Serial.print("BSSID: ");
166  printMacAddress(bssid);
167
168  // print the received signal strength:
169  long rssi = WiFi.RSSI();
170  Serial.print("signal strength (RSSI):");
171  Serial.println(rssi);
172
173  // print the encryption type:
174  byte encryption = WiFi.encryptionType();
175  Serial.print("Encryption Type:");
176  Serial.println(encryption, HEX);
177  Serial.println();
178}
179
180void printMacAddress(byte mac[]) {
181  for (int i = 5; i >= 0; i--) {
182    if (mac[i] < 16) {
183      Serial.print("0");
184    }
185    Serial.print(mac[i], HEX);
186    if (i > 0) {
187      Serial.print(":");
188    }
189  }
190  Serial.println();
191}
192
193
194void onMqttMessage(int messageSize) {
195  // we received a message, print out the topic and contents
196  Serial.print("Received a message with topic '");
197  Serial.print(mqttClient.messageTopic());
198  Serial.println("'");
199  Serial.print("Message length: ");
200  Serial.print(messageSize);
201  Serial.println(" bytes:");
202
203  // Read the message contents into a String
204  String message = mqttClient.readString();
205
206  // Convert the received message and comparison strings to lowercase
207  message.toLowerCase();
208
209  // If a message is received on the topic, you will check this message.
210  // Changes the output state according to the message
211  if (String(topic) == "cheerlights") {
212    Serial.print("Changing color to ");
213    Serial.println(message);
214    setColor(message);
215  }
216}
217
218void setColor(String color) {
219  // Loop through the list of colors to find the matching color
220  for (int colorIndex = 0; colorIndex < 12; colorIndex++) {
221    if (color == colorName[colorIndex]) {
222      // Set the color of each NeoPixel on the strip
223      for (int pixel = 0; pixel < NUM_LEDS; pixel++) {
224        leds[pixel] = CRGB(colorRGB[colorIndex][0], colorRGB[colorIndex][1], colorRGB[colorIndex][2]);
225      }
226      FastLED.show();
227    }
228  }
229}
グローバルな@CheerLightsデバイスを制御する
Discordサーバー に参加し、
/CheerLightsボットを利用して色を設定します。 CheerLights Discord Server の任意のチャンネルで「/cheerlights」と入力してボットをアクティブにします。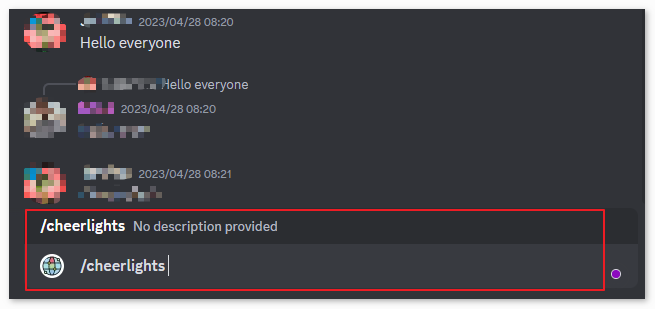
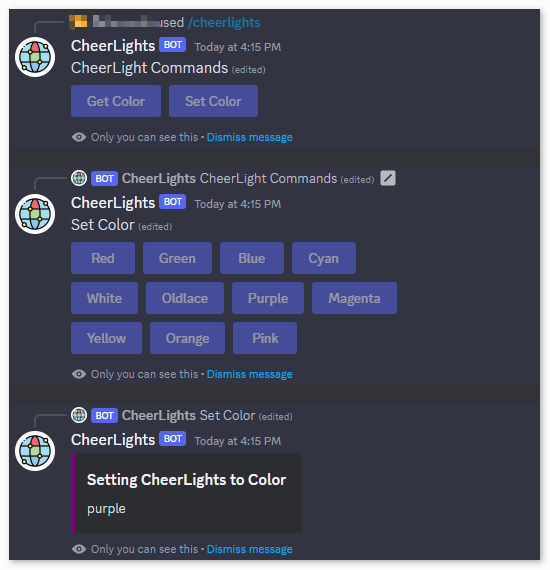
ボットが提供する指示に従って色を設定します。これにより、グローバルにCheerLightsデバイスを制御できます。
どのように動作するのか?
こちらはコードの主要部分とその機能の説明です:
必要なライブラリを含む:
WiFiS3.h:Wi-Fi接続の処理に使用します。ArduinoMqttClient.h:MQTT接続の処理に使用します。FastLED.h:NeoPixel LEDストリップの制御に使用します。
いくつかの定数を定義する:
NUM_LEDS:LEDストリップ上のLEDの数。DATA_PIN:LEDストリップを制御するためにArduinoに接続されているデータピン。arduino_secrets.h:Wi-Fiネットワーク名とパスワードを含むヘッダーファイルで、機密情報を保護します。broker:MQTTサーバーのアドレス。port:MQTTサーバーのポート。topic:サブスクライブするMQTTトピック。
いくつかのグローバル変数を定義する:
CRGB leds[NUM_LEDS]:LEDの色データを格納するための配列。colorName:CheerLightsプロジェクトでサポートされている色名の配列。colorRGB:色名に対応するRGBカラーコードの配列。
setup()関数:シリアル通信を初期化します。
Wi-Fiモジュールが存在するかを確認し、そのファームウェアバージョンを出力します。
Wi-Fiネットワークに接続を試み、失敗した場合は10秒待って再試行します。
接続に成功したら、MQTTブローカー(サーバー)に接続し、指定されたトピックにサブスクライブします。
NeoPixel LEDストリップを初期化します。
loop()関数:定期的に
mqttClient.poll()関数を呼び出して、MQTTメッセージを受信し、MQTTのキープアライブ信号を送信します。継続的な接続を避けるために5秒の遅延を追加します。
printWifiData()およびprintCurrentNet()関数は、Wi-Fiネットワークおよび接続情報を出力するために使用されます。printMacAddress()関数は、MACアドレスを16進数形式で印刷するために使用されます。onMqttMessage()関数は、MQTTメッセージが受信されたときにトリガーされるコールバック関数です。受信したトピックとメッセージ内容を出力し、メッセージ内容を小文字に変換します。トピックが「cheerlights」の場合、setColor()関数を呼び出して、LEDストリップの色を設定します。setColor()関数は、色名をパラメータとして取り、colorName配列で一致する色を探します。一致する色が見つかった場合、LEDストリップの色を対応するRGB値に設定し、FastLED.show()関数を使用してLEDストリップの色を更新します。