注釈
こんにちは、SunFounderのRaspberry Pi & Arduino & ESP32愛好家コミュニティへようこそ!Facebook上でRaspberry Pi、Arduino、ESP32についてもっと深く掘り下げ、他の愛好家と交流しましょう。
参加する理由は?
エキスパートサポート:コミュニティやチームの助けを借りて、販売後の問題や技術的な課題を解決します。
学び&共有:ヒントやチュートリアルを交換してスキルを向上させましょう。
独占的なプレビュー:新製品の発表や先行プレビューに早期アクセスしましょう。
特別割引:最新製品の独占割引をお楽しみください。
祭りのプロモーションとギフト:ギフトや祝日のプロモーションに参加しましょう。
👉 私たちと一緒に探索し、創造する準備はできていますか?[ここ]をクリックして今すぐ参加しましょう!
メトロノーム
ここではメトロノームを作成します。 メトロノームは5つのレベルに分けられ、レベルが高いほどブザーの呼び出しが緊急になります。
回路

注釈
ここではアクティブブザーが使用されており、白いステッカーが貼られています。
スケッチ
import processing.io.*;

int level = 0;
int buzzerPin = 17;
int levelRange=5;
Slider mySlider;

void setup() {
    size(400, 200);
    frameRate(50);
    mySlider = new Slider(width * 0.2,height * 0.4,width * 0.8,height * 0.6,0,levelRange,level);
    GPIO.pinMode(buzzerPin, GPIO.OUTPUT);
}

void draw() {

    background(255);
    mySlider.show();
    if(level==0){
        GPIO.digitalWrite(buzzerPin, GPIO.HIGH);
    }else if((frameCount/5) % (levelRange-level+1) ==0){
        GPIO.digitalWrite(buzzerPin, GPIO.LOW);
    }else{
        GPIO.digitalWrite(buzzerPin, GPIO.HIGH);
    }
}

void mouseDragged(){
    level = mySlider.dragPoint(mouseX,mouseY);
}

class Slider{
    float slotPointAX;
    float slotPointBX;
    float slotPointAY;
    float slotPointBY;
    float linePoint;
    float depth;
    int maxRange;
    int minRange;
    int value;

    Slider(float ax, float ay, float bx, float by, int min, int max, int v){
        slotPointAX = ax;
        slotPointAY = ay;
        slotPointBX = bx;
        slotPointBY = by;
        maxRange = max;
        minRange = min;
        value = v;
        linePoint = slotPointAX;// + map(value, minRange, maxRange, slotPointAX, slotPointBX);
        depth = (slotPointBY - slotPointAY)*0.75;
    }

    void show(){
        rectMode(CORNERS);
        fill(200);
        stroke(255,0,0);
        rect(slotPointAX, slotPointAY, slotPointBX, slotPointBY);
        fill(255,0,0);
        rect(slotPointAX, slotPointAY, linePoint, slotPointBY);
        fill(200);
        textSize(depth);
        text(minRange, slotPointAX, slotPointBY+depth);
        text(maxRange, slotPointBX, slotPointBY+depth);
        text(value, linePoint, slotPointAY);
    }

    int dragPoint(float mx, float my){
        if(mx>=slotPointAX && mx<=slotPointBX && my>=slotPointAY && my<=slotPointBY){
            value = int(map(mx,slotPointAX,slotPointBX,minRange,maxRange));
            linePoint = map(value,minRange,maxRange,slotPointAX,slotPointBX);
        }
        return value;
    }
}
原理
ここでは、 Slider クラスを作成し、それを widget として機能させました。
Slider(ax, ay, bx, by, min, max, v)
宣言では、7つのパラメーターで渡す必要があります。
最初の4つのパラメーターはwidgetのサイズを決定し、その後に左上隅の開始点の座標(x1、y1)と右下隅の(x2、y2)が続きます。
最後の3つのパラメーターは、その数値範囲(最小から最大)と初期値を決定します。
これには2つのメソッドがあります。 dragPoint() の効果は、スライダーをドラッグ可能にして、スライダーの現在の位置の値を返すことです。
int dragPoint(float mx, float my){
    if(mx>=slotPointAX && mx<=slotPointBX && my>=slotPointAY && my<=slotPointBY){
        value = int(map(mx,slotPointAX,slotPointBX,minRange,maxRange));
        linePoint = map(value,minRange,maxRange,slotPointAX,slotPointBX);
    }
    return value;
}
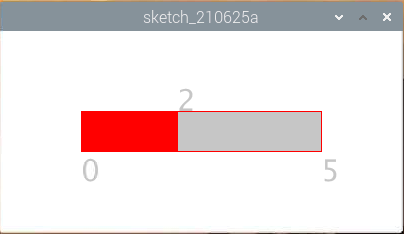
別のメソッド show() は、スライダーを表示することです。 同時に、範囲値と現在値が対応する位置に表示されます。
void show(){
    rectMode(CORNERS);
    fill(200);
    stroke(255,0,0);
    rect(slotPointAX, slotPointAY, slotPointBX, slotPointBY);
    fill(255,0,0);
    rect(slotPointAX, slotPointAY, linePoint, slotPointBY);
    fill(200);
    textSize(depth);
    text(minRange, slotPointAX, slotPointBY+depth);
    text(maxRange, slotPointBX, slotPointBY+depth);
    text(value, linePoint, slotPointAY);
}
詳細については、 Processing Reference を参照してください。