注釈
こんにちは、SunFounderのRaspberry Pi & Arduino & ESP32愛好家コミュニティへようこそ!Facebook上でRaspberry Pi、Arduino、ESP32についてもっと深く掘り下げ、他の愛好家と交流しましょう。
参加する理由は?
エキスパートサポート:コミュニティやチームの助けを借りて、販売後の問題や技術的な課題を解決します。
学び&共有:ヒントやチュートリアルを交換してスキルを向上させましょう。
独占的なプレビュー:新製品の発表や先行プレビューに早期アクセスしましょう。
特別割引:最新製品の独占割引をお楽しみください。
祭りのプロモーションとギフト:ギフトや祝日のプロモーションに参加しましょう。
👉 私たちと一緒に探索し、創造する準備はできていますか?[ここ]をクリックして今すぐ参加しましょう!
スイングのドット
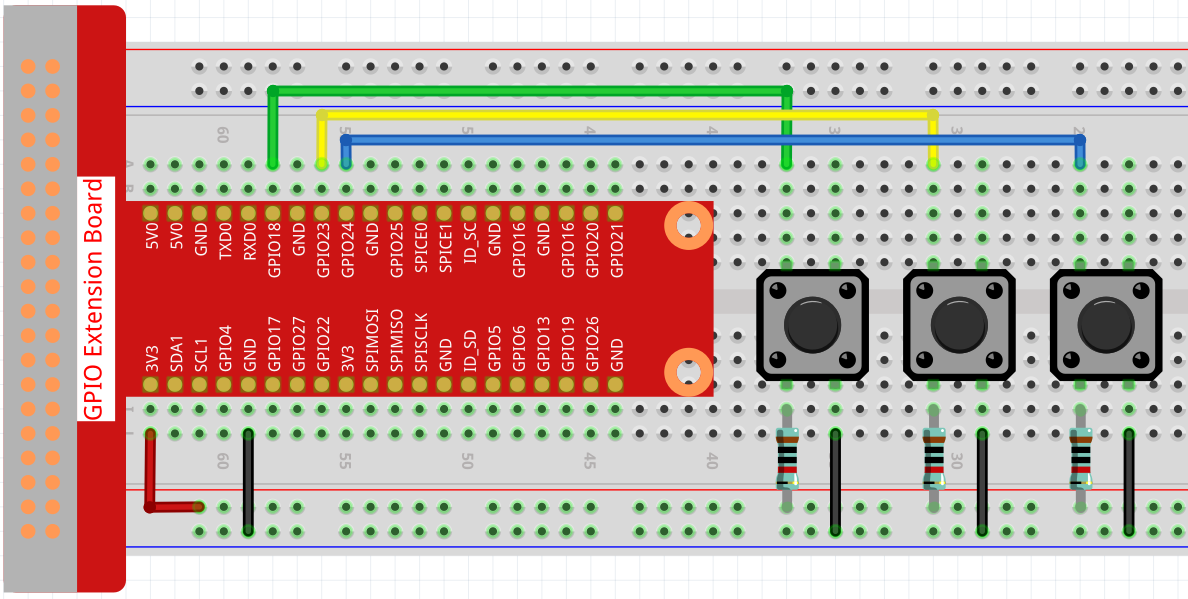
このプロジェクトでは、ドットのサイズを変更するためのボタン、 位置を変更するためのボタン、色を変更するためのボタンの3つのボタンが接続されています。 3つのボタンすべてを同時に押すと、揺れるドットが表示され、色が変化します。

回路
スケッチ
import processing.io.*;

// Define an instance of the Dot object
Dot myDot;

// Define the pins that will be reading button presses
int[] pins = { 18, 23, 24 };

void setup() {
    size(400, 400);
    // Change the color mode of the sketch to HSB
    colorMode(HSB, 360, 100, 100);
    noStroke();

    for (int i = 0; i < pins.length; i++) {
        GPIO.pinMode(pins[i], GPIO.INPUT_PULLUP);
    }

    // Create a Dot in the middle of the screen
    myDot = new Dot(width / 2, height / 2, 100, 255);
}

void draw() {
    background(0);

    // Modify attributes of the Dot depending on which buttons are pressed
    if (GPIO.digitalRead(pins[0]) == GPIO.LOW) {myDot.setSize();}
    if (GPIO.digitalRead(pins[1]) == GPIO.LOW) {myDot.setPosition();}
    if (GPIO.digitalRead(pins[2]) == GPIO.LOW) {myDot.setColor();}

    // Update the Dot state
    myDot.update();
    // And draw it to the screen
    myDot.show();
}

class Dot {

    float initX;
    float initY;
    float currentX;
    float currentY;
    int positionRange = 60;

    float initSize;
    float currentSize;
    int sizeRange = 50;

    int initColor;
    int currentColor;
    int ColorRange = 80;

    float timer = 0.0;
    float speed = 0.06;

    Dot(float x, float y, float s, int c) {
        initX = x;
        initY = y;
        currentX = x;
        currentY = y;

        initSize = s;
        currentSize = s;

        initColor = c;
        currentColor = c;
    }

    void setSize() {
        currentSize = initSize + sizeRange * sin( timer );
    }

    void setPosition() {
        currentY = initY + positionRange * cos( timer *2);
    }

    void setColor() {
        currentColor = int(initColor + ColorRange * sin( timer ));
    }

    void update() {
        timer += speed;
    }

    void show() {
        fill(currentColor, 100, 100);
        ellipse(currentX, currentY, currentSize, currentSize);
    }
}
原理
ドットを直接描画する代わりに、ここで Dot クラスを作成します。 次に、オブジェクトを宣言します。(この場合は myDot )
これは、複数の同一のプロパティを持つドットを描画する簡単な方法です。 たとえば、このプロジェクトのドットに3つの関数(サイズの変更、位置の変更、色の変更)を追加すると、宣言する各ドットは同じ関数になります。 同じボタンを使用して同じことを実行することも、異なるボタンを使用して各ドットを個別に制御することもできます。
Class (computer programming) - Wikipedia を使用すると、スケッチが美しく、強力で柔軟になります。
次に、 Dot クラスを詳しく見てみましょう。
Dot(float x, float y, float s, int c)
宣言では、位置のX座標値とY座標値、サイズ、および色(ここでは、 HSB color mode )に設定されています)の4つのパラメーターを渡す必要があります。
各パラメータは、2セットの値(初期値と現在の値)に割り当てられます。
float initX;
float initY;
float currentX;
float currentY;
int positionRange = 60;

float initSize;
float currentSize;
int sizeRange = 50;

int initColor;
int currentColor;
int ColorRange = 80;
初期値と現在の値に加えて、範囲値のセットもあります。 初期値がドットの初期状態(入力パラメータによって決定される)を決定するために使用され、現在の値が範囲内で変化してドットを移動させることを意味します。
したがって、X座標値を除いて、他の3つのパラメーターの現在の値は次のように計算されます:
void setSize() {
    currentSize = initSize + sizeRange * sin( timer );
}

void setPosition() {
    currentY = initY + positionRange * cos( timer *2);
}

void setColor() {
    currentColor = int(initColor + ColorRange * sin( timer ));
}
三角関数に精通している場合は、正弦と余弦 sine & cosine を理解するのは難しくありません。これにより、ドットの現在の値が滑らかに周期的に変化します(-1から1)。
また、周期的な変動のためにシード、 timer を追加する必要があります。 これは、メソッド update() に固定値を追加し、 draw() で呼び出されます。
void update() {
    timer += speed;
}
最後に、 draw() でも呼び出される show() メソッドを使用して、現在の値に従ってドットが表示されます。
void show() {
    fill(currentColor, 100, 100);
    ellipse(currentX, currentY, currentSize, currentSize);
}
それと?
クラスの使い方をマスターすれば、同じプロパティで複数のドットを描くことができるので、もっとクールなことをしてみませんか。 たとえば、安定した連星系を描いたり、'DUET'ゲームを作ったりするのはどうですか?
詳細については、 Processing Reference を参照してください。