Note
Hello, welcome to the SunFounder Raspberry Pi & Arduino & ESP32 Enthusiasts Community on Facebook! Dive deeper into Raspberry Pi, Arduino, and ESP32 with fellow enthusiasts.
Why Join?
Expert Support: Solve post-sale issues and technical challenges with help from our community and team.
Learn & Share: Exchange tips and tutorials to enhance your skills.
Exclusive Previews: Get early access to new product announcements and sneak peeks.
Special Discounts: Enjoy exclusive discounts on our newest products.
Festive Promotions and Giveaways: Take part in giveaways and holiday promotions.
👉 Ready to explore and create with us? Click [here] and join today!
Metronome
Here we will make a metronome, the metronome is divided into 5 levels, the higher the level, the more urgent the buzzer call.
Wiring
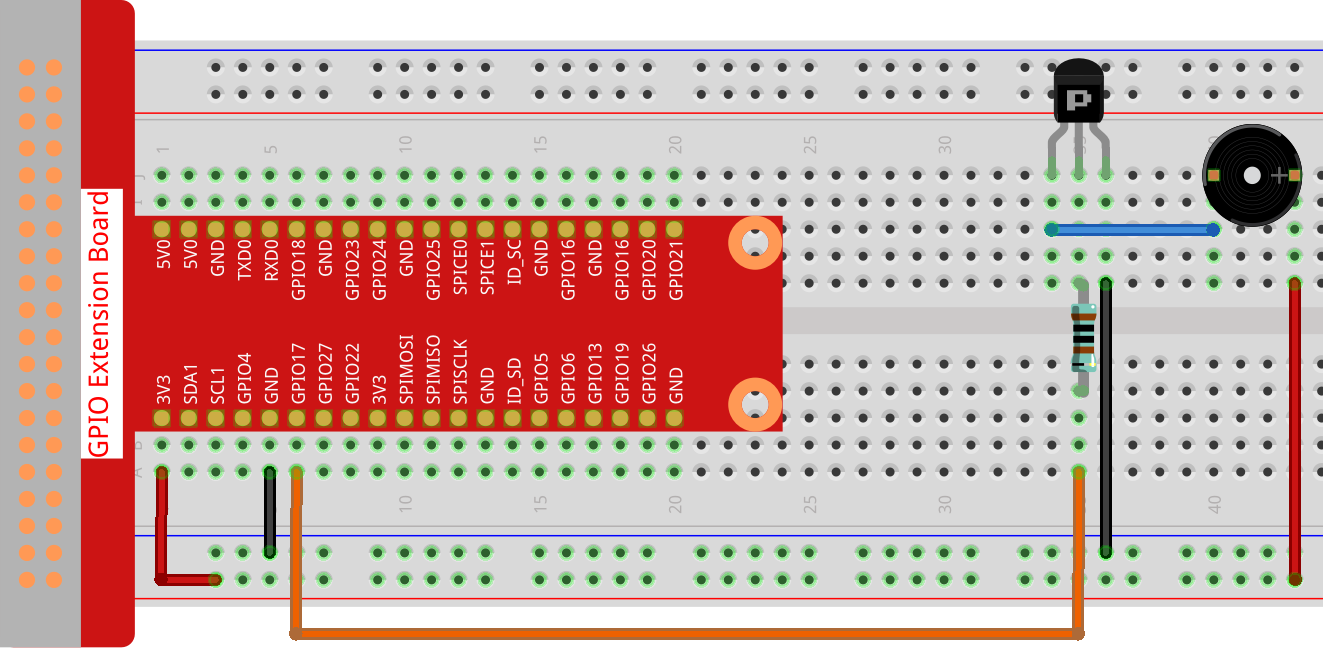
Note
An active buzzer is used here, and it has a white sticker on it.
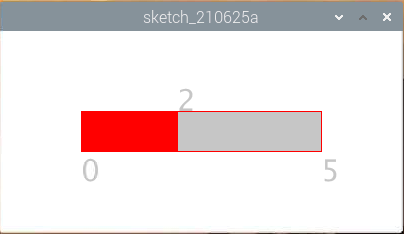
Sketch
import processing.io.*;

int level = 0;
int buzzerPin = 17;
int levelRange=5;
Slider mySlider;

void setup() {
    size(400, 200);
    frameRate(50);
    mySlider = new Slider(width * 0.2,height * 0.4,width * 0.8,height * 0.6,0,levelRange,level);
    GPIO.pinMode(buzzerPin, GPIO.OUTPUT);
}

void draw() {

    background(255);
    mySlider.show();
    if(level==0){
        GPIO.digitalWrite(buzzerPin, GPIO.HIGH);
    }else if((frameCount/5) % (levelRange-level+1) ==0){
        GPIO.digitalWrite(buzzerPin, GPIO.LOW);
    }else{
        GPIO.digitalWrite(buzzerPin, GPIO.HIGH);
    }
}

void mouseDragged(){
    level = mySlider.dragPoint(mouseX,mouseY);
}

class Slider{
    float slotPointAX;
    float slotPointBX;
    float slotPointAY;
    float slotPointBY;
    float linePoint;
    float depth;
    int maxRange;
    int minRange;
    int value;

    Slider(float ax, float ay, float bx, float by, int min, int max, int v){
        slotPointAX = ax;
        slotPointAY = ay;
        slotPointBX = bx;
        slotPointBY = by;
        maxRange = max;
        minRange = min;
        value = v;
        linePoint = slotPointAX;// + map(value, minRange, maxRange, slotPointAX, slotPointBX);
        depth = (slotPointBY - slotPointAY)*0.75;
    }

    void show(){
        rectMode(CORNERS);
        fill(200);
        stroke(255,0,0);
        rect(slotPointAX, slotPointAY, slotPointBX, slotPointBY);
        fill(255,0,0);
        rect(slotPointAX, slotPointAY, linePoint, slotPointBY);
        fill(200);
        textSize(depth);
        text(minRange, slotPointAX, slotPointBY+depth);
        text(maxRange, slotPointBX, slotPointBY+depth);
        text(value, linePoint, slotPointAY);
    }

    int dragPoint(float mx, float my){
        if(mx>=slotPointAX && mx<=slotPointBX && my>=slotPointAY && my<=slotPointBY){
            value = int(map(mx,slotPointAX,slotPointBX,minRange,maxRange));
            linePoint = map(value,minRange,maxRange,slotPointAX,slotPointBX);
        }
        return value;
    }
}
How it works?
Here, we created a Slider class and made it act as WIDGET.
Slider(ax, ay, bx, by, min, max, v)
In the declaration, it needs to be passed in 7 parameters.
The first four parameters determine the size of the widget, followed by the coordinates (x1, y1) of the starting point in the upper left corner and (x2, y2) in the lower right corner.
The last three parameters determine its numerical range (min to max) and initial value.
It has two methods, the effect of dragPoint() is to make the slider draggable and return the slider’s current position value.
int dragPoint(float mx, float my){
    if(mx>=slotPointAX && mx<=slotPointBX && my>=slotPointAY && my<=slotPointBY){
        value = int(map(mx,slotPointAX,slotPointBX,minRange,maxRange));
        linePoint = map(value,minRange,maxRange,slotPointAX,slotPointBX);
    }
    return value;
}
Another method show() is to show the Slider. At the same time, the range value and current value are displayed in the corresponding position.
void show(){
    rectMode(CORNERS);
    fill(200);
    stroke(255,0,0);
    rect(slotPointAX, slotPointAY, slotPointBX, slotPointBY);
    fill(255,0,0);
    rect(slotPointAX, slotPointAY, linePoint, slotPointBY);
    fill(200);
    textSize(depth);
    text(minRange, slotPointAX, slotPointBY+depth);
    text(maxRange, slotPointBX, slotPointBY+depth);
    text(value, linePoint, slotPointAY);
}
For more please refer to Processing Reference.