Bemerkung
Hallo und willkommen in der SunFounder Raspberry Pi & Arduino & ESP32 Enthusiasten-Gemeinschaft auf Facebook! Tauchen Sie tiefer ein in die Welt von Raspberry Pi, Arduino und ESP32 mit anderen Enthusiasten.
Warum beitreten?
Expertenunterstützung: Lösen Sie Nachverkaufsprobleme und technische Herausforderungen mit Hilfe unserer Gemeinschaft und unseres Teams.
Lernen & Teilen: Tauschen Sie Tipps und Anleitungen aus, um Ihre Fähigkeiten zu verbessern.
Exklusive Vorschauen: Erhalten Sie frühzeitigen Zugang zu neuen Produktankündigungen und exklusiven Einblicken.
Spezialrabatte: Genießen Sie exklusive Rabatte auf unsere neuesten Produkte.
Festliche Aktionen und Gewinnspiele: Nehmen Sie an Gewinnspielen und Feiertagsaktionen teil.
👉 Sind Sie bereit, mit uns zu erkunden und zu erschaffen? Klicken Sie auf [hier] und treten Sie heute bei!
3.1.2 Willkommen
Einführung
In diesem Projekt werden wir PIR verwenden, um die Bewegung von Fußgängern zu erfassen, und Servos, LED und Summer verwenden, um die Arbeit der Sensortür des Supermarkts zu simulieren. Wenn der Fußgänger innerhalb des Erfassungsbereichs des PIR erscheint, leuchtet die Anzeigelampe, die Tür wird geöffnet und der Summer ertönt die Öffnungsglocke.
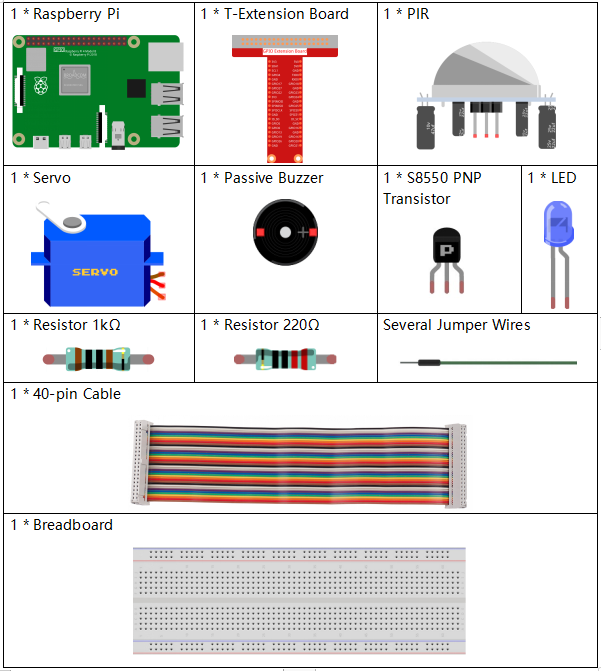
Komponenten
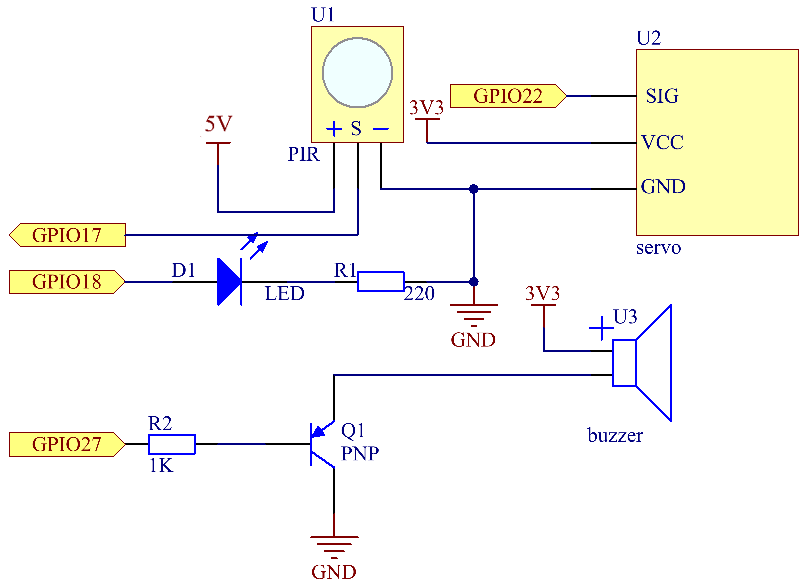
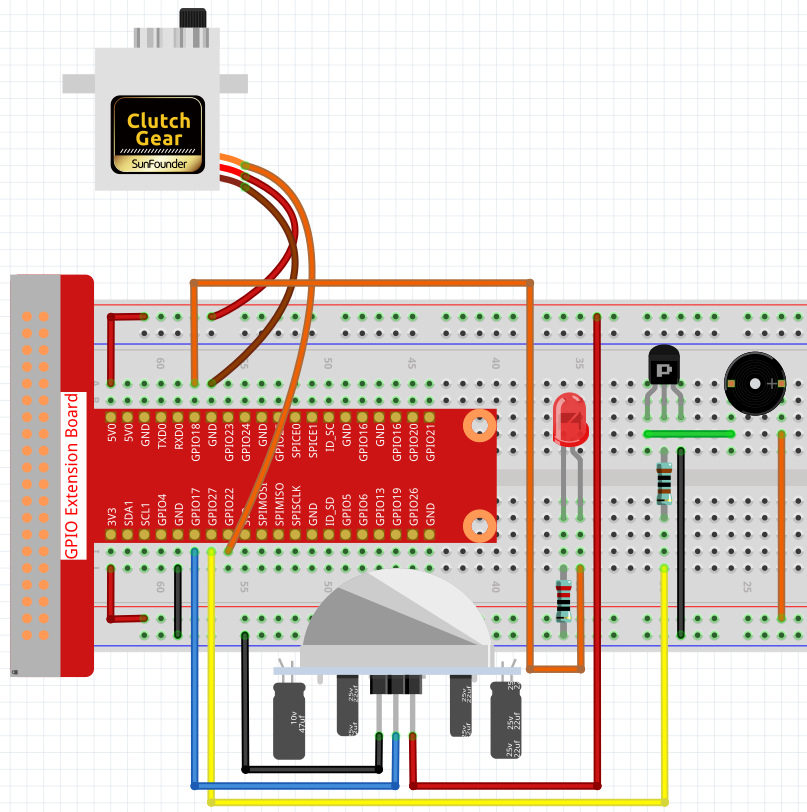
Schematische Darstellung
T-Board Name |
physical |
wiringPi |
BCM |
GPIO18 |
Pin 12 |
1 |
18 |
GPIO17 |
Pin 11 |
0 |
17 |
GPIO27 |
Pin 13 |
2 |
27 |
GPIO22 |
Pin 15 |
3 |
22 |
Experimentelle Verfahren
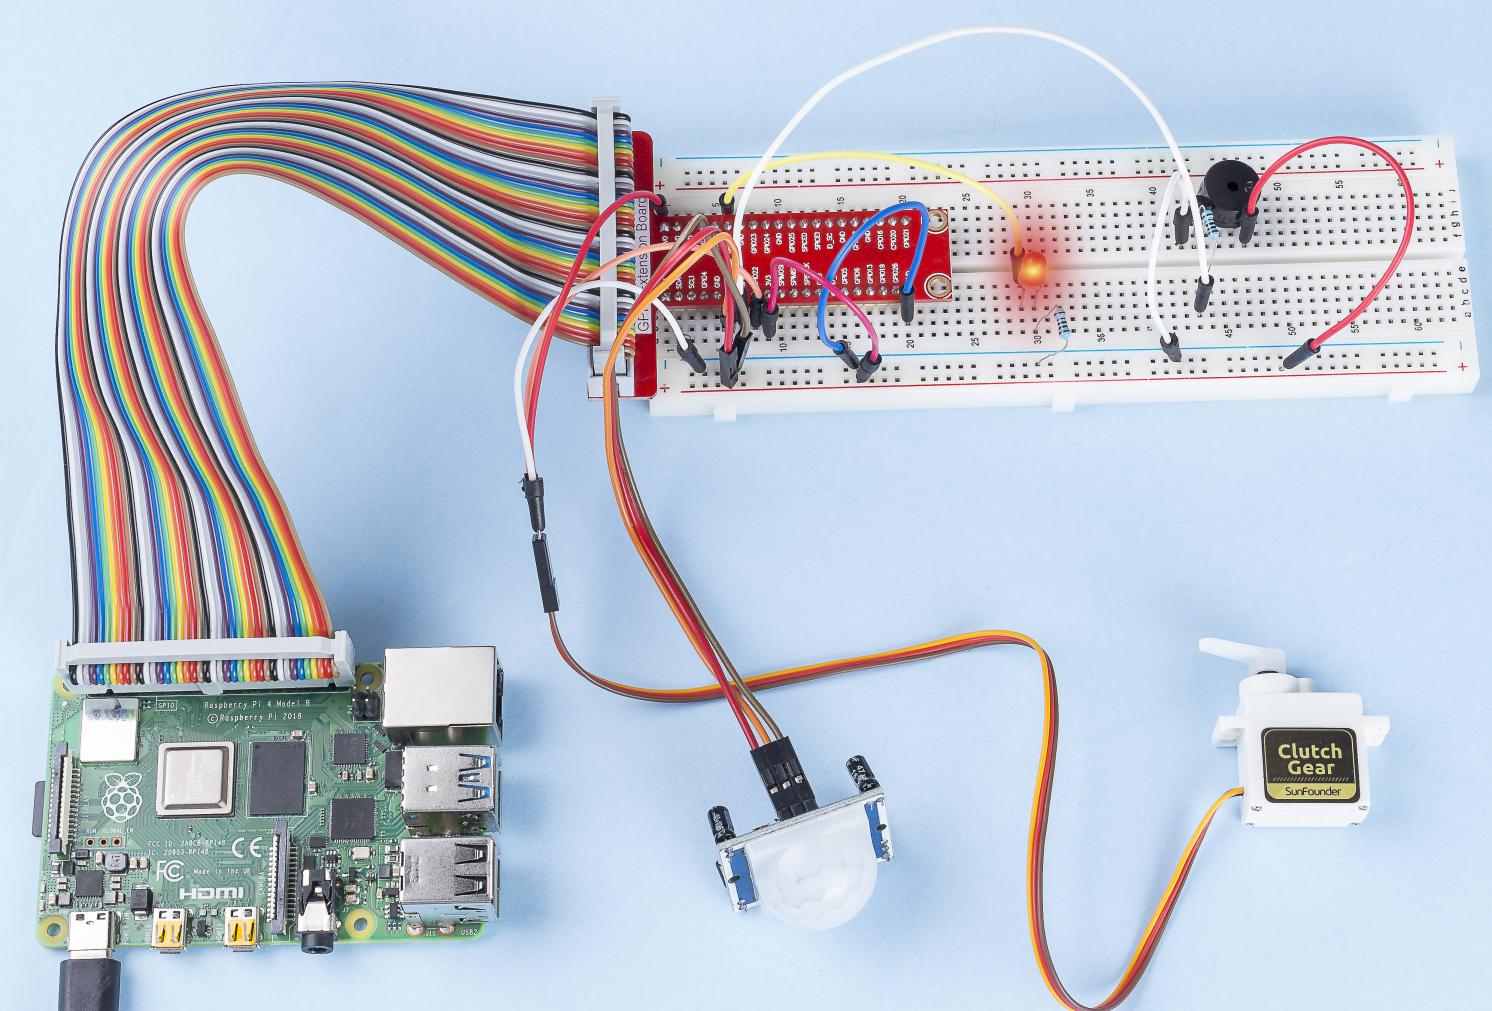
Schritt 1: Bauen Sie die Schaltung auf.
Für Benutzer in C-Sprache
Schritt 2: Verzeichnis wechseln.
cd ~/davinci-kit-for-raspberry-pi/c/3.1.2/
Schritt 3: Kompilieren.
gcc 3.1.2_Welcome.c -lwiringPi
Schritt 4: Ausführen.
sudo ./a.out
Wenn der PIR-Sensor nach dem Ausführen der Kode jemanden erkennt, der vorbeikommt, öffnet sich die Tür automatisch (vom Servo simuliert), schaltet die Anzeige ein und spielt die Türklingelmusik ab. Nachdem die Türklingelmusik abgespielt wurde, schließt das System automatisch die Tür und schaltet die Anzeigelampe aus, um auf das nächste Mal zu warten, wenn jemand vorbeikommt.
There are two potentiometers on the PIR module: one is to adjust sensitivity and the other is to adjust the detection distance. To make the PIR module work better, you You need to turn both of them counterclockwise to the end.
Code Erklärung
void setAngle(int pin, int angle){    //Create a funtion to control the angle of the servo.
    if(angle < 0)
        angle = 0;
    if(angle > 180)
        angle = 180;
    softPwmWrite(pin,Map(angle, 0, 180, 5, 25));
}
Erstellen Sie eine Funktion, setAngle, um den Winkel im Servo von 0-180 zu schreiben.
void doorbell(){
for(int i=0;i<sizeof(song)/4;i++){
        softToneWrite(BuzPin, song[i]);
        delay(beat[i] * 250);
    }
Erstellen Sie eine Funktion, Türklingel, damit der Summer Musik abspielen kann.
void closedoor(){
digitalWrite(ledPin, LOW);   //led off
for(int i=180;i>-1;i--){  //make servo rotate from maximum angle to minimum angle
    setAngle(servoPin,i);
    delay(1);
    }
}
Erstellen Sie eine Closedoor-Funktion, um das Schließen der Tür zu simulieren, schalten Sie die LED aus und lassen Sie das Servo von 180 Grad auf 0 Grad drehen.
void opendoor(){
    digitalWrite(ledPin, HIGH);   //led on
    for(int i=0;i<181;i++){  //make servo rotate from minimum angle to maximum angle
        setAngle(servoPin,i);
        delay(1);
    }
    doorbell();
    closedoor();
}
Die Funktion opendoor() besteht aus mehreren Teilen: Schalten Sie die Anzeigelampe ein,
schalten Sie das Servo ein (simulieren Sie das Öffnen der Tür),
spielen Sie die Klingelmusik des Supermarkts und rufen Sie nach dem Abspielen der Musik die Funktion geschlossene closedoor() auf.
    int main(void)
{
    if(wiringPiSetup() == -1){ //when initialize wiring failed,print message to screen
        printf("setup wiringPi failed !");
        return 1;
    }
    if(softToneCreate(BuzPin) == -1){
        printf("setup softTone failed !");
        return 1;
......
Initialisieren Sie in der Funktion main() die Bibliothek wiringPi und richten Sie softTone ein. Setzen Sie dann ledPin in den Ausgabestatus und pirPin in den Eingabestatus. Wenn der PIR-Sensor jemanden erkennt, der vorbeikommt, wird die Funktion opendoor aufgerufen, um das Öffnen der Tür zu simulieren.
Für Python-Sprachbenutzer
Schritt 2: Verzeichnis wechseln.
cd ~/davinci-kit-for-raspberry-pi/python/
Schritt 3: Ausführen.
sudo python3 3.1.2_Welcome.py
Wenn der PIR-Sensor nach dem Ausführen der Kode jemanden erkennt, der vorbeikommt, öffnet sich die Tür automatisch (vom Servo simuliert), schaltet die Anzeige ein und spielt die Türklingelmusik ab. Nachdem die Türklingelmusik abgespielt wurde, schließt das System automatisch die Tür und schaltet die Anzeigelampe aus, um auf das nächste Mal zu warten, wenn jemand vorbeikommt.
There are two potentiometers on the PIR module: one is to adjust sensitivity and the other is to adjust the detection distance. To make the PIR module work better, you You need to turn both of them counterclockwise to the end.
code
Bemerkung
Sie können den folgenden Code Ändern/Zurücksetzen/Kopieren/Ausführen/Stoppen . Zuvor müssen Sie jedoch zu einem Quellcodepfad wie davinci-kit-for-raspberry-pi/python gehen.
import RPi.GPIO as GPIO
import time

SERVO_MIN_PULSE = 500
SERVO_MAX_PULSE = 2500

ledPin = 18    # define the ledPin
pirPin = 17    # define the sensorPin
servoPin = 22  # define the servoPin
buzPin = 27    # define the buzzerpin


CL = [0, 131, 147, 165, 175, 196, 211, 248]        # Frequency of Low C notes

CM = [0, 262, 294, 330, 350, 393, 441, 495]        # Frequency of Middle C notes

CH = [0, 525, 589, 661, 700, 786, 882, 990]        # Frequency of High C notes

song = [    CH[5],CH[2],CM[6],CH[2],CH[3],CH[6],CH[3],CH[5],CH[3],CM[6],CH[2]    ]

beat = [    1,1,1,1,1,2,1,1,1,1,1,]


def setup():
    global p
    global Buzz                        # Assign a global variable to replace GPIO.PWM
    GPIO.setmode(GPIO.BCM)       # Numbers GPIOs by physical location
    GPIO.setup(ledPin, GPIO.OUT)   # Set ledPin's mode is output
    GPIO.setup(pirPin, GPIO.IN)    # Set sensorPin's mode is input
    GPIO.setup(servoPin, GPIO.OUT)   # Set servoPin's mode is output
    GPIO.output(servoPin, GPIO.LOW)  # Set servoPin to low
    GPIO.setup(buzPin, GPIO.OUT)    # Set pins' mode is output

    Buzz = GPIO.PWM(buzPin, 440)    # 440 is initial frequency.
    Buzz.start(50)                    # Start Buzzer pin with 50% duty ration

    p = GPIO.PWM(servoPin, 50)     # set Frequece to 50Hz
    p.start(0)                     # Duty Cycle = 0

def map(value, inMin, inMax, outMin, outMax):
    return (outMax - outMin) * (value - inMin) / (inMax - inMin) + outMin


def setAngle(angle):      # make the servo rotate to specific angle (0-180 degrees)
    angle = max(0, min(180, angle))
    pulse_width = map(angle, 0, 180, SERVO_MIN_PULSE, SERVO_MAX_PULSE)
    pwm = map(pulse_width, 0, 20000, 0, 100)
    p.ChangeDutyCycle(pwm)#map the angle to duty cycle and output it

def doorbell():
    for i in range(1, len(song)):        # Play song 1
        Buzz.ChangeFrequency(song[i])    # Change the frequency along the song note
        time.sleep(beat[i] * 0.25)        # delay a note for beat * 0.25s
    time.sleep(1)                        # Wait a second for next song.

def closedoor():
    GPIO.output(ledPin, GPIO.LOW)
    for i in range(180, -1, -1): #make servo rotate from 180 to 0 deg
        setAngle(i)
        time.sleep(0.001)
    time.sleep(1)
def opendoor():
    GPIO.output(ledPin, GPIO.LOW)
    for i in range(0, 181, 1):   #make servo rotate from 0 to 180 deg
        setAngle(i)     # Write to servo
        time.sleep(0.001)
    time.sleep(1)
    doorbell()
    closedoor()

def loop():
    while True:
        if GPIO.input(pirPin)==GPIO.HIGH:
            opendoor()


def destroy():
    GPIO.cleanup()                     # Release resource
    p.stop()
    Buzz.stop()

if __name__ == '__main__':     # Program start from here
    setup()
    try:
        loop()
    except KeyboardInterrupt:  # When 'Ctrl+C' is pressed, the program destroy() will be  executed.
        destroy()
Code Erklärung
def setup():
    global p
    global Buzz                        # Assign a global variable to replace GPIO.PWM
    GPIO.setmode(GPIO.BCM)       # Numbers GPIOs by physical location
    GPIO.setup(ledPin, GPIO.OUT)   # Set ledPin's mode is output
    GPIO.setup(pirPin, GPIO.IN)    # Set sensorPin's mode is input
    GPIO.setup(buzPin, GPIO.OUT)    # Set pins' mode is output
    Buzz = GPIO.PWM(buzPin, 440)    # 440 is initial frequency.
    Buzz.start(50)                    # Start Buzzer pin with 50% duty ration
    GPIO.setup(servoPin, GPIO.OUT)   # Set servoPin's mode is output
    GPIO.output(servoPin, GPIO.LOW)  # Set servoPin to low
    p = GPIO.PWM(servoPin, 50)     # set Frequece to 50Hz
    p.start(0)                     # Duty Cycle = 0
Diese Anweisungen werden verwendet, um die Pins jeder Komponente zu initialisieren.
def setAngle(angle):      # make the servo rotate to specific angle (0-180 degrees)
    angle = max(0, min(180, angle))
    pulse_width = map(angle, 0, 180, SERVO_MIN_PULSE, SERVO_MAX_PULSE)
    pwm = map(pulse_width, 0, 20000, 0, 100)
    p.ChangeDutyCycle(pwm)#map the angle to duty cycle and output it
Erstellen Sie eine Funktion von servowrite, um den Winkel in das Servo zu schreiben, der 0-180 ist.
def doorbell():
    for i in range(1,len(song)): # Play song1
        Buzz.ChangeFrequency(song[i]) # Change the frequency along the song note
        time.sleep(beat[i] * 0.25) # delay a note for beat * 0.25s
Erstellen Sie eine Funktion, Türklingel, damit der Summer Musik abspielen kann.
def closedoor():
    GPIO.output(ledPin, GPIO.LOW)
    Buzz.ChangeFrequency(1)
    for i in range(180, -1, -1): #make servo rotate from 180 to 0 deg
        setAngle(i)
        time.sleep(0.001)
Schließen Sie die Tür und schalten Sie die Kontrollleuchte aus.
def opendoor():
    GPIO.output(ledPin, GPIO.LOW)
    for i in range(0, 181, 1):   #make servo rotate from 0 to 180 deg
        setAngle(i)     # Write to servo
        time.sleep(0.001)
    doorbell()
    closedoor()
Die Funktion opendoor() besteht aus mehreren Teilen: Schalten Sie die Anzeigelampe ein, schalten Sie das Servo ein (um das Öffnen der Tür zu simulieren), spielen Sie die Klingelmusik des Supermarkts und rufen Sie nach dem Spielen die Funktion closedoor() auf Musik.
def loop():
while True:
    if GPIO.input(pirPin)==GPIO.HIGH:
        opendoor()
Wenn RIP erkennt, dass jemand vorbeikommt, ruft es die Funktion opendoor() auf.
Phänomen Bild