注釈
こんにちは、SunFounder Raspberry Pi & Arduino & ESP32 Enthusiast Community on Facebookへようこそ!他の愛好家と一緒に、Raspberry Pi、Arduino、ESP32の世界により深く入り込みましょう。
参加する理由
専門家サポート: 購入後の問題や技術的な課題を、コミュニティと私たちのチームの助けを借りて解決します。
学習と共有: ヒントやチュートリアルを交換して、スキルを向上させましょう。
限定プレビュー: 新製品の発表や先行プレビューに早期アクセスできます。
特別割引: 最新製品を特別割引でお楽しみいただけます。
季節限定キャンペーンとプレゼント: プレゼント企画やホリデーキャンペーンに参加しましょう。
👉 一緒に発見し、創造する準備はできましたか? [こちら] をクリックして、今すぐ参加しましょう!
6. 手のジェスチャー認識
1. 概要
前の章では、MediaPipe Hands を使用して 21 個の手ランドマークを取得し、 手の骨格を可視化しました。
この章では MediaPipe Tasks – Gesture Recognizer を紹介します。 これを使うと、次のような意味的なジェスチャーラベルを 直接出力できます:
Thumb_UpOpen_PalmVictoryClosed_Fist
以下を組み合わせることで:
動画取得用の
Picamera2ランドマーク可視化用の
MediaPipe Hands分類用の
Gesture Recognizer
骨格描画とラベル表示の両方を備えた リアルタイムジェスチャー認識を実現できます。
2. 動作の仕組み
プログラムは次の手順で動作します:
Picamera2を使用して映像フレームを取得する(任意で)
MediaPipe Handsを使ってランドマークを描画するVIDEOモードで MediaPipe Tasks – Gesture Recognizer を使用する検出された各手について、次を取得する:
ジェスチャーカテゴリ一覧(ラベル + 信頼度)
利き手情報(Left / Right)
正規化ランドマーク
最も信頼度の高いジェスチャー(top-1)を選び、 対応する手の上に 「ラベル + 信頼度スコア」 を描画する
注釈
この章では MediaPipe の Tasks API (0.10+) を使用します。
3. モデル
Gesture Recognizer には次のモデルファイルが必要です:
gesture_recognizer.task
このモデルファイルはすでにサンプルディレクトリに含まれています。 付属のものをそのまま使用してください。
組み込みモデルは次のジェスチャーラベルに対応しています:
0 →
Unknown1 →
Closed_Fist2 →
Open_Palm3 →
Pointing_Up4 →
Thumb_Down5 →
Thumb_Up6 →
Victory7 →
ILoveYou
4. コードの実行
重要
開始する前に、次の項目を確認してください:
パンチルト機構が組み立てられている
Raspberry Pi のデスクトップにアクセスできる
コードパッケージがインストールされている
Fusion HAT+ がインストールおよび設定されている
OpenCV がインストールされている
詳細な手順については 0. OpenCV のセットアップ を参照してください。
ターミナルを開き、次のコマンドを入力します:
sudo python3 ~/ai-lab-kit/mediapipe/mp_hand_gesture.py
プログラムを実行すると、「Show Video」というタイトルのウィンドウが開き、ライブカメラ映像が表示されます。
カメラの前に 1 つまたは 2 つの手が現れると、プログラムは次の処理を行います:
各フレームで 21 個の手ランドマークと接続線(手の骨格)をリアルタイムで検出・描画します。
Gesture Recognizer モデルを実行してジェスチャーを分類します。
ジェスチャーが
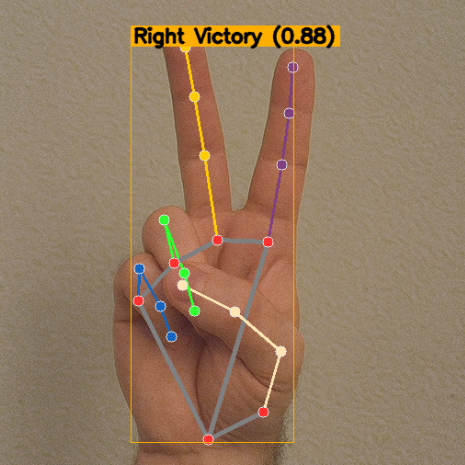
SCORE_THRESHOLD(デフォルト 0.5)以上のスコアで認識されると、対応する手の近くに次の情報を含むラベルが表示されます:利き手情報(Left/Right)
ジェスチャー名(例:
Thumb_Up、Open_Palm、Victory)信頼度スコア(例:
0.87)
また、ラベル位置を分かりやすくするために、手の領域の周囲に細いバウンディングボックスも描画されます。
手の形を変えると、ジェスチャーラベルとスコアはリアルタイムで継続的に更新されます。
手が検出されない場合、またはジェスチャーの信頼度が閾値を下回る場合は、ジェスチャーラベルなしで手の骨格(または生のカメラ映像)のみが表示されます。
qを押すとプログラムを終了できます。カメラは停止し、OpenCV ウィンドウは自動的に閉じます。
5. 完全なコード
from picamera2 import Picamera2, Preview
import cv2
import numpy as np
import mediapipe.python.solutions.hands as mp_hands
import mediapipe.python.solutions.drawing_utils as drawing
import mediapipe.python.solutions.drawing_styles as drawing_styles

# Import MediaPipe Tasks (Gesture Recognizer)
import mediapipe as mp
from mediapipe.tasks import python
from mediapipe.tasks.python import vision

from pathlib import Path

# --------------------- Settings ---------------------
BASE_DIR = Path(__file__).resolve().parent
GESTURE_MODEL_PATH = str(BASE_DIR / "gesture_recognizer.task")  # Path to the gesture model
SCORE_THRESHOLD = 0.5                           # Show gestures above this score
# ---------------------------------------------------

# Initialize the Hands model (kept for landmark drawing)
hands = mp_hands.Hands(
    static_image_mode=False,
    max_num_hands=2,
    min_detection_confidence=0.5
)

# Initialize Gesture Recognizer (VIDEO mode for streaming)
BaseOptions = python.BaseOptions
GestureRecognizerOptions = vision.GestureRecognizerOptions
RunningMode = vision.RunningMode

base_options = BaseOptions(model_asset_path=GESTURE_MODEL_PATH)
gr_options = GestureRecognizerOptions(
    base_options=base_options,
    running_mode=RunningMode.VIDEO
)
recognizer = vision.GestureRecognizer.create_from_options(gr_options)

# Open the camera
picam2 = Picamera2()
config = picam2.create_preview_configuration(
   main={"size": (640, 480), "format": "XRGB8888"} ,
)

picam2.configure(config)
picam2.start()

print("Streaming... press 'q' to quit")

# (Optional) helper to draw a label near a hand bounding box computed from landmarks
def draw_gesture_label(frame_bgr, norm_landmarks, text, color=(0, 175, 255)):
    """
    norm_landmarks: list of 21 normalized landmarks (x,y in [0,1]).
    We compute a tight bbox to place the gesture text.
    """
    if not norm_landmarks:
        return
    h, w = frame_bgr.shape[:2]
    xs = [int(lm.x * w) for lm in norm_landmarks]
    ys = [int(lm.y * h) for lm in norm_landmarks]
    x1, y1 = max(0, min(xs)), max(0, min(ys))
    x2, y2 = min(w-1, max(xs)), min(h-1, max(ys))
    cv2.rectangle(frame_bgr, (x1, y1), (x2, y2), color, 1)
    (tw, th), _ = cv2.getTextSize(text, cv2.FONT_HERSHEY_SIMPLEX, 0.7, 2)
    y_text = max(0, y1 - th - 6)
    cv2.rectangle(frame_bgr, (x1, y_text), (x1 + tw + 6, y_text + th + 6), color, -1)
    cv2.putText(frame_bgr, text, (x1 + 3, y_text + th + 2),
                cv2.FONT_HERSHEY_SIMPLEX, 0.7, (0,0,0), 2, cv2.LINE_AA)

while True:
    frame_bgra = picam2.capture_array()               # XRGB8888 to BGRA
    frame_bgr  = cv2.cvtColor(frame_bgra, cv2.COLOR_BGRA2BGR)

    # Convert the frame from BGR to RGB (required by MediaPipe)
    frame_rgb = cv2.cvtColor(frame_bgr, cv2.COLOR_BGR2RGB)

    # ---- A) Run legacy Hands (for landmark drawing you already have) ----
    hands_detected = hands.process(frame_rgb)

    # ---- B) Run Gesture Recognizer (direct gesture labels) ----
    mp_image = mp.Image(image_format=mp.ImageFormat.SRGB, data=frame_rgb)
    ts_ms = int((cv2.getTickCount() / cv2.getTickFrequency()) * 1000)
    gesture_result = recognizer.recognize_for_video(mp_image, ts_ms)

    # Convert the frame back from RGB to BGR (required by OpenCV)
    frame = cv2.cvtColor(frame_rgb, cv2.COLOR_RGB2BGR)

    # If hands are detected, draw landmarks and connections on the frame
    if hands_detected.multi_hand_landmarks:
        for hand_landmarks in hands_detected.multi_hand_landmarks:
            drawing.draw_landmarks(
                frame,
                hand_landmarks,
                mp_hands.HAND_CONNECTIONS,
                drawing_styles.get_default_hand_landmarks_style(),
                drawing_styles.get_default_hand_connections_style(),
            )

    # ---- C) Overlay gesture names on top of each detected hand ----
    if gesture_result and getattr(gesture_result, "gestures", None):
        for i, gesture_list in enumerate(gesture_result.gestures):
            if not gesture_list:
                continue
            top = gesture_list[0]
            label = top.category_name  # e.g., "Thumb_Up"
            score = top.score or 0.0
            if score < SCORE_THRESHOLD:
                continue

            hand_label = ""
            if gesture_result.handedness and i < len(gesture_result.handedness):
                if gesture_result.handedness[i]:
                    hand_label = gesture_result.handedness[i][0].category_name or ""

            text = f"{hand_label} {label} ({score:.2f})".strip()

            hand_lms = None
            if gesture_result.hand_landmarks and i < len(gesture_result.hand_landmarks):
                hand_lms = gesture_result.hand_landmarks[i]

            if hand_lms:
                draw_gesture_label(frame, hand_lms, text)
            else:
                cv2.putText(frame, text, (20, 40 + 30*i),
                            cv2.FONT_HERSHEY_SIMPLEX, 0.8, (0, 175, 255), 2, cv2.LINE_AA)

    # Display the frame with annotations
    cv2.imshow("Show Video", frame)
    if cv2.waitKey(1) & 0xff == ord('q'):
        break

# Release the camera
try:
    picam2.stop_preview()
except Exception:
    pass
picam2.stop()
cv2.destroyAllWindows()
スクリプトを実行すると、ウィンドウには手の骨格(任意)とジェスチャーのテキストボックスが表示されます。モデルのカテゴリに一致するジェスチャーが認識されると、対応する手のバウンディングボックス上部に次の情報が表示されます:
左手 / 右手(handedness)
ジェスチャー名(例:
Thumb_Up)信頼度スコア(0~1)
6. コードの説明
このサンプルは 2 つの部分を組み合わせています:
Hands (Solutions API):手の骨格(21 ランドマーク + 接続線)の描画に使用
Gesture Recognizer (Tasks API):
Thumb_UpやOpen_Palmのようなジェスチャーラベルの推定に使用
全体の流れ
ランドマーク描画用に Hands を初期化する(任意ですが可視化に便利です)
Gesture Recognizer モデル(
gesture_recognizer.task)を読み込み、VIDEOモードを有効にするカメラを起動し、ループ内でフレームを処理する:
フレームを RGB に変換する(MediaPipe は RGB を要求)
Hands を実行して骨格を描画する
Gesture Recognizer を実行して各手の
label + scoreを取得する対応する手の近くにラベルを描画する
qを押して終了し、リソースを解放する
理解しておくべきポイント
モデルファイル
Gesture Recognizer には
gesture_recognizer.taskが必要です。モデルファイルがスクリプトと同じフォルダにあることを確認するか、パスを適切に更新してください。VIDEO モードではタイムスタンプが必要
recognize_for_video()には、ミリ秒単位で増加し続けるタイムスタンプが必要です。このサンプルでは OpenCV の tick time を使って生成しています。信頼度しきい値を使ってラベルを表示
スコアが
SCORE_THRESHOLD以上のジェスチャーだけを表示します。これにより、不安定な予測結果の表示を防ぎます。
7. パラメータと調整
Parameter |
Description |
Suggestion |
|---|---|---|
|
このスコア未満のジェスチャーは無視される |
誤検出を減らしたい場合は上げる、見逃しを減らしたい場合は下げる |
|
同時に検出する手の数 |
ほとんどの用途では 2 で十分 |
|
タイムスタンプを必要とする動画ストリームモード |
継続使用を推奨(ストリーミング認識の方が安定) |
Resolution |
速度と精度に影響する |
Raspberry Pi では 640×480 以下を推奨(FPS を確保しやすい) |
8. トラブルシューティング
FileNotFoundError: gesture_recognizer.taskこれは通常、モデルファイルのパスが間違っていることを意味します。 モデルファイルがスクリプトと同じディレクトリにあることを確認するか、
GESTURE_MODEL_PATHを正しく更新してください。ImportError: cannot import name 'vision'このエラーは、MediaPipe のバージョンが古いことを示しています。 次のコマンドで MediaPipe を 0.10 以降に更新してください:
pip install --upgrade mediapipe認識カテゴリが期待と異なる
モデルのカテゴリセットが異なるか、照明条件が認識に影響している可能性があります。 照明を改善し、背景をシンプルにするか、 別のモデルバージョンに切り替えて試してください。
フレームレートが低い
Raspberry Pi の性能がボトルネックになっている可能性があります。 解像度を下げる、骨格描画を無効にする、 不要なバックグラウンドプロセスを終了してください。
9. まとめ
Gesture Recognizer を使うと、Raspberry Pi 上でリアルタイムの意味的ジェスチャー認識を実現できます
Hands の骨格描画と組み合わせることで、直感的でデバッグしやすい構成になります
しきい値や解像度を調整することで、「安定性」と「速度」のバランスを取ることができます
今後の発展例:
異なるジェスチャーを特定のコマンドに割り当てる(ショートカット、GPIO 制御など)
特定用途向けにカスタムジェスチャーモデルを学習する