注釈
こんにちは、SunFounder Raspberry Pi & Arduino & ESP32 Enthusiast Community on Facebookへようこそ!他の愛好家と一緒に、Raspberry Pi、Arduino、ESP32の世界により深く入り込みましょう。
参加する理由
専門家サポート: 購入後の問題や技術的な課題を、コミュニティと私たちのチームの助けを借りて解決します。
学習と共有: ヒントやチュートリアルを交換して、スキルを向上させましょう。
限定プレビュー: 新製品の発表や先行プレビューに早期アクセスできます。
特別割引: 最新製品を特別割引でお楽しみいただけます。
季節限定キャンペーンとプレゼント: プレゼント企画やホリデーキャンペーンに参加しましょう。
👉 一緒に発見し、創造する準備はできましたか? [こちら] をクリックして、今すぐ参加しましょう!
10. 物体検出
1. 概要
顔・手・姿勢向けの専用モデルに加えて、 MediaPipe には TensorFlow Lite ベースの 汎用 Object Detector も用意されています。
この章では、Raspberry Pi 上で
efficientdet_lite0.tflite モデルを使用し、
リアルタイム物体検出を行い、その結果を
カメラ映像上に可視化する方法を紹介します。
このモジュールは、次のような用途に活用できます:
リアルタイム物体認識デモ
スマートホーム / ロボティクスの認識機能
シンプルな安全監視
組み込みビジョンプロジェクト
2. 動作の仕組み
プログラムは次の手順で動作します:
MediaPipe Tasks の ObjectDetector を初期化し、
efficientdet_lite0.tfliteモデルを読み込むPicamera2 の動画ストリームからフレームを取得する
各フレームを MediaPipe の
mp.Imageオブジェクトに変換するdetect_for_videoを呼び出してリアルタイム物体検出を実行するOpenCV を使ってバウンディングボックスとラベルを描画する
表示する検出数を制限し、出力を見やすく保ちながら Raspberry Pi 上で安定した性能を維持する
3. モデルの準備
このサンプルでは、TensorFlow Lite(TFLite)形式の EfficientDet Lite0 モデルを使用します。
EfficientDet Lite0 は軽量で、 Raspberry Pi のような組み込みデバイス向けに最適化されています。 速度と精度のバランスが良好です。
efficientdet_lite0.tflite ファイルは
プロジェクトディレクトリ内に含まれているため、
そのまま利用できます。
より高い精度が必要で、ハードウェア性能に余裕がある場合は、 次のモデルに切り替えることもできます:
EfficientDet Lite1
EfficientDet Lite2
また、MediaPipe Tasks Object Detector の形式要件を満たしていれば、 独自に学習した TFLite 物体検出モデルに置き換えることも可能です。
4. コードの実行
重要
開始する前に、次の項目を確認してください:
パンチルトが組み立てられている
Raspberry Pi のデスクトップにアクセスできる
コードパッケージがインストールされている
Fusion HAT+ がインストールおよび設定されている
OpenCV がインストールされている
詳細な手順については 0. OpenCV のセットアップ を参照してください。
ターミナルを開き、次のコマンドを入力します:
sudo python3 ~/ai-lab-kit/mediapipe/mp_object.py
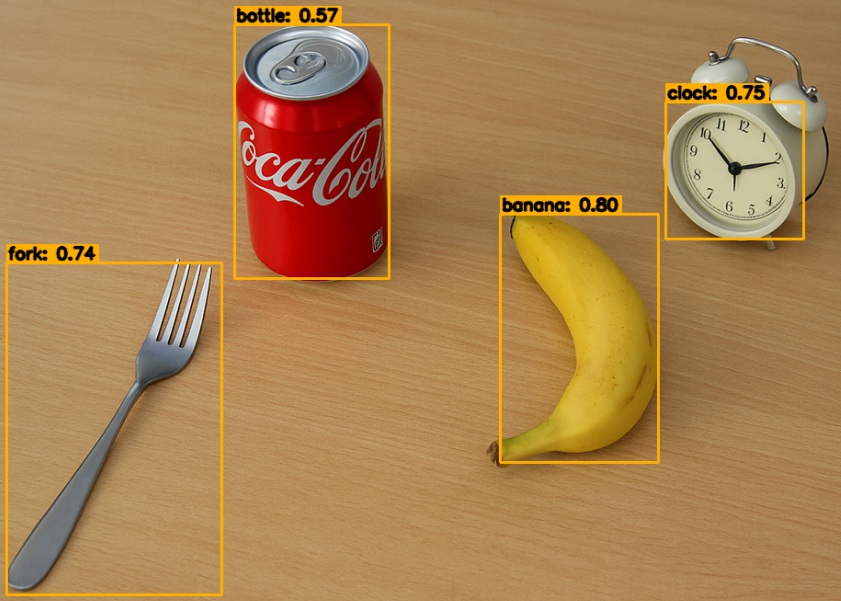
プログラムを実行すると、「Show Video」というタイトルのウィンドウが開き、ライブカメラ映像が表示されます。
各動画フレームに対して、Object Detector モデル(
efficientdet_lite0.tflite)がリアルタイムで実行され、シーン内の認識可能な物体を探索します。物体が検出されると:
各物体の周囲に矩形のバウンディングボックスが描画されます。
ボックスの上部に
name: score形式のラベルと信頼度スコアが表示されます (例:person: 0.87)。SCORE_THRESHOLD(デフォルト 0.5)以上の検出結果のみが表示されます。表示を見やすくし、性能を維持するため、1 フレームあたり最大
MAX_DRAW件 (デフォルト 20 件)まで描画します。
カメラ映像が変化すると、バウンディングボックスとラベルもリアルタイムで継続的に更新されます。
qを押すとプログラムを終了できます。 カメラは停止し、OpenCV ウィンドウは自動的に閉じます。
5. 完全なコード
# STEP 1: Import the necessary modules.
from picamera2 import Picamera2, Preview
import cv2
import numpy as np
import time
from pathlib import Path

import mediapipe as mp
from mediapipe.tasks import python
from mediapipe.tasks.python import vision

# -------------------- Paths & basic settings --------------------
BASE_DIR = Path(__file__).resolve().parent
TFLITE_MODEL_PATH = str(BASE_DIR / "efficientdet_lite0.tflite")  # Model path
SCORE_THRESHOLD = 0.5
MAX_DRAW = 20  # Limit the number of drawn detections

# -------------------- Helper: visualization --------------------
def visualize(bgr_image: np.ndarray, detection_result) -> np.ndarray:
    img = bgr_image.copy()
    h, w = img.shape[:2]
    drawn = 0

    for det in detection_result.detections:
        bbox = det.bounding_box
        x1 = max(0, min(int(bbox.origin_x), w - 1))
        y1 = max(0, min(int(bbox.origin_y), h - 1))
        x2 = max(0, min(int(bbox.origin_x + bbox.width), w - 1))
        y2 = max(0, min(int(bbox.origin_y + bbox.height), h - 1))

        # top-1 category
        if det.categories:
            c = det.categories[0]
            name = c.category_name if c.category_name else "object"
            score = c.score if c.score is not None else 0.0
            caption = f"{name}: {score:.2f}"
        else:
            caption = "object"

        # Draw bounding box
        cv2.rectangle(img, (x1, y1), (x2, y2), (0, 175, 255), 2)
        (tw, th), _ = cv2.getTextSize(caption, cv2.FONT_HERSHEY_SIMPLEX, 0.6, 2)
        cv2.rectangle(img, (x1, y1 - th - 6), (x1 + tw + 4, y1), (0, 175, 255), -1)
        cv2.putText(img, caption, (x1 + 2, y1 - 4),
                    cv2.FONT_HERSHEY_SIMPLEX, 0.6, (0, 0, 0), 2, cv2.LINE_AA)

        drawn += 1
        if drawn >= MAX_DRAW:
            break
    return img

# STEP 2: Initialize the detector
BaseOptions = python.BaseOptions
ObjectDetectorOptions = vision.ObjectDetectorOptions
RunningMode = vision.RunningMode

base_options = BaseOptions(model_asset_path=TFLITE_MODEL_PATH)
options = ObjectDetectorOptions(
    base_options=base_options,
    score_threshold=SCORE_THRESHOLD,
    running_mode=RunningMode.VIDEO,
)
detector = vision.ObjectDetector.create_from_options(options)

# STEP 3: Camera
picam2 = Picamera2()
config = picam2.create_preview_configuration(
    main={"size": (640, 480), "format": "XRGB8888"},
)
picam2.configure(config)
picam2.start()
print("Streaming... press 'q' to quit")

while True:
    frame_bgra = picam2.capture_array()
    frame_bgr = cv2.cvtColor(frame_bgra, cv2.COLOR_BGRA2BGR)

    # Convert to RGB and wrap as mp.Image
    frame_rgb = cv2.cvtColor(frame_bgr, cv2.COLOR_BGR2RGB)
    mp_image = mp.Image(image_format=mp.ImageFormat.SRGB, data=frame_rgb)

    # STEP 4: Detect
    ts_ms = int(time.time() * 1000)
    detection_result = detector.detect_for_video(mp_image, ts_ms)

    # STEP 5: Visualize
    annotated = visualize(frame_bgr, detection_result)

    cv2.imshow("Show Video", annotated)
    if cv2.waitKey(1) & 0xFF == ord('q'):
        break

try:
    picam2.stop_preview()
except Exception:
    pass
picam2.stop()
cv2.destroyAllWindows()
スクリプトを実行すると、カメラ映像には次の内容が表示されます:
検出された物体の周囲のバウンディングボックス
分類ラベルと信頼度スコア
リアルタイム検出 (Raspberry Pi 上でおおよそ 10~20 FPS 程度)
6. コードの解説
設定項目
BASE_DIR = Path(__file__).resolve().parent
TFLITE_MODEL_PATH = str(BASE_DIR / "efficientdet_lite0.tflite")
SCORE_THRESHOLD = 0.5
MAX_DRAW = 20
SCORE_THRESHOLDは、表示する検出結果の最小信頼度を制御します (Tasks ランタイム内部で適用されます)。MAX_DRAWは、1 フレームごとに描画するボックス数を制限するための UI 上の補助設定です。
インポート
from picamera2 import Picamera2, Preview
import cv2, numpy as np, time
from pathlib import Path
import mediapipe as mp
from mediapipe.tasks import python
from mediapipe.tasks.python import vision
mediapipe.tasks.python.visionには ObjectDetector の Tasks API が含まれています。ウィンドウ表示や描画には、引き続き従来の OpenCV を使用します。
可視化ヘルパー
def visualize(bgr_image: np.ndarray, detection_result) -> np.ndarray:
    """
    Draw bounding boxes and category labels on a BGR image.
    Compatible with MediaPipe Tasks ObjectDetector's detection_result.
    """
    img = bgr_image.copy()
    h, w = img.shape[:2]

    drawn = 0
    for det in detection_result.detections:
        bbox = det.bounding_box  # (origin_x, origin_y, width, height) in pixels
        x1 = int(bbox.origin_x); y1 = int(bbox.origin_y)
        x2 = int(bbox.origin_x + bbox.width); y2 = int(bbox.origin_y + bbox.height)

        # Clamp to frame bounds (defensive)
        x1 = max(0, min(x1, w - 1)); y1 = max(0, min(y1, h - 1))
        x2 = max(0, min(x2, w - 1)); y2 = max(0, min(y2, h - 1))

        # Top-1 category
        if det.categories:
            c = det.categories[0]
            name = c.category_name if c.category_name else "object"
            score = c.score if c.score is not None else 0.0
            caption = f"{name}: {score:.2f}"
        else:
            caption = "object"

        # Draw rectangle and caption
        cv2.rectangle(img, (x1, y1), (x2, y2), (0, 175, 255), 2)
        (tw, th), _ = cv2.getTextSize(caption, cv2.FONT_HERSHEY_SIMPLEX, 0.6, 2)
        cv2.rectangle(img, (x1, y1 - th - 6), (x1 + tw + 4, y1), (0, 175, 255), -1)
        cv2.putText(img, caption, (x1 + 2, y1 - 4),
                    cv2.FONT_HERSHEY_SIMPLEX, 0.6, (0, 0, 0), 2, cv2.LINE_AA)

        drawn += 1
        if drawn >= MAX_DRAW:
            break

    return img
メインループをすっきり保てます。
存在しない
visualizeユーティリティに依存せず、Tasks の出力を直接扱っています。
ObjectDetector の作成
BaseOptions = python.BaseOptions
ObjectDetectorOptions = vision.ObjectDetectorOptions
RunningMode = vision.RunningMode

base_options = BaseOptions(model_asset_path=TFLITE_MODEL_PATH)
options = ObjectDetectorOptions(
    base_options=base_options,
    score_threshold=SCORE_THRESHOLD,
    running_mode=RunningMode.VIDEO,  # VIDEO mode for streaming input
)
detector = vision.ObjectDetector.create_from_options(options)
RunningMode.VIDEOはストリーム入力向けに最適化されており、 タイムスタンプが必要 です。Tasks ランタイムが画像のリサイズや正規化を内部で処理してくれます。
カメラ設定(ストリーミング入力)
picam2 = Picamera2()
config = picam2.create_preview_configuration(
    main={"size": (640, 480), "format": "XRGB8888"},
)
picam2.configure(config)
picam2.start()
Raspberry Pi では、640×480 は FPS と精度のバランスが良い設定です。
Picamera2 は BGRA(
XRGB8888)を返すため、後で BGR / RGB に変換します。
各フレームごとの検出処理
frame_bgra = picam2.capture_array()
frame_bgr  = cv2.cvtColor(frame_bgra, cv2.COLOR_BGRA2BGR)
frame_rgb  = cv2.cvtColor(frame_bgr,  cv2.COLOR_BGR2RGB)

mp_image = mp.Image(image_format=mp.ImageFormat.SRGB, data=frame_rgb)

ts_ms = int(time.time() * 1000)  # monotonically increasing timestamp
detection_result = detector.detect_for_video(mp_image, ts_ms)
MediaPipe は RGB バッファを前提としています。
タイムスタンプは 各フレームで増加し続ける必要 があり、 このデモでは
time.time()*1000で十分です。
描画と表示
annotated = visualize(frame_bgr, detection_result)
cv2.imshow("Show Video", annotated)
if cv2.waitKey(1) & 0xFF == ord('q'):
    break
ヘルパー関数は、OpenCV 表示にそのまま使える BGR 画像を返します。
qを押すとループを終了します。
後片付け
try:
    picam2.stop_preview()
except Exception:
    pass
picam2.stop()
cv2.destroyAllWindows()
デバイスがロックされたままにならないよう、 必ずカメラを解放し、ウィンドウを閉じてください。
7. パフォーマンスと応用
Optimization Direction |
Effect |
Suggestion |
|---|---|---|
Resolution |
解像度が高いほど画質は良くなるが速度は低下する |
640x480 で十分 |
Model Selection |
Lite0 ~ Lite2 |
Lite0 は高速、Lite2 は高精度 |
Multi-object Drawing |
物体数が多すぎると遅延の原因になる |
|
8. トラブルシューティング
検出結果が出ない
何も検出されない場合、信頼度の閾値が高すぎる可能性があります。
SCORE_THRESHOLDを下げて (たとえば 0.5 から 0.3 にして)再度試してください。フレームレートが低い
動画が遅く感じる場合、モデルまたは解像度が Raspberry Pi に対して重すぎる可能性があります。
より軽量なモデル(
efficientdet_lite0.tflite)を使用し、解像度も下げてください (たとえば 640×480 や 320×240)。 バックグラウンドで動作している他のプロセスを終了するのも効果的です。検出ボックスがずれて見える
バウンディングボックスがずれていたり、画面外にはみ出したりする場合、 たいていは座標変換の問題が原因です。
バウンディングボックスの座標が必ず画像範囲内に収まるようにしてください。 このサンプルでは、
x1, y1, x2, y2をすでにクランプしており、範囲外描画を防いでいます。表示がごちゃごちゃして見づらい
検出される物体が多すぎると、画面が煩雑になり結果が見づらくなります。
MAX_DRAW(たとえば 10~20)を使って描画数を制限し、表示を見やすく安定させてください。
9. まとめ
この章では、MediaPipe Tasks に基づく汎用物体検出を実装しました
EfficientDet Lite0 モデルを使用し、精度と性能のバランスを取りました
検出結果の可視化方法を習得しました
将来的には独自モデル(果物、車両、危険物検出など)へ拡張することも可能です