Note
Hello, welcome to the SunFounder Raspberry Pi & Arduino & ESP32 Enthusiasts Community on Facebook! Dive deeper into Raspberry Pi, Arduino, and ESP32 with fellow enthusiasts.
Why Join?
Expert Support: Solve post-sale issues and technical challenges with help from our community and team.
Learn & Share: Exchange tips and tutorials to enhance your skills.
Exclusive Previews: Get early access to new product announcements and sneak peeks.
Special Discounts: Enjoy exclusive discounts on our newest products.
Festive Promotions and Giveaways: Take part in giveaways and holiday promotions.
👉 Ready to explore and create with us? Click [here] and join today!
7. Canny Edge Detection
In this chapter, we will capture real-time video using Raspberry Pi + Picamera2 and perform edge detection with OpenCV’s Canny algorithm. Edge detection is a fundamental part of computer vision, and the Canny algorithm is widely regarded as one of the most stable and noise-robust methods.
1. What Does the Canny Algorithm Do?
In images, edges usually correspond to locations with strong intensity (grayscale) changes, such as:
Object outlines
Boundaries between bright and dark regions
Structural edge lines
The purpose of Canny edge detection is to:
Accurately extract edge information while reducing unnecessary interference;
Provide a reliable foundation for subsequent contour detection, object segmentation, and geometric recognition (e.g., circles, rectangles);
In robot vision, it’s often used for path detection and obstacle recognition.
2. Run the Code
Important
Before you start, make sure:
The pan-tilt is assembled
You can access the Raspberry Pi desktop
The code package is installed
Fusion HAT+ is installed and configured
OpenCV is installed
For detailed instructions, see 0. Setup OpenCV.
Open the terminal and enter the following command:
cd ~/ai-lab-kit/opencv_python
python3 cv_7_canny.py
Tip
We also provide
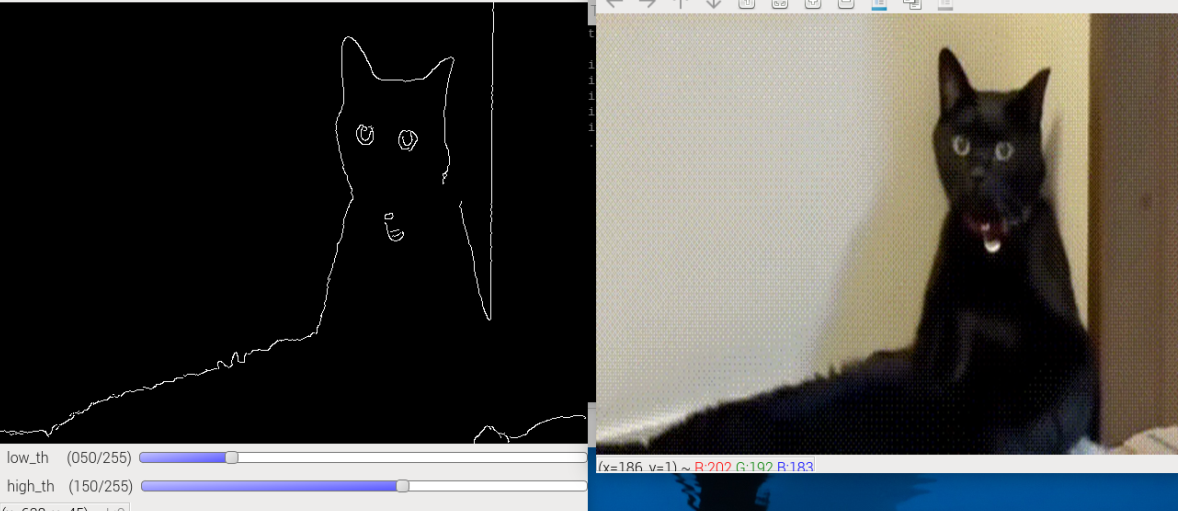
cv_7_canny_video.pyto process video files, andcv_7_canny_conbine.pyto combine real-time capture with video (combined view).When you run the program, two OpenCV windows will appear:
Camera – displays the live camera image
Canny Edges – displays the detected edges in real time
You can adjust the edge detection thresholds using the trackbars. Press q or close any window to exit the program.
3. Complete Code
from picamera2 import Picamera2
import cv2

# Empty callback function for trackbars (required by OpenCV API)
def _noop(x):
   pass

# -----------------------------
# Camera setup
# -----------------------------
picam2 = Picamera2()

# Create a preview configuration:
# size: resolution of the camera image
# format: XRGB8888 (4-channel image, similar to BGRA)
picam2.configure(
   picam2.create_preview_configuration(
      main={"size": (640, 480), "format": "XRGB8888"}
   )
)

# Start the camera
picam2.start()

# -----------------------------
# Create OpenCV windows
# -----------------------------
WIN_CAM = "Camera"        # window for original image
WIN_EDGE = "Canny Edges"  # window for edge detection result

cv2.namedWindow(WIN_CAM)
cv2.namedWindow(WIN_EDGE)

# -----------------------------
# Create trackbars to tune Canny thresholds
# -----------------------------
# low_th: lower threshold for Canny
# high_th: higher threshold for Canny
cv2.createTrackbar("low_th",  WIN_EDGE, 50, 255, _noop)
cv2.createTrackbar("high_th", WIN_EDGE, 150, 255, _noop)

print("Press 'q' to exit")

# -----------------------------
# Main loop
# -----------------------------
while True:
   # Capture one frame from the camera (BGRA format)
   frame_bgra = picam2.capture_array()

   # Convert BGRA to BGR for OpenCV processing
   frame_bgr = cv2.cvtColor(frame_bgra, cv2.COLOR_BGRA2BGR)

   # Convert the frame to grayscale
   gray = cv2.cvtColor(frame_bgr, cv2.COLOR_BGR2GRAY)

   # Apply Gaussian blur to reduce noise
   blurred = cv2.GaussianBlur(gray, (5, 5), 0)

   # Read current threshold values from trackbars
   low_th = cv2.getTrackbarPos("low_th", WIN_EDGE)
   high_th = cv2.getTrackbarPos("high_th", WIN_EDGE)

   # Ensure high_th is always larger than low_th
   if high_th <= low_th:
      high_th = low_th + 1
      cv2.setTrackbarPos("high_th", WIN_EDGE, high_th)

   # Perform Canny edge detection
   edges = cv2.Canny(blurred, low_th, high_th)

   # Show original camera image
   cv2.imshow(WIN_CAM, frame_bgr)

   # Show edge detection result
   cv2.imshow(WIN_EDGE, edges)

   # Process GUI events and keyboard input
   key = cv2.waitKey(1) & 0xFF

   # Press 'q' to exit the program
   if key == ord("q"):
      break

   # Exit if the user closes any OpenCV window
   if (cv2.getWindowProperty(WIN_CAM, cv2.WND_PROP_VISIBLE) < 1 or
      cv2.getWindowProperty(WIN_EDGE, cv2.WND_PROP_VISIBLE) < 1):
      break

# -----------------------------
# Cleanup
# -----------------------------
picam2.stop()             # Stop the camera
cv2.destroyAllWindows()   # Close all OpenCV windows
4. Code Explanation
Define a callback function for trackbars:
def _noop(x):
    pass
OpenCV trackbars require a callback function. We do not need to do anything inside it, so an empty function is enough.
Initialize Picamera2 and set the preview format:
picam2 = Picamera2()
picam2.configure(
    picam2.create_preview_configuration(
        main={"size": (640, 480), "format": "XRGB8888"}
    )
)
picam2.start()
This starts the Raspberry Pi camera at 640×480.
XRGB8888is a 4-channel format, so frames are BGRA-like.Create two OpenCV windows:
WIN_CAM = "Camera"
WIN_EDGE = "Canny Edges"

cv2.namedWindow(WIN_CAM)
cv2.namedWindow(WIN_EDGE)
One window shows the original camera image, and the other shows the Canny edge result.
Create trackbars to adjust Canny thresholds in real time:
cv2.createTrackbar("low_th",  WIN_EDGE, 50, 255, _noop)
cv2.createTrackbar("high_th", WIN_EDGE, 150, 255, _noop)
low_th: lower threshold for Canny.high_th: higher threshold for Canny.
You can drag these sliders to change the edge detection sensitivity.
Capture a frame and convert it for OpenCV processing:
frame_bgra = picam2.capture_array()
frame_bgr = cv2.cvtColor(frame_bgra, cv2.COLOR_BGRA2BGR)
The camera output is 4-channel, so we convert it to standard 3-channel BGR.
Convert to grayscale and blur the image:
gray = cv2.cvtColor(frame_bgr, cv2.COLOR_BGR2GRAY)
blurred = cv2.GaussianBlur(gray, (5, 5), 0)
Canny works on grayscale images.
Gaussian blur reduces noise, which helps avoid detecting too many false edges.
Read trackbar values and keep them valid:
low_th = cv2.getTrackbarPos("low_th", WIN_EDGE)
high_th = cv2.getTrackbarPos("high_th", WIN_EDGE)

if high_th <= low_th:
    high_th = low_th + 1
    cv2.setTrackbarPos("high_th", WIN_EDGE, high_th)
Canny expects
high_thto be larger thanlow_th. This block automatically fixes the values if the user drags them too close.Run Canny edge detection:
edges = cv2.Canny(blurred, low_th, high_th)
Canny highlights strong edges in the image. Lower thresholds usually detect more edges, but also more noise.
Display both windows:
cv2.imshow(WIN_CAM, frame_bgr)
cv2.imshow(WIN_EDGE, edges)
The left window shows the live camera feed, and the other shows the detected edges.
Exit conditions (press
qor close the window):key = cv2.waitKey(1) & 0xFF if key == ord("q"): break if (cv2.getWindowProperty(WIN_CAM, cv2.WND_PROP_VISIBLE) < 1 or cv2.getWindowProperty(WIN_EDGE, cv2.WND_PROP_VISIBLE) < 1): break
This allows beginners to stop the program in two ways: keyboard or closing the window.
Cleanup:
picam2.stop()
cv2.destroyAllWindows()
Always stop the camera and close all OpenCV windows to release resources.
5. Why is Canny Useful?
Canny output is well-suited for subsequent vision tasks:
Application |
Description |
|---|---|
Contour detection |
Use |
Object segmentation |
Use edges as a basis to separate target from background |
Shape recognition |
Combine with Hough transforms to detect circles, lines, etc. |
Robot navigation |
Detect ground, roads, obstacle outlines to assist planning |
OCR / Target localization |
Text regions, QR codes, markers often have clear edge features |
Canny isn’t just “cool-looking”—it’s the entry point to a broader CV pipeline.
6. Threshold Selection Tips
Scenario |
low_th |
high_th |
Notes |
|---|---|---|---|
Stable indoor lighting |
50 |
150 |
General case, stable results |
Strong lighting & high contrast |
100 |
200 |
Increase thresholds to reduce false edges |
Low light, noisy |
30 |
100 |
Lower thresholds to keep more details |
Very blurry edges |
20 |
80 |
Lower thresholds further to make edges more sensitive |
Use the trackbars to quickly tune an appropriate range, then hardcode it into your program.
7. Extended Exercises
Use
cv2.findContourson the Canny output to draw object boundaries.Change the Gaussian kernel size and observe how edge accuracy changes.
Try different thresholds in low/high light to understand double-threshold effects.
Use the edge map for shape detection with
cv2.HoughLines(lines) orcv2.HoughCircles(circles).