Note
Hello, welcome to the SunFounder Raspberry Pi & Arduino & ESP32 Enthusiasts Community on Facebook! Dive deeper into Raspberry Pi, Arduino, and ESP32 with fellow enthusiasts.
Why Join?
Expert Support: Solve post-sale issues and technical challenges with help from our community and team.
Learn & Share: Exchange tips and tutorials to enhance your skills.
Exclusive Previews: Get early access to new product announcements and sneak peeks.
Special Discounts: Enjoy exclusive discounts on our newest products.
Festive Promotions and Giveaways: Take part in giveaways and holiday promotions.
👉 Ready to explore and create with us? Click [here] and join today!
5. MeanShift Object Tracking
MeanShift is a classic histogram-based object tracking algorithm. In this lesson, we’ll not only implement a complete MeanShift tracking example, but also explain why each step is taken and what’s happening under the hood.
1. What is MeanShift?
MeanShift iteratively shifts a window according to probability density to find the most likely location of the target.
In plain words: You first give the algorithm an “initial target region.” It computes the color features of this region (e.g., the target’s color histogram), and then in each subsequent frame finds the area most similar to that color and moves the rectangle there.
This process doesn’t rely on deep learning and requires no pre-training—it’s very lightweight.
2. Run the Code
Important
Before you start, make sure:
The pan-tilt is assembled
You can access the Raspberry Pi desktop
The code package is installed
Fusion HAT+ is installed and configured
OpenCV is installed
For detailed instructions, see 0. Setup OpenCV.
Open the terminal and enter the following command:
cd ~/ai-lab-kit/opencv_python
python3 cv_5_meanshift.py
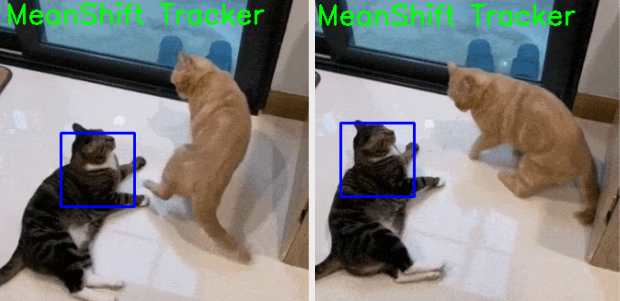
When you run the program, an OpenCV window named MeanShift Tracker will appear and start playing the video file
sample2.mp4.A green rectangle will be drawn around the target object and updated in real time using the MeanShift tracking algorithm.
The tracking window will move as the object moves in the video.
You can exit the program in two ways:
Press the q key on the keyboard
Close the window by clicking the close button (X)
After exiting, the video playback stops and all OpenCV windows are closed.
3. Complete Code
Below is the full MeanShift tracking script (cv_5_meanshift.py):
import numpy as np
import cv2

cap = cv2.VideoCapture("sample2.mp4")

# Read the first frame
ret, frame = cap.read()
if not ret:
   raise RuntimeError("Cannot read the video file.")

# Initial tracking window (x, y, w, h)
x, y, w, h = 80, 100, 80, 80
track_window = (x, y, w, h)

# Convert the first frame to HSV
hsv_frame = cv2.cvtColor(frame, cv2.COLOR_BGR2HSV)

# Extract ROI in HSV (ONLY the selected area)
roi_hsv = hsv_frame[y:y+h, x:x+w]

# Create a mask for ROI (filter out low saturation/value pixels)
roi_mask = cv2.inRange(
   roi_hsv,
   np.array((0, 61, 33), dtype=np.uint8),
   np.array((180, 255, 255), dtype=np.uint8)
)

# Compute histogram of ROI (Hue channel)
roi_hist = cv2.calcHist([roi_hsv], [0], roi_mask, [180], [0, 180])

# Normalize histogram for better tracking
cv2.normalize(roi_hist, roi_hist, 0, 255, cv2.NORM_MINMAX)

# Termination criteria: max 15 iterations or move by at least 2 pixels
termination = (cv2.TERM_CRITERIA_EPS | cv2.TERM_CRITERIA_COUNT, 15, 2)

# FPS settings (fallback if FPS is unavailable)
fps = cap.get(cv2.CAP_PROP_FPS)
if not fps or fps <= 1e-3:
   fps = 30.0
delay_ms = int(1000 / fps)

WINDOW_NAME = "MeanShift Tracker"

while True:
   ret, frame = cap.read()

   # Loop video
   if not ret:
      cap.set(cv2.CAP_PROP_POS_FRAMES, 0)
      continue

   # Convert frame to HSV
   hsv = cv2.cvtColor(frame, cv2.COLOR_BGR2HSV)

   # Back projection: probability map of where the ROI histogram appears in the frame
   bp = cv2.calcBackProject([hsv], [0], roi_hist, [0, 180], scale=1)

   # Apply meanShift to update tracking window
   _, track_window = cv2.meanShift(bp, track_window, termination)

   # Draw tracking window
   x, y, w, h = track_window
   cv2.rectangle(frame, (x, y), (x + w, y + h), (0, 255, 0), 2)
   cv2.putText(frame, "MeanShift Tracker", (10, 30),
               cv2.FONT_HERSHEY_SIMPLEX, 1, (0, 255, 0), 2)

   cv2.imshow(WINDOW_NAME, frame)

   # Handle keyboard input and GUI events
   key = cv2.waitKey(delay_ms) & 0xFF
   if key == ord("q"):
      break

   # Exit if window is closed
   if cv2.getWindowProperty(WINDOW_NAME, cv2.WND_PROP_VISIBLE) < 1:
      break

cap.release()
cv2.destroyAllWindows()
4. Explanation
Open the video file:
cap = cv2.VideoCapture("sample2.mp4")
This creates a video capture object so OpenCV can read frames from the file.
Read the first frame and make sure it works:
ret, frame = cap.read()
if not ret:
    raise RuntimeError("Cannot read the video file.")
MeanShift tracking needs an initial frame to learn what to track.
Set the initial tracking window (the object you want to track):
x, y, w, h = 80, 100, 80, 80
track_window = (x, y, w, h)
This rectangle is the starting position of the target (ROI). You usually adjust these values to match the object in the first frame.
Convert the first frame to HSV and extract the ROI:
hsv_frame = cv2.cvtColor(frame, cv2.COLOR_BGR2HSV)
roi_hsv = hsv_frame[y:y+h, x:x+w]
HSV is commonly used for tracking because the Hue channel describes color more consistently than RGB/BGR.
Build a mask to ignore weak/invalid pixels in the ROI:
roi_mask = cv2.inRange(
    roi_hsv,
    np.array((0, 61, 33), dtype=np.uint8),
    np.array((180, 255, 255), dtype=np.uint8)
)
This filters out pixels with very low saturation/value (often shadows or noise), improving tracking stability.
Compute and normalize the ROI histogram (Hue channel):
roi_hist = cv2.calcHist([roi_hsv], [0], roi_mask, [180], [0, 180])
cv2.normalize(roi_hist, roi_hist, 0, 255, cv2.NORM_MINMAX)
The histogram describes the target’s color distribution (Hue).
Normalization makes the histogram scale consistent across different lighting or ROI sizes.
Define termination criteria for MeanShift:
termination = (cv2.TERM_CRITERIA_EPS | cv2.TERM_CRITERIA_COUNT, 15, 2)
MeanShift will stop when either: - it runs 15 iterations, or - the window movement is smaller than 2 pixels.
Set a playback delay based on the video FPS:
fps = cap.get(cv2.CAP_PROP_FPS)
if not fps or fps <= 1e-3:
    fps = 30.0
delay_ms = int(1000 / fps)
This keeps playback close to the original video speed. If FPS cannot be read, it falls back to 30 FPS.
Convert each frame to HSV (for tracking):
hsv = cv2.cvtColor(frame, cv2.COLOR_BGR2HSV)
Tracking is performed in HSV so we can match the target’s Hue histogram.
Back projection (find where the target color is likely to be):
bp = cv2.calcBackProject([hsv], [0], roi_hist, [0, 180], scale=1)
Back projection produces a probability map: bright areas are more likely to match the ROI histogram.
Update the tracking window using MeanShift:
_, track_window = cv2.meanShift(bp, track_window, termination)
MeanShift moves the tracking window toward the highest-density area in the probability map, updating the target position frame by frame.
Draw the tracking result:
x, y, w, h = track_window
cv2.rectangle(frame, (x, y), (x + w, y + h), (0, 255, 0), 2)
This draws the current tracking rectangle on the video frame.
Display the window and exit conditions:
key = cv2.waitKey(delay_ms) & 0xFF
if key == ord("q"):
    break

if cv2.getWindowProperty(WINDOW_NAME, cv2.WND_PROP_VISIBLE) < 1:
    break
Press
qto quit.Closing the window also exits safely.
Release resources:
cap.release()
cv2.destroyAllWindows()
Always release the video and close windows to free system resources.
5. MeanShift vs. CAMShift
Feature |
MeanShift |
CAMShift |
|---|---|---|
Window size |
Fixed |
Auto-adjusts (adapts to target scale) |
Rotating target |
Not supported |
Supported |
Suitable scenarios |
Target size relatively stable |
Target may scale/rotate |
Applications |
Simple tracking, balls, markers |
Practical tracking, surveillance, recognition |
6. Advanced: Select ROI with the Mouse
Previously, we used fixed values:
x, y, w, h = 150, 200, 80, 80
That’s simple but not flexible. If you switch videos or the target starts elsewhere, you’d have to change the code.
OpenCV provides cv2.selectROI so you can select the target region interactively on the first frame with the mouse, and the program will obtain (x, y, w, h) automatically.
Modified initialization code
Run cv_5_meanshift_auto.py for the modified code.
cd ~/ai-lab-kit/opencv_python
python3 cv_5_meanshift_auto.py
import numpy as np
import cv2
from pathlib import Path

# -----------------------------
# Load video
# -----------------------------
BASE_DIR = Path(__file__).resolve().parent
video_path = str(BASE_DIR / "sample3.mp4")

cap = cv2.VideoCapture(video_path)
if not cap.isOpened():
   raise RuntimeError("Error opening video file")

# Read the first frame (needed for ROI selection and building the target model)
ret, frame = cap.read()
if not ret:
   raise RuntimeError("Cannot read the first frame from the video")

# -----------------------------
# Select ROI with mouse
# -----------------------------
# Press Enter/Space to confirm, press Esc to cancel
roi_box = cv2.selectROI("Select ROI", frame, fromCenter=False, showCrosshair=True)
cv2.destroyWindow("Select ROI")
...
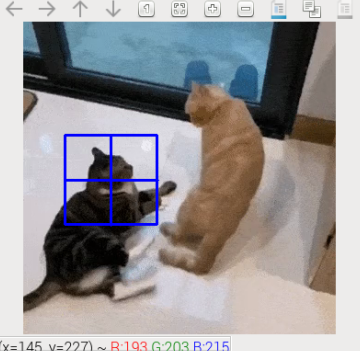
When you run the program, the first frame of the video will be displayed and you will be asked to select a Region of Interest (ROI) using the mouse.
Drag the mouse to draw a rectangle around the target object, then press Enter or Space to confirm the selection. Press Esc to cancel the selection.
After confirming the ROI, a window named MeanShift Tracker will appear. The selected object will be tracked with a green bounding box, and the box will move as the object moves in the video.
To stop the program:
Press the q key on the keyboard
Or close the display window using the close button (X)
After exiting, the video playback stops and all OpenCV windows are closed.
Notes
cv2.selectROI is OpenCV’s built-in interactive ROI selector—great for manual initialization.
It returns (x, y, w, h), which is fully compatible with track_window, so you don’t need to change the main CAMShift/MeanShift logic.
This lets you reuse the same program on different videos and targets.
7. Advanced II: Dynamically Compute HSV Thresholds for the ROI
The original cv_5_meanshift.py uses manually set HSV thresholds, suitable when the target color is fixed and lighting is stable.
# apply mask on the HSV frame
roi_mask = cv2.inRange(roi_hsv, lower, upper)
If lighting varies significantly or the target color isn’t fixed, hard-coded inRange bounds may be suboptimal.
A smarter approach is to automatically compute the HSV lower/upper bounds from the selected ROI.
Example: Auto-computing HSV thresholds
Run cv_5_meanshift_auto.py for the modified code.
cd ~/ai-lab-kit/opencv_python
python3 cv_5_meanshift_auto.py
hsv0 = cv2.cvtColor(frame, cv2.COLOR_BGR2HSV)
roi_hsv = hsv0[y:y + h, x:x + w]

# Split ROI HSV channels
h_roi = roi_hsv[:, :, 0]
s_roi = roi_hsv[:, :, 1]
v_roi = roi_hsv[:, :, 2]

# Use percentiles to get robust ranges (ignore outliers)
h_low, h_high = np.percentile(h_roi, [5, 95])
s_low, s_high = np.percentile(s_roi, [5, 95])
v_low, v_high = np.percentile(v_roi, [5, 95])

# Add padding so the range is not too tight
pad_h, pad_s, pad_v = 10, 20, 20

lower = np.array([
   max(int(h_low) - pad_h, 0),
   max(int(s_low) - pad_s, 0),
   max(int(v_low) - pad_v, 0)
], dtype=np.uint8)

upper = np.array([
   min(int(h_high) + pad_h, 180),
   min(int(s_high) + pad_s, 255),
   min(int(v_high) + pad_v, 255)
], dtype=np.uint8)

# Mask ONLY the ROI (do not use the whole frame mask)
roi_mask = cv2.inRange(roi_hsv, lower, upper)
When selecting very dark or very bright targets, you no longer need to tweak thresholds manually; it also adapts quickly to different lighting and colors.
Note
np.percentile(5%–95%) trims extremes (edges, shadows, highlights, etc.) within the ROI, improving robustness.pad_h,pad_s,pad_vprovide tolerance so mild color shifts are still captured.lowerandupperare the dynamic HSV bounds used directly withcv2.inRange.
Summary
Use
cv2.selectROIfor flexible target initialization.Use
np.percentileto auto-compute HSV bounds for adaptability.Combined with
cv2.inRangeand CAMShift/MeanShift, this approach remains stable under challenging lighting and target variations.