Note
Hello, welcome to the SunFounder Raspberry Pi & Arduino & ESP32 Enthusiasts Community on Facebook! Dive deeper into Raspberry Pi, Arduino, and ESP32 with fellow enthusiasts.
Why Join?
Expert Support: Solve post-sale issues and technical challenges with help from our community and team.
Learn & Share: Exchange tips and tutorials to enhance your skills.
Exclusive Previews: Get early access to new product announcements and sneak peeks.
Special Discounts: Enjoy exclusive discounts on our newest products.
Festive Promotions and Giveaways: Take part in giveaways and holiday promotions.
👉 Ready to explore and create with us? Click [here] and join today!
3. Real-Time Camera Capture
In the previous chapters, we learned how to read and play local video files. In this chapter, we will take it a step further by using the Raspberry Pi camera for real-time video capture and applying color space conversion with OpenCV.
1. Project Objectives
Use Picamera2 to capture real-time camera frames
Convert the camera output from BGRA format to BGR format
Use OpenCV for real-time preview
Understand the characteristics and use cases of different color spaces
2. Run the Code
Important
Before you start, make sure:
The pan-tilt is assembled
You can access the Raspberry Pi desktop
The code package is installed
Fusion HAT+ is installed and configured
OpenCV is installed
For detailed instructions, see 0. Setup OpenCV.
Open the terminal and enter the following command:
cd ~/ai-lab-kit/opencv_python
python3 cv_3_camera.py
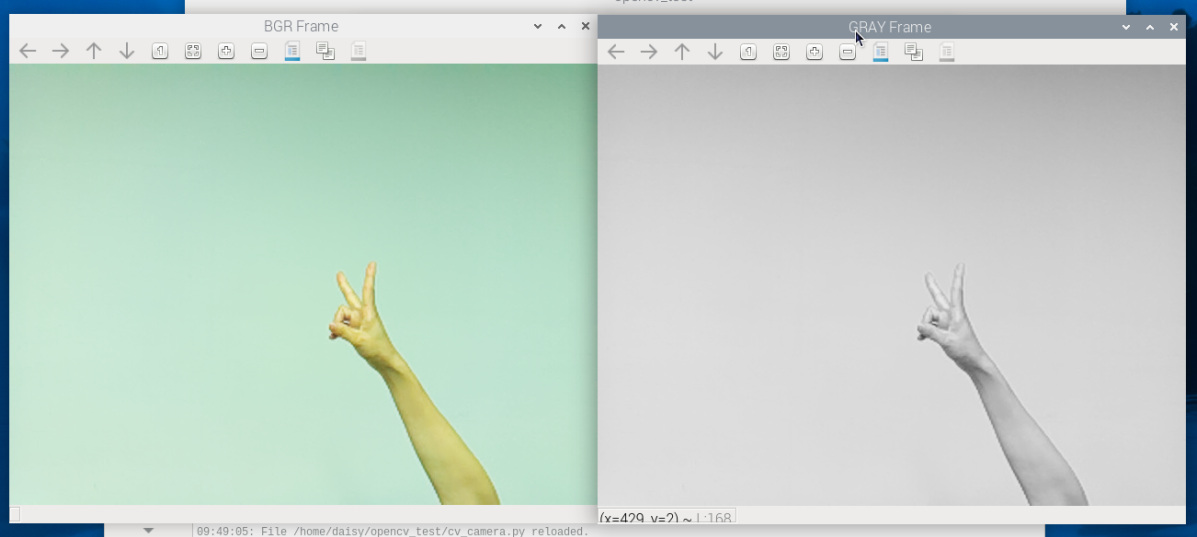
When you run the program, two OpenCV windows will appear:
BGR Frame – shows the live color camera image
GRAY Frame – shows the grayscale version of the same image
You can exit the program in two ways:
Press the q key on the keyboard
Close any of the windows by clicking the close button (X)
After exiting, the camera stops streaming and all OpenCV windows are closed.
3. Example Code
Below is the complete Python example for this chapter (cv_3_camera.py):
# Import Picamera2 for Raspberry Pi Camera
from picamera2 import Picamera2
import cv2
import time

# Create a Picamera2 object
picam2 = Picamera2()

# Create a camera configuration
# XRGB8888 is a 4-channel format (similar to BGRA)
# size sets the resolution of the camera frame
config = picam2.create_preview_configuration(
   main={"size": (640, 480), "format": "XRGB8888"}
)

# Apply the configuration to the camera
picam2.configure(config)

# Start the camera
picam2.start()

print("Streaming... press 'q' to quit")

# Window names
WINDOW_BGR = "BGR Frame"
WINDOW_GRAY = "GRAY Frame"

while True:
   # Capture one frame as a NumPy array (BGRA-like format)
   frame_bgra = picam2.capture_array()

   # Convert BGRA to BGR for normal color display
   frame_bgr = cv2.cvtColor(frame_bgra, cv2.COLOR_BGRA2BGR)

   # Convert BGRA directly to grayscale
   frame_gray = cv2.cvtColor(frame_bgra, cv2.COLOR_BGRA2GRAY)

   # Display the color and grayscale frames
   cv2.imshow(WINDOW_BGR, frame_bgr)
   cv2.imshow(WINDOW_GRAY, frame_gray)

   # Process GUI events and check keyboard input
   # Press 'q' to exit the loop
   key = cv2.waitKey(1) & 0xFF
   if key == ord("q"):
      break

   # Exit if the user closes any OpenCV window
   if (cv2.getWindowProperty(WINDOW_BGR, cv2.WND_PROP_VISIBLE) < 1 or
      cv2.getWindowProperty(WINDOW_GRAY, cv2.WND_PROP_VISIBLE) < 1):
      break

   # Optional: limit frame rate to reduce CPU usage (about 30 FPS)
   time.sleep(1 / 30)

# Stop the camera
picam2.stop()

# Close all OpenCV windows
cv2.destroyAllWindows()
4. Code Explanation
Import required libraries:
from picamera2 import Picamera2
import cv2
import time
Picamera2 captures frames from the Raspberry Pi camera, and OpenCV is used for image conversion and display.
Create a Picamera2 object and configure the camera:
picam2 = Picamera2()

config = picam2.create_preview_configuration(
    main={"size": (640, 480), "format": "XRGB8888"}
)

picam2.configure(config)
picam2.start()
This starts the camera at 640×480.
XRGB8888is a 4-channel format, so each captured frame is BGRA-like.Capture a frame as a NumPy array:
frame_bgra = picam2.capture_array()
Each loop reads one frame from the camera.
Convert the frame for display:
frame_bgr = cv2.cvtColor(frame_bgra, cv2.COLOR_BGRA2BGR)
frame_gray = cv2.cvtColor(frame_bgra, cv2.COLOR_BGRA2GRAY)
frame_bgris used for normal color display.frame_grayis a grayscale version of the same frame.
Display the frames in two windows:
cv2.imshow(WINDOW_BGR, frame_bgr)
cv2.imshow(WINDOW_GRAY, frame_gray)
This opens two OpenCV windows: one shows the color frame, and the other shows the grayscale frame.
Exit conditions (press
qor close a window):key = cv2.waitKey(1) & 0xFF if key == ord("q"): break if (cv2.getWindowProperty(WINDOW_BGR, cv2.WND_PROP_VISIBLE) < 1 or cv2.getWindowProperty(WINDOW_GRAY, cv2.WND_PROP_VISIBLE) < 1): break
Press
qto quit.Closing either window will also stop the program safely.
Limit FPS to reduce CPU usage:
time.sleep(1 / 30)
This adds a small delay so the loop runs at about 30 FPS, which can reduce CPU load on Raspberry Pi.
Stop the camera and close OpenCV windows:
picam2.stop()
cv2.destroyAllWindows()
This releases the camera and closes all OpenCV windows before the program exits.
5. The Importance of Color Space Conversion
The raw image format output from the camera may not always match the format OpenCV requires for processing. In this example, Picamera2 outputs images in XRGB8888 (BGRA) format, while OpenCV primarily uses BGR format.
Therefore, we need to convert the image as follows:
frame_bgr = cv2.cvtColor(frame_bgra, cv2.COLOR_BGRA2BGR)
This ensures that the image is arranged in the standard BGR channel order used by OpenCV, making it display and process correctly.
We can then convert the BGR image to grayscale for further processing:
frame_gray = cv2.cvtColor(frame_bgr, cv2.COLOR_BGR2GRAY)
This allows us to transform camera-captured images into a format suitable for OpenCV image processing workflows.
Common Color Spaces and Use Cases
Color Space |
Characteristics |
Typical Use Cases |
|---|---|---|
BGR |
OpenCV default format |
Image display, basic processing, edge detection |
RGB |
Intuitive for human perception |
Visualization, deep learning image input |
GRAY |
Single-channel grayscale image |
Object detection, edge detection, performance optimization |
HSV |
Separates color and brightness |
Color detection, object tracking, segmentation |
YCrCb |
Separates luminance and chrominance |
Face detection, video compression, illumination robustness |
For example, HSV is often better for color detection and object tracking, while YCrCb is more robust in face recognition or scenes with varying lighting.
6. Extensions and Practice
Try converting from BGR to GRAY or HSV and observe the results.
For example, use:
cv2.cvtColor(frame_bgr, cv2.COLOR_BGR2RGB)cv2.cvtColor(frame_bgr, cv2.COLOR_BGR2HSV)and others
Test different resolutions (e.g., 1280×720) and observe the effect on latency and frame rate.
Combine this code with the previous video playback example to implement switching between a camera stream and a video source.