Note
Hello, welcome to the SunFounder Raspberry Pi & Arduino & ESP32 Enthusiasts Community on Facebook! Dive deeper into Raspberry Pi, Arduino, and ESP32 with fellow enthusiasts.
Why Join?
Expert Support: Solve post-sale issues and technical challenges with help from our community and team.
Learn & Share: Exchange tips and tutorials to enhance your skills.
Exclusive Previews: Get early access to new product announcements and sneak peeks.
Special Discounts: Enjoy exclusive discounts on our newest products.
Festive Promotions and Giveaways: Take part in giveaways and holiday promotions.
👉 Ready to explore and create with us? Click [here] and join today!
(Example) AI-Powered Morse Code Decoder
Introduction
This project creates an intelligent Morse Code Decoder that uses AI to interpret timing patterns of button presses. The system captures precise timing data and leverages OpenAI’s GPT to decode Morse code messages in real-time. The decoder features:
Timing-based Input capturing precise press and release times
AI-powered Decoding using GPT to interpret dot/dash patterns
Visual Indicator with LED showing active decoding state
Dual-button Interface separate input and control buttons
Real-time Feedback displaying timing data as you input
The system records button press durations, sends the timing data to AI for interpretation, and accurately decodes Morse code sequences like the universal distress signal “SOS.”
You can combine timing-sensitive inputs with AI interpretation for various coding systems. See:
What You’ll Need
The following components are required for this project:
COMPONENT |
PURCHASE LINK |
|---|---|
BUY (x2) |
|
- |
|
Raspberry Pi |
- |
Wiring Diagram
Connect the components to the Raspberry Pi as follows:

Get and Save your API Key
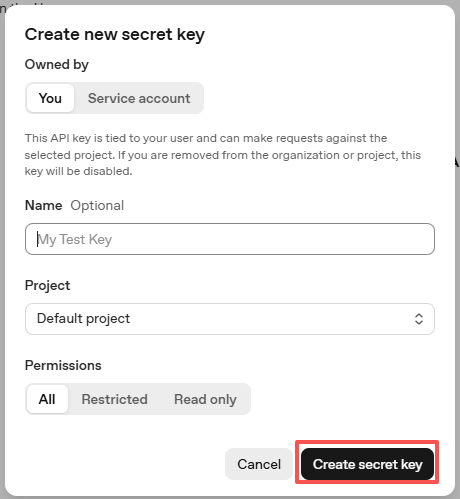
Go to OpenAI Platform and log in. On the API keys page, click Create new secret key.

Fill in the details (Owner, Name, Project, and permissions if needed), then click Create secret key.
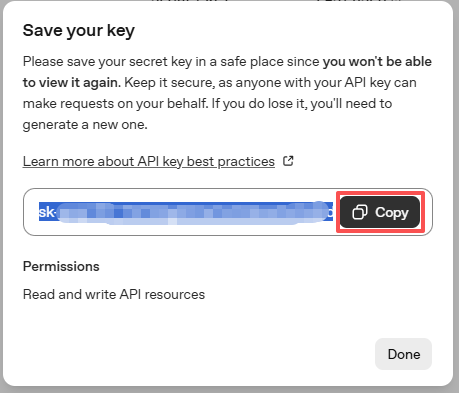
Once the key is created, copy it right away — you won’t be able to see it again. If you lose it, you’ll need to generate a new one.
In your project folder (for example:
/), create a file calledsecret.py:cd ~/ai-lab-kit/llm sudo nano secret.py
Paste your key into the file like this:
# secret.py
# Store secrets here. Never commit this file to Git.
OPENAI_API_KEY = "sk-xxx"
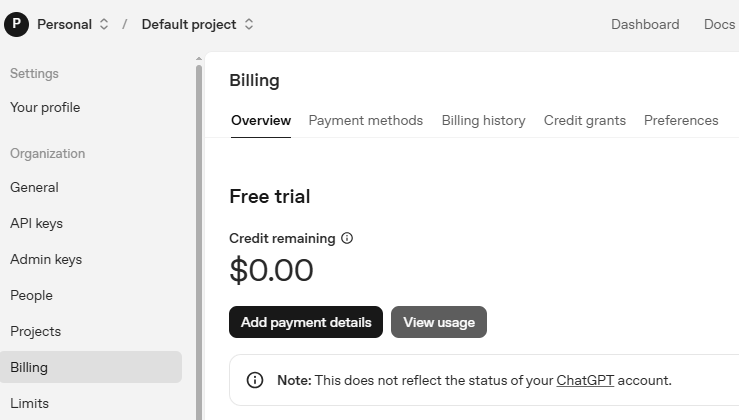
Enable billing and check models
Before using the key, go to the Billing page in your OpenAI account, add your payment details, and top up a small amount of credits.
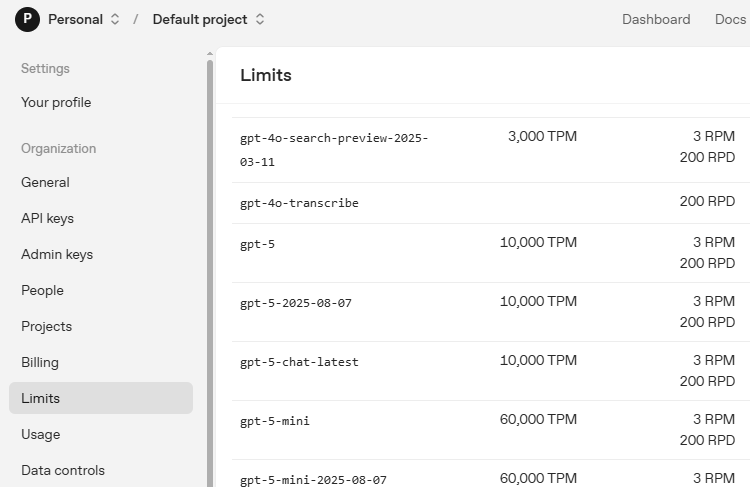
Then go to the Limits page to check which models are available for your account and copy the exact model ID to use in your code.
Run the Example
Run the code
cd ~/ai-lab-kit/llm
sudo python3 llm_openai_morse_decoder.py
Try a simple Morse code message (example: “SOS”)
After the program starts, press the start/stop button to begin recording. Then press the Morse button to input dots (short presses) and dashes (long presses).
When you finish, press the start/stop button again to stop recording and decode the message.
Check the console output
The console will display the press/release timestamps, and the AI will analyze the timing data and output the decoded message.
Typical console output when inputting “SOS”:
To decode the Morse code message based on the button press times provided, we need to interpret the duration of each press. Typically, a short press (dot) is around 0.2 to 0.3 seconds, while a long press (dash) is about 0.5 seconds or longer. Let's analyze the press durations:

1. `1767773542.1257536` to `1767773542.285196` - Duration: ~0.16 seconds - Dot (.)
2. `1767773542.4936137` to `1767773542.6315389` - Duration: ~0.14 seconds - Dot (.)
3. `1767773542.9092748` to `1767773543.0543947` - Duration: ~0.15 seconds - Dot (.)
4. `1767773544.2299025` to `1767773544.5774245` - Duration: ~0.35 seconds - Dash (-)
5. `1767773545.1017563` to `1767773545.4954002` - Duration: ~0.39 seconds - Dash (-)
6. `1767773546.11932` to `1767773546.5881057` - Duration: ~0.47 seconds - Dash (-)
7. `1767773547.824543` to `1767773547.9534554` - Duration: ~0.13 seconds - Dot (.)
8. `1767773548.1879761` to `1767773548.2895174` - Duration: ~0.10 seconds - Dot (.)
9. `1767773548.5281847` to `1767773548.6453152` - Duration: ~0.12 seconds - Dot (.)

Now let's decode the sequence into letters using Morse code:

- `...` (Dot Dot Dot) = S
- `---` (Dash Dash Dash) = O
- `...` (Dot Dot Dot) = S

Putting it all together, the decoded message is "SOS".
Understand the workflow
Start recording: press the start/stop button (GPIO 17) and the LED turns ON
Input Morse code: use the Morse button (GPIO 22) for dots and dashes
Real-time display: the console shows press/release timestamps
Stop and decode: press the start/stop button again and the LED turns OFF
AI analysis: the timing data is sent to OpenAI GPT for interpretation
Decoded output: the AI prints the decoded message
Code
Here is the full Python script for the AI-Powered Morse Code Decoder:
from fusion_hat.llm import OpenAI
from secret import OPENAI_API_KEY
from fusion_hat.pin import Pin
import random, time

# Register OpenAI API
# openai.com

# Export your openai api key with :LLM_API_KEY
# export LLM_API_KEY=sk-xxxxxxxxxxxxxxxxx

# Setup GPIO pins
morse_input = Pin(22, mode=Pin.IN, pull=Pin.PULL_DOWN, bounce_time=0.05)
start_stop_button = Pin(17, mode=Pin.IN, pull=Pin.PULL_DOWN, bounce_time=0.05)
led = Pin(27, Pin.OUT)  # Indicator LED on GPIO 27

# Store the morse code events with timing data
morse_events = []
input_active = False  # Flag to indicate if input is active

# Setup LLM with Morse code decoding instructions
INSTRUCTIONS = "You are a Morse code decoder. Decode based on the button press time, interpreting short presses as dots and long presses as dashes. The message you receive may be a word or a sentence, please decode it and output it."

WELCOME = "Hello, I am a Morse code decoder. Please press the button to start decoding. When you are done, press the button again to stop."

llm = OpenAI(
    api_key=OPENAI_API_KEY,
    model="gpt-4o",
)

# Set how many messages to keep
llm.set_max_messages(20)
# Set instructions
llm.set_instructions(INSTRUCTIONS)
# Set welcome message
llm.set_welcome(WELCOME)

print(WELCOME)

# Send the morse code timing data to the AI for decoding
def decode_and_print():
    global morse_events

    # Convert timing events to string for AI processing
    input_text = str(morse_events)

    # Get response from AI with streaming
    response = llm.prompt(input_text, stream=True)

    # Print streaming response
    for next_word in response:
        if next_word:
            print(next_word, end="", flush=True)

    print("")  # New line after complete response

    morse_events = []  # Clear the morse code events for next message

# Morse code input handling variables
start_time = 0

# Function called when morse input button is pressed
def morse_input_pressed():
    global start_time
    start_time = time.time()
    morse_events.append(('pressed', start_time))
    print(f" Pressed at {start_time} -", end="")

# Function called when morse input button is released
def morse_input_released():
    global morse_events, start_time
    release_time = time.time()

    # Debounce: ignore releases within 0.1 seconds
    if release_time - start_time < 0.1:
        return

    morse_events.append(('released', release_time))
    print(f" {release_time}")

# Start/stop button handler
def handle_start_stop():
    global input_active, morse_events

    if input_active:
        # Stop recording and decode
        led.off()
        print("Input stopped and decoded.")
        decode_and_print()
        input_active = False
    else:
        # Start recording new message
        input_active = True
        morse_events.clear()  # Clear previous events
        led.on()
        print("Input started.")

# Add event listeners to buttons
start_stop_button.when_activated = handle_start_stop
morse_input.when_activated = morse_input_pressed
morse_input.when_deactivated = morse_input_released

# Main program loop
try:
    while True:
        time.sleep(0.1)
except KeyboardInterrupt:
    pass
Understanding the Code
GPIO Pin Configuration
Three GPIO pins are configured for different purposes:
morse_input = Pin(22, mode=Pin.IN, pull=Pin.PULL_DOWN, bounce_time=0.05)
start_stop_button = Pin(17, mode=Pin.IN, pull=Pin.PULL_DOWN, bounce_time=0.05)
led = Pin(27, Pin.OUT)
Bounce time (0.05s): Prevents multiple detections from mechanical switch bouncing
Pull-down: Ensures clean LOW signal when button is not pressed
Separate functions: Input vs. control buttons prevent accidental inputs
Timing Data Storage
Press/release events are stored with precise timestamps:
morse_events = []  # Empty list to store events

# Each event stored as tuple: ('pressed'/'released', timestamp)
morse_events.append(('pressed', 1767773542.1257536))
morse_events.append(('released', 1767773542.285196))
Debounce Mechanism
Prevents false triggers from switch bouncing:
def morse_input_released():
    if release_time - start_time < 0.1:  # 100ms debounce
        return  # Ignore very short releases

    morse_events.append(('released', release_time))
State Management
The system uses a flag to track recording state:
input_active = False  # Initially not recording

def handle_start_stop():
    if input_active:
        # Stop recording and decode
        input_active = False
    else:
        # Start recording
        input_active = True
        morse_events.clear()  # Clear previous data
Visual Indicator
LED provides visual feedback of recording state:
def handle_start_stop():
    if input_active:
        led.off()  # LED OFF when not recording
    else:
        led.on()   # LED ON when recording
AI Prompt Construction
Timing data is converted to string for AI processing:
input_text = str(morse_events)

# Example format sent to AI:
# "[('pressed', 1767773542.1257536), ('released', 1767773542.285196), ...]"
Streaming Response
AI response is processed and displayed in real-time:
response = llm.prompt(input_text, stream=True)

for next_word in response:
    if next_word:
        print(next_word, end="", flush=True)
Event-driven Architecture
Button events trigger immediate callbacks:
# Assign callback functions to button events
start_stop_button.when_activated = handle_start_stop
morse_input.when_activated = morse_input_pressed
morse_input.when_deactivated = morse_input_released
Timing Precision
Uses
time.time()for microsecond-precise timing:start_time = time.time() # Current time in seconds since epoch # Calculate press duration: duration = release_time - start_time
Data Clearing
After decoding, the event list is cleared for next message:
def decode_and_print():
    # ... process events ...
    morse_events = []  # Clear for next message
Morse Code Timing Standards
Standard Timing (based on word PARIS):
Dot: 1 unit
Dash: 3 units
Intra-character gap (between dots/dashes): 1 unit
Inter-character gap (between letters): 3 units
Word gap (between words): 7 units
Practical Implementation:
Dot: < 0.3 seconds (short press)
Dash: > 0.5 seconds (long press)
Between elements: < 0.5 seconds pause
Between letters: 0.5-1.5 seconds pause
Between words: > 1.5 seconds pause
Common Morse Code Letters:
A: • — (dot-dash)
B: — • • • (dash-dot-dot-dot)
C: — • — • (dash-dot-dash-dot)
S: • • • (dot-dot-dot)
O: — — — (dash-dash-dash)
Troubleshooting
Button presses not registering
Check wiring: GPIO 22/17 to button, other side to Ground
Verify pull-down configuration
Test with simple script:
print(Pin(22, mode=Pin.IN, pull=Pin.PULL_DOWN).read())Check bounce time setting (0.05s may be too high)
LED not lighting up
Verify LED polarity: anode (long leg) to GPIO 27 through resistor
Check resistor value (220Ω recommended)
Test LED directly:
Pin(27, Pin.OUT).on()should light LEDEnsure ground connection is complete
Timing data seems wrong
Check system clock:
datecommandReduce debounce time if too sensitive
Add print statements to verify callback execution
Test with consistent press durations
AI not decoding correctly
Check API key and internet connection
Examine timing data sent to AI (print
morse_events)Ensure consistent press durations (dots short, dashes long)
Add clearer pauses between letters
Multiple triggers from single press
Increase bounce_time parameter (try 0.1s)
Check for mechanical switch bouncing
Add hardware debounce with capacitor
Verify button is properly wired
System doesn’t respond to start/stop
Check if other callback is interfering
Verify
input_activeflag logicAdd debug prints to
handle_start_stop()Ensure no other process using GPIO
AI response too slow
Check internet connection speed
Reduce number of events (shorter messages)
Consider using local decoding as fallback
Implement timeout for AI responses
Can’t distinguish dots from dashes
Practice consistent timing
Adjust threshold in AI instructions
Add local preprocessing before sending to AI
Use visual feedback during input
This AI-powered Morse code decoder demonstrates how precise timing data combined with intelligent pattern recognition can revive and modernize historical communication methods, making them accessible and educational for new generations!