Note
Hello, welcome to the SunFounder Raspberry Pi & Arduino & ESP32 Enthusiasts Community on Facebook! Dive deeper into Raspberry Pi, Arduino, and ESP32 with fellow enthusiasts.
Why Join?
Expert Support: Solve post-sale issues and technical challenges with help from our community and team.
Learn & Share: Exchange tips and tutorials to enhance your skills.
Exclusive Previews: Get early access to new product announcements and sneak peeks.
Special Discounts: Enjoy exclusive discounts on our newest products.
Festive Promotions and Giveaways: Take part in giveaways and holiday promotions.
👉 Ready to explore and create with us? Click [here] and join today!
(Example) Homework Grading Demo with Pan-Tilt Camera
Introduction
This project creates an interactive AI Homework Grading Assistant that combines computer vision, artificial intelligence, and robotics. The system:
Captures photos of handwritten or printed homework questions using a Raspberry Pi camera
Analyzes content using OpenAI’s GPT-4 Vision model to determine if answers are correct
Provides physical feedback through servo-controlled pan-tilt head movements:
Nods for correct answers
Shakes for incorrect answers
Uses simple interaction triggered by a single button press
This demonstration showcases how AI can interact with the physical world, creating an engaging educational tool that provides immediate visual feedback on homework accuracy.
You can use other LLM modules and hardware components to build your own AI-assisted learning devices. See:
What You’ll Need
The following components are required for this project:
COMPONENT |
PURCHASE LINK |
|---|---|
Pan-Tilt |
|
- |
|
Raspberry Pi |
- |
Homework sample (printed or handwritten) |
- |
Hardware Setup
To use camera module conveniently, Assemble the Pan-tilt (For Camera) is recommended.
Note
Assembling the pan-tilt may obscure some pins, so it is recommended to assemble it only when using the camera, or place it on the outside after assembly.

Get and Save your API Key
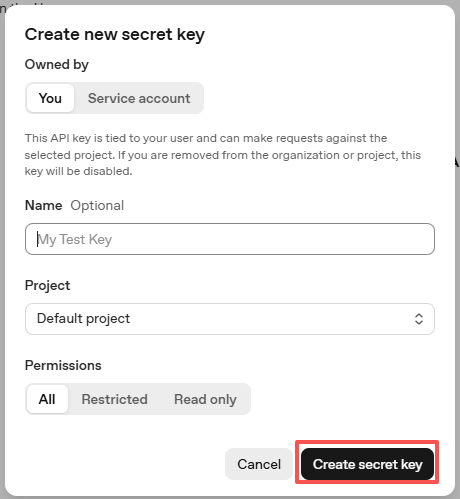
Go to OpenAI Platform and log in. On the API keys page, click Create new secret key.

Fill in the details (Owner, Name, Project, and permissions if needed), then click Create secret key.
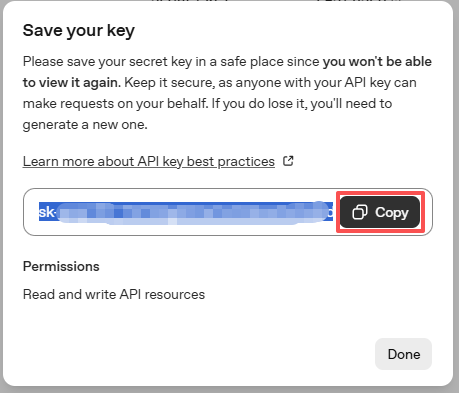
Once the key is created, copy it right away — you won’t be able to see it again. If you lose it, you’ll need to generate a new one.
In your project folder (for example:
/), create a file calledsecret.py:cd ~/ai-lab-kit/llm sudo nano secret.py
Paste your key into the file like this:
# secret.py
# Store secrets here. Never commit this file to Git.
OPENAI_API_KEY = "sk-xxx"
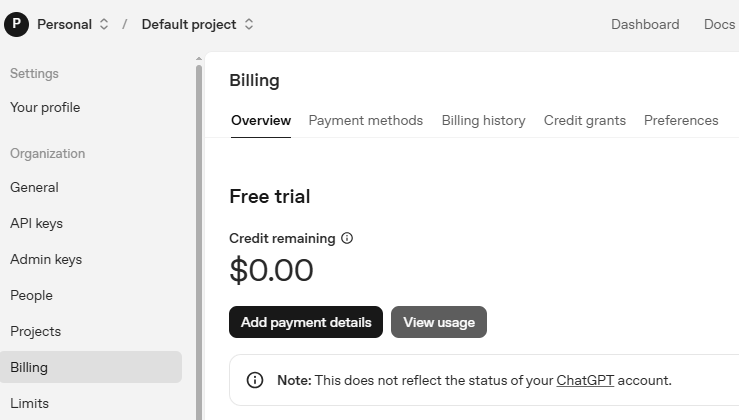
Enable billing and check models
Before using the key, go to the Billing page in your OpenAI account, add your payment details, and top up a small amount of credits.
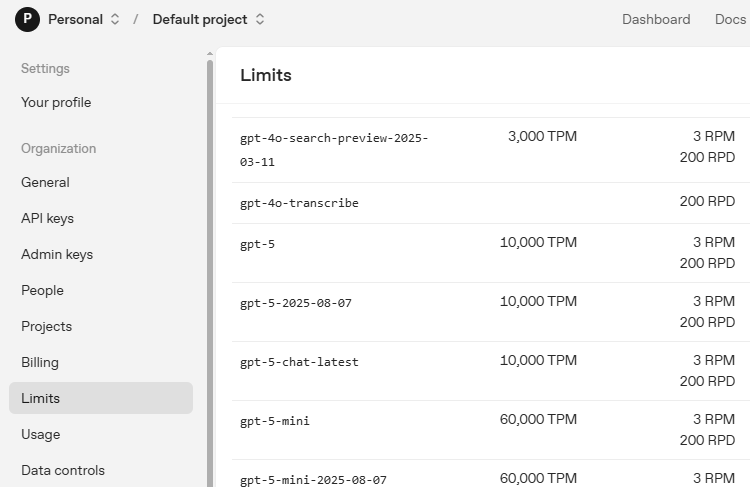
Then go to the Limits page to check which models are available for your account and copy the exact model ID to use in your code.
Running the Code
Create Homework Sample:
Write or print a simple math problem with answer
Example: “5 + 3 = 8” (correct) or “5 + 3 = 7” (incorrect)
Ensure clear handwriting or printing
Run the Program:
cd ~/ai-lab-kit/llm
python3 llm_openai_homework.py
Follow On-Screen Instructions:
Position homework under camera
Press User Button (USR) on Fusion HAT+
Watch for servo response
Expected Output:
HOMEWORK GRADING DEMO
==================================================
Instructions:
1. Place a homework question under the camera
2. Make sure the question AND answer are visible
3. Press the User Button (USR) on Fusion HAT to grade
4. The camera will take a photo
5. AI will grade the answer
6. Servo will nod (correct) or shake (incorrect)
==================================================

Waiting for button press...

==================================================
Button pressed - Starting grading process

Taking photo...
Photo captured
Sending to AI for grading...
AI response: CORRECT
Answer is correct - nodding head
==================================================
Code
Here is the full Python script for the Homework Grading Demo:
#!/usr/bin/env python3
"""
Homework Grading Demo with Pan-Tilt Camera
Press User Button to take photo, LLM grades, servo nods or shakes
"""

import time
from fusion_hat.llm import OpenAI
from fusion_hat.servo import Servo
from fusion_hat.user_button import UserButton
from picamera2 import Picamera2, Preview

# ========== LLM SETTINGS ==========
# Create a secret.py file with: OPENAI_API_KEY = "your-api-key-here"
try:
    from secret import OPENAI_API_KEY
except ImportError:
    print("ERROR: Please create a secret.py file with your OpenAI API key")
    print("Example content: OPENAI_API_KEY = 'sk-...'")
    exit()

# LLM instructions for grading
INSTRUCTIONS = """You are a homework grading assistant.
When you see a photo of a homework question with an answer,
determine if the answer is correct or incorrect.

Respond with ONLY ONE WORD:
- If the answer is CORRECT, respond: "CORRECT"
- If the answer is INCORRECT, respond: "INCORRECT"

Do not provide any other text, explanations, or justifications.
Only respond with "CORRECT" or "INCORRECT"."""

# Initialize LLM
llm = OpenAI(
    api_key=OPENAI_API_KEY,
    model="gpt-4o"
)

# Set LLM settings
llm.set_max_messages(5)
llm.set_instructions(INSTRUCTIONS)

# ========== HARDWARE SETTINGS ==========
PAN_CHANNEL = 2      # Horizontal servo for shaking head
TILT_CHANNEL = 3     # Vertical servo for nodding head

# Servo center positions
TILT_CENTER = 0      # Looking straight ahead
PAN_CENTER = 0       # Center position

# ========== INITIALIZE HARDWARE ==========
print("Initializing Homework Grading Demo...")
print("-" * 50)

# Initialize servos
pan_servo = Servo(PAN_CHANNEL)
tilt_servo = Servo(TILT_CHANNEL)

# Center servos
tilt_servo.angle(TILT_CENTER)
pan_servo.angle(PAN_CENTER)
time.sleep(1)
print("Servos ready")

# Initialize camera
camera = Picamera2()
camera_config = camera.create_preview_configuration(main={"size": (1280, 720)})
camera.configure(camera_config)
camera.start_preview(Preview.QT)
camera.start()
time.sleep(2)
print("Camera ready")

# Initialize user button
user_button = UserButton()
print("User button ready")
print("-" * 50)

# ========== SERVO MOVEMENT FUNCTIONS ==========
def nod_head():
    """
    Nodding head movement for "correct"
    """
    # Look down
    tilt_servo.angle(15)
    time.sleep(0.2)
    # Look up
    tilt_servo.angle(-10)
    time.sleep(0.2)
    # Return to center
    tilt_servo.angle(TILT_CENTER)

def shake_head():
    """
    Shaking head movement for "incorrect"
    """
    # Look left
    pan_servo.angle(-20)
    time.sleep(0.15)
    # Look right
    pan_servo.angle(20)
    time.sleep(0.15)
    # Look left again
    pan_servo.angle(-15)
    time.sleep(0.15)
    # Return to center
    pan_servo.angle(PAN_CENTER)

# ========== GRADING FUNCTION ==========
def grade_homework():
    """
    Main grading function: take photo, send to LLM, move servo
    """
    print("\nTaking photo...")

    # Capture image
    img_path = './homework.jpg'
    camera.capture_file(img_path)
    print("Photo captured")

    # Send to LLM for grading
    print("Sending to AI for grading...")

    prompt = "Look at this homework question and answer. Is the answer correct? Respond with only one word: 'CORRECT' or 'INCORRECT'."

    response = llm.prompt(prompt, image_path=img_path)
    response_text = response.strip().upper()

    print(f"AI response: {response_text}")

    # Move servo based on response
    if "INCORRECT" in response_text:
        print("Answer is incorrect - shaking head")
        shake_head()
    elif "CORRECT" in response_text:
        print("Answer is correct - nodding head")
        nod_head()
    else:
        print(f"Unexpected response: {response_text}")

# ========== BUTTON CALLBACK ==========
def on_button_click():
    """
    Called when user button is pressed
    """
    print("\n" + "=" * 50)
    print("Button pressed - Starting grading process")
    grade_homework()
    print("=" * 50)

# ========== MAIN DEMO ==========
def main():
    """
    Main demo function
    """
    print("\nHOMEWORK GRADING DEMO")
    print("=" * 50)
    print("Instructions:")
    print("1. Place a homework question under the camera")
    print("2. Make sure the question AND answer are visible")
    print("3. Press the User Button (USR) on Fusion HAT to grade")
    print("4. The camera will take a photo")
    print("5. AI will grade the answer")
    print("6. Servo will nod (correct) or shake (incorrect)")
    print("=" * 50)
    print("\nWaiting for button press...")

    # Set button callback
    user_button.set_on_click(on_button_click)

    # Keep program running
    try:
        while True:
            time.sleep(0.1)
    except KeyboardInterrupt:
        print("\nDemo stopped by user")

# ========== CLEANUP ==========
def cleanup():
    """
    Clean up resources
    """
    print("\nCleaning up...")

    # Return servos to center
    tilt_servo.angle(TILT_CENTER)
    pan_servo.angle(PAN_CENTER)

    # Stop camera
    camera.stop()

    print("Demo ended")

# ========== RUN DEMO ==========
if __name__ == "__main__":
    try:
        main()
    finally:
        cleanup()
Understanding the Code
LLM Configuration and Setup
The system uses OpenAI’s GPT-4o with Vision capabilities to analyze images:
# Import and initialize the LLM
from fusion_hat.llm import OpenAI
llm = OpenAI(api_key=OPENAI_API_KEY, model="gpt-4o")

# Set specific instructions for consistent responses
INSTRUCTIONS = """You are a homework grading assistant..."""
llm.set_instructions(INSTRUCTIONS)

# Limit conversation history to manage tokens
llm.set_max_messages(5)
Hardware Initialization
Three hardware components are initialized: servos, camera, and button:
# Servo control for pan-tilt mechanism
pan_servo = Servo(PAN_CHANNEL)   # Channel 2 for horizontal movement
tilt_servo = Servo(TILT_CHANNEL) # Channel 3 for vertical movement

# Camera setup with preview
camera = Picamera2()
camera_config = camera.create_preview_configuration(main={"size": (1280, 720)})
camera.configure(camera_config)
camera.start_preview(Preview.QT)
camera.start()

# User button for interaction
user_button = UserButton()
Servo Animation Functions
Natural-looking movements for nodding and shaking:
def nod_head():
    """Nodding head movement for 'correct' answers"""
    tilt_servo.angle(15)    # Look down
    time.sleep(0.2)
    tilt_servo.angle(-10)   # Look up
    time.sleep(0.2)
    tilt_servo.angle(TILT_CENTER)  # Return to center

def shake_head():
    """Shaking head movement for 'incorrect' answers"""
    pan_servo.angle(-20)    # Look left
    time.sleep(0.15)
    pan_servo.angle(20)     # Look right
    time.sleep(0.15)
    pan_servo.angle(-15)    # Look left again
    time.sleep(0.15)
    pan_servo.angle(PAN_CENTER)  # Return to center
Image Capture and AI Analysis
The main grading workflow:
def grade_homework():
    # Capture image from camera
    img_path = './homework.jpg'
    camera.capture_file(img_path)

    # Send image to LLM with specific prompt
    prompt = "Look at this homework question and answer..."
    response = llm.prompt(prompt, image_path=img_path)
    response_text = response.strip().upper()

    # Interpret response and trigger appropriate servo movement
    if "INCORRECT" in response_text:
        shake_head()
    elif "CORRECT" in response_text:
        nod_head()
Button Event Handling
Simple callback system for user interaction:
def on_button_click():
    print("Button pressed - Starting grading process")
    grade_homework()

# Assign callback to button
user_button.set_on_click(on_button_click)
Main Application Loop
Minimal main loop that waits for button presses:
def main():
    print("Waiting for button press...")
    user_button.set_on_click(on_button_click)

    # Keep program running until interrupted
    try:
        while True:
            time.sleep(0.1)  # Low CPU usage wait
    except KeyboardInterrupt:
        print("\nDemo stopped by user")
Resource Cleanup
Proper shutdown procedure:
def cleanup():
    # Return servos to neutral position
    tilt_servo.angle(TILT_CENTER)
    pan_servo.angle(PAN_CENTER)

    # Stop camera
    camera.stop()
Troubleshooting
No module named
picamera2Install the required library:
sudo apt update
sudo apt install python3-picamera2
Camera not detected
Check camera connection: ensure ribbon cable is inserted correctly
Verify camera is enabled:
sudo raspi-config→ Interface Options → CameraTest camera independently:
libcamera-hello
Servos not moving
Check power connections: servos need 5V power
Verify servo channels match code (Channels 2 and 3)
Test servos independently with simple angle commands
AI not responding or error
Verify API key in
secret.pyis correctCheck internet connection:
ping 8.8.8.8Ensure you have credits in your OpenAI account
Verify model “gpt-4o” is available in your account
Incorrect servo movements
Check if pan and tilt servos are swapped
Adjust angle values in
nod_head()andshake_head()functionsVerify servo center positions (may need calibration)
Image too blurry or dark
Ensure adequate lighting on homework
Adjust camera focus if adjustable
Position camera 15-30cm from paper
Use high-contrast pen/marker for handwriting
Button not responding
Check if User Button LED lights when pressed
Verify button callback is registered
Test button with simple print statement
AI returns unexpected response
Check prompt formatting in code
Ensure image clearly shows question AND answer
Test with very simple arithmetic problems first
This homework grading demo showcases how AI vision models can interact with physical hardware to create engaging educational experiences, blending digital intelligence with tangible feedback mechanisms!