Note
Hello, welcome to the SunFounder Raspberry Pi & Arduino & ESP32 Enthusiasts Community on Facebook! Dive deeper into Raspberry Pi, Arduino, and ESP32 with fellow enthusiasts.
Why Join?
Expert Support: Solve post-sale issues and technical challenges with help from our community and team.
Learn & Share: Exchange tips and tutorials to enhance your skills.
Exclusive Previews: Get early access to new product announcements and sneak peeks.
Special Discounts: Enjoy exclusive discounts on our newest products.
Festive Promotions and Giveaways: Take part in giveaways and holiday promotions.
👉 Ready to explore and create with us? Click [here] and join today!
(Example) Book Expert
Introduction
In this project, you’ll build an AI-powered book cover analyzer that uses computer vision and natural language processing to identify books from their covers. The system captures images of book covers using a Raspberry Pi camera, sends them to LLM model (here we use OpenAI’s GPT-4o vision model) for analysis, and provides audio feedback about the book’s title, author, summary, and reception using text-to-speech technology.
The project combines multiple technologies:
Camera capture with Picamera2
Image analysis with GPT-4o vision capabilities
Text-to-speech conversion for audio responses
RGB LED for visual status feedback
Physical button for intuitive interaction
To use the other llm model, please refer to 5. Connecting to Online LLMs .
What You’ll Need
The following components are required for this project:
COMPONENT |
PURCHASE LINK |
|---|---|
Raspberry Pi Camera Module |
|
- |
|
Book (for testing) |
- |
Wiring Diagram
To use camera module conveniently, Assemble the Pan-tilt (For Camera) is recommended.
Note
Assembling the pan-tilt may obscure some pins, so it is recommended to assemble it only when using the camera, or place it on the outside after assembly.

Connect the components to the Fusion HAT+ as follows:

The User Button is already integrated into the Fusion HAT+ and doesn’t require additional wiring. It is near by the BATTERY port.*

Get and Save your API Key
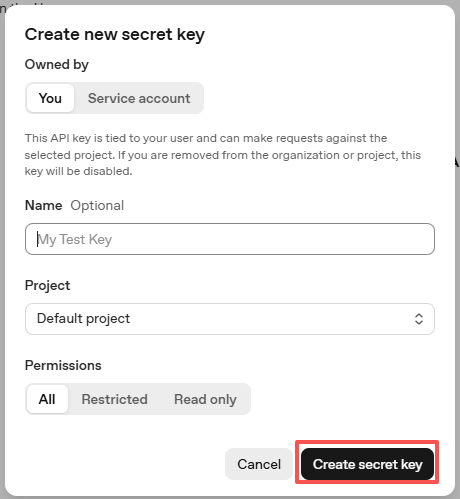
Go to OpenAI Platform and log in. On the API keys page, click Create new secret key.

Fill in the details (Owner, Name, Project, and permissions if needed), then click Create secret key.
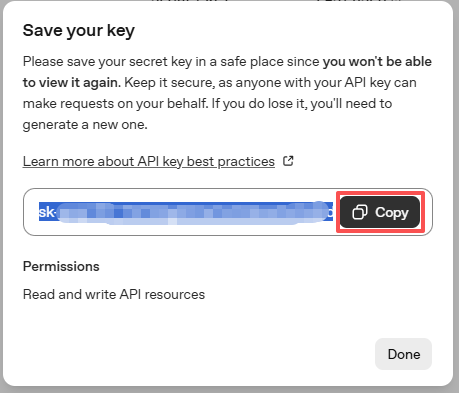
Once the key is created, copy it right away — you won’t be able to see it again. If you lose it, you’ll need to generate a new one.
In your project folder (for example:
/), create a file calledsecret.py:cd ~/ai-lab-kit/llm sudo nano secret.py
Paste your key into the file like this:
# secret.py
# Store secrets here. Never commit this file to Git.
OPENAI_API_KEY = "sk-xxx"
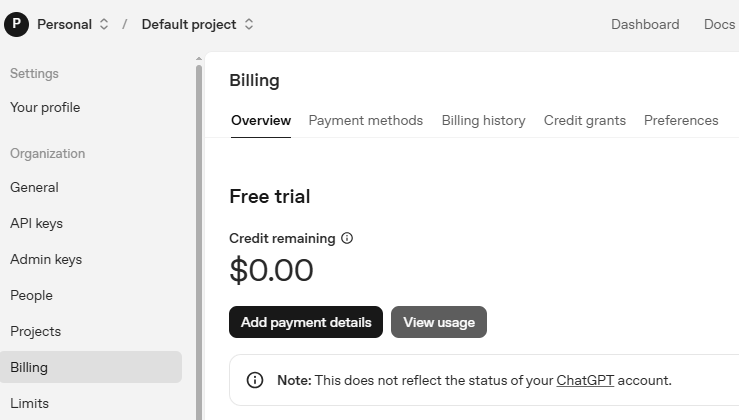
Enable billing and check models
Before using the key, go to the Billing page in your OpenAI account, add your payment details, and top up a small amount of credits.
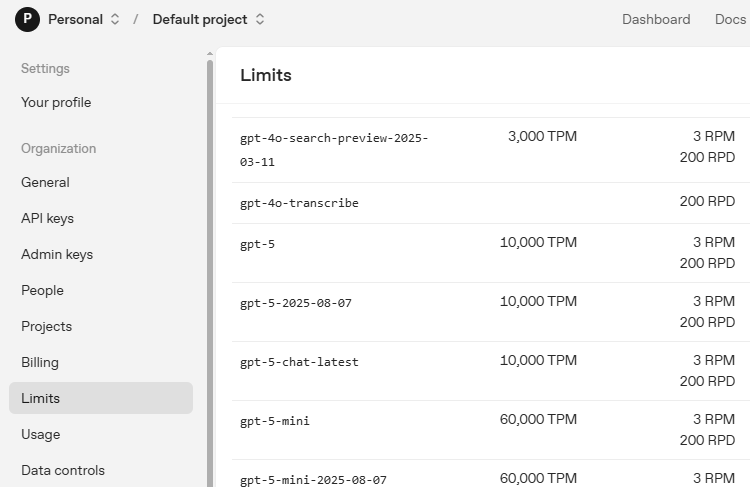
Then go to the Limits page to check which models are available for your account and copy the exact model ID to use in your code.
Running the Example
Access the Raspberry Pi Desktop:
Remote Desktop: Use VNC for a full desktop experience.
Raspberry Pi Connect: Use Raspberry Pi Connect to access your Pi securely from any browser.
Open a Terminal and go to the code folder:
cd ~/ai-lab-kit/llm
sudo python3 llm_openai_bookexpert.py
When the script runs:
A camera preview window will open
The RGB LED will glow blue, indicating ready state
Place a book cover in front of the camera
Press the USR Button on the Fusion HAT+ (which is near the BATTERY port)
The system will:
Capture a photo (LED turns yellow 🟡)
Analyze with AI (LED turns purple 🟣)
Speak the analysis (LED turns green 🟢)
Return to ready state (LED turns blue 🔵)
If error occurs, the LED will turn red 🔴
Photos are saved to ~/Pictures/book_covers/
Press Ctrl+C to exit
Code
Here is the full Python script for the AI Book Cover Analyzer:
#!/usr/bin/env python3
import os
import time
import re
import base64
import threading
from pathlib import Path
from picamera2 import Picamera2, Preview
from fusion_hat.user_button import UserButton
from fusion_hat.modules import RGB_LED
from fusion_hat.pwm import PWM
from fusion_hat.llm import OpenAI
from fusion_hat.tts import OpenAI_TTS
from secret import OPENAI_API_KEY

class BookCoverAnalyzer:
    def __init__(self):
        # Initialize LED for status feedback
        self.rgb_led = RGB_LED(PWM(0), PWM(1), PWM(2), common=RGB_LED.CATHODE)
        self.set_led_color("blue")  # Ready state

        # Initialize OpenAI LLM for image analysis
        self.llm = OpenAI(
            api_key=OPENAI_API_KEY,
            model="gpt-4o",  # GPT-4o supports image input
        )

        # Initialize TTS for audio responses
        self.tts = OpenAI_TTS(api_key=OPENAI_API_KEY)
        self.tts.set_voice(self.tts.Voice.ALLOY)

        # Initialize camera
        self.camera = Picamera2()
        self.camera.configure(self.camera.create_preview_configuration(main={"size": (800, 600)}))

        # Initialize button
        self.btn = UserButton()

        # Set up directories
        self.real_user = os.getenv("SUDO_USER") or os.getlogin()
        self.user_home = f"/home/{self.real_user}"
        self.pictures_dir = Path(self.user_home) / "Pictures" / "book_covers"
        self.pictures_dir.mkdir(parents=True, exist_ok=True)

        # Threading locks
        self.photo_lock = threading.Lock()
        self.photo_index = 1

        # Set LLM instructions
        self.instructions = """You are a book expert. Analyze book covers that are sent to you.

        When you receive a book cover image, provide:
        1. Book title (if identifiable from cover)
        2. Author (if identifiable from cover)
        3. Brief summary of what the book is about (50 words)
        4. Overall rating/reception (e.g., "Highly acclaimed", "Classic", "Popular", etc.)

        Keep your response under 100 words total.
        Speak in a friendly, informative tone suitable for an audio response.

        If the image is not a book cover or is unclear, politely say you can't identify it and ask for another photo."""

        self.llm.set_max_messages(10)
        self.llm.set_instructions(self.instructions)

    def set_led_color(self, color_name):
        """Set RGB LED color for status feedback"""
        color_map = {
            "red": (255, 0, 0),
            "green": (0, 255, 0),
            "blue": (0, 0, 255),
            "yellow": (255, 255, 0),
            "purple": (255, 0, 255),
            "white": (255, 255, 255),
            "off": (0, 0, 0),
        }

        if color_name in color_map:
            self.rgb_led.color(color_map[color_name])

    def capture_photo(self):
        """Capture a photo and return the filepath"""
        with self.photo_lock:
            filepath = self.pictures_dir / f"book_cover_{self.photo_index:03d}.jpg"
            print(f"\n📸 Capturing photo: {filepath}")

            # LED feedback: yellow for capturing
            self.set_led_color("yellow")

            # Capture image
            self.camera.capture_file(str(filepath))

            # Increment counter for next photo
            self.photo_index += 1

            print("Photo captured successfully")
            return str(filepath)

    def analyze_book_cover(self, image_path):
        """Send book cover image to OpenAI for analysis"""
        print("\n Analyzing book cover...")

        # LED feedback: purple for processing
        self.set_led_color("purple")

        try:
            # use fusion_hat.llm's prompt method to process the image
            prompt_text = "Please analyze this book cover and tell me about the book. Provide: 1) Book title if identifiable, 2) Author if identifiable, 3) Brief summary, 4) Overall rating/reception. Keep under 100 words."

            print("Sending to AI for analysis...")

            # method1: non-streaming response
            response = self.llm.prompt(prompt_text, image_path=image_path)

            # if the response is a string, use it directly
            if isinstance(response, str):
                analysis = response
            else:
                # if response is not a string, try to convert it to a string
                analysis = str(response)

            print(f"\n Analysis:\n{analysis}")

            # LED feedback: green for success
            self.set_led_color("green")

            return analysis

        except Exception as e:
            print(f"Error analyzing image: {e}")
            print(f"Error type: {type(e)}")

            # method2: streaming response
            try:
                print("Trying stream method...")
                stream_response = self.llm.prompt(prompt_text, stream=True, image_path=image_path)

                # receive the stream response
                analysis_parts = []
                for next_word in stream_response:
                    if next_word:
                        analysis_parts.append(next_word)

                analysis = ''.join(analysis_parts)
                print(f"\n Analysis (stream):\n{analysis}")

                # LED feedback: green for success
                self.set_led_color("green")
                return analysis

            except Exception as e2:
                print(f"Stream method also failed: {e2}")

                # LED feedback: red for error
                self.set_led_color("red")
                return "Sorry, I couldn't analyze the book cover. Please make sure the book cover is clearly visible and try again."

    def speak_response(self, text):
        """Convert text to speech"""
        print("\nSpeaking response...")

        # Clean up text for TTS (remove markdown, etc.)
        clean_text = re.sub(r'[*_\[\]()#]', '', text)

        # Speak with friendly instructions
        self.tts.say(clean_text, instructions="speak clearly and warmly")
        print("Response spoken")

        # Return to ready state
        self.set_led_color("blue")

    def button_handler(self):
        """Handle button press: capture photo, analyze, and speak"""
        print("\n" + "="*50)
        print("Processing request...")

        # Step 1: Capture photo
        try:
            image_path = self.capture_photo()
        except Exception as e:
            print(f"Failed to capture photo: {e}")
            self.set_led_color("red")
            self.tts.say("Sorry, I couldn't take a photo. Please try again.")
            self.set_led_color("blue")
            return

        # Step 2: Analyze with AI
        analysis = self.analyze_book_cover(image_path)

        # Step 3: Speak the analysis
        self.speak_response(analysis)

        print(f"Complete! Photo saved at: {image_path}")
        print("="*50 + "\n")

    def run(self):
        """Main program loop"""
        # Set button callback
        self.btn.set_on_click(self.button_handler)

        # Start camera preview
        print("Starting camera preview...")
        self.camera.start_preview(Preview.QT)
        self.camera.start()

        # LED feedback: blue for ready
        self.set_led_color("blue")

        print("\n" + "="*50)
        print("BOOK COVER ANALYZER")
        print("="*50)
        print("\nReady to analyze book covers!")
        print("Press the USR button to capture and analyze a book cover")
        print("I will speak the analysis aloud")
        print("LED colors:")
        print("   Blue: Ready")
        print("   Yellow: Capturing photo")
        print("   Purple: Analyzing with AI")
        print("   Green: Analysis successful")
        print("   Red: Error occurred")
        print(f"Photos saved to: {self.pictures_dir}")
        print("Press Ctrl+C to exit")
        print("="*50 + "\n")

        try:
            # Keep program running
            while True:
                time.sleep(0.1)

        except KeyboardInterrupt:
            print("\nExiting...")

        finally:
            # Cleanup
            self.camera.stop_preview()
            self.camera.close()
            self.set_led_color("off")
            print("Cleanup complete")

if __name__ == "__main__":
    analyzer = BookCoverAnalyzer()
    analyzer.run()
Understanding the Code
Camera Initialization
The Picamera2 library provides a modern interface for Raspberry Pi camera control, supporting both image capture and preview.
self.camera = Picamera2()
self.camera.configure(self.camera.create_preview_configuration(main={"size": (800, 600)}))

# Start preview and camera
self.camera.start_preview(Preview.QT)
self.camera.start()
Image Capture with Thread Safety
The capture_photo method uses threading locks to prevent multiple simultaneous captures and ensures proper file naming.
def capture_photo(self):
    with self.photo_lock:
        filepath = self.pictures_dir / f"book_cover_{self.photo_index:03d}.jpg"
        self.camera.capture_file(str(filepath))
        self.photo_index += 1
        return str(filepath)
Vision AI Analysis
The system uses GPT-4o’s vision capabilities to analyze book covers. Two methods (streaming and non-streaming) are implemented for robustness.
def analyze_book_cover(self, image_path):
    prompt_text = "Please analyze this book cover..."

    # Method 1: Non-streaming response
    response = self.llm.prompt(prompt_text, image_path=image_path)

    # Method 2: Fallback to streaming if needed
    stream_response = self.llm.prompt(prompt_text, stream=True, image_path=image_path)
Text-to-Speech Conversion
OpenAI’s TTS API converts the AI’s analysis into natural-sounding speech with configurable voice options.
self.tts = OpenAI_TTS(api_key=OPENAI_API_KEY)
self.tts.set_voice(self.tts.Voice.ALLOY)

def speak_response(self, text):
    clean_text = re.sub(r'[*_\[\]()#]', '', text)  # Remove markdown
    self.tts.say(clean_text, instructions="speak clearly and warmly")
Status Feedback System
The RGB LED provides visual feedback throughout the process using color coding:
def set_led_color(self, color_name):
    color_map = {
        "red": (255, 0, 0),      # Error
        "green": (0, 255, 0),    # Success
        "blue": (0, 0, 255),     # Ready
        "yellow": (255, 255, 0), # Capturing
        "purple": (255, 0, 255), # Processing
    }
    self.rgb_led.color(color_map[color_name])
Button Event Handling
The User Button triggers the entire analysis workflow through an event callback.
def button_handler(self):
    # 1. Capture photo
    image_path = self.capture_photo()
    # 2. Analyze with AI
    analysis = self.analyze_book_cover(image_path)
    # 3. Speak the analysis
    self.speak_response(analysis)

# Set callback
self.btn.set_on_click(self.button_handler)
File Management
Photos are automatically organized in dated folders with sequential numbering.
self.real_user = os.getenv("SUDO_USER") or os.getlogin()
self.user_home = f"/home/{self.real_user}"
self.pictures_dir = Path(self.user_home) / "Pictures" / "book_covers"
self.pictures_dir.mkdir(parents=True, exist_ok=True)
Troubleshooting
“Camera not detected” error
Ensure the camera ribbon cable is properly inserted (gold contacts facing the correct direction)
Run
sudo raspi-configand enable the camera interfaceReboot after enabling the camera
“No preview window appears”
Ensure you’re running on a Raspberry Pi with a desktop environment
For headless operation, remove or modify the preview code
Check if you have sufficient GPU memory allocated
“OpenAI API error”
Verify your API key in
secret.pyis correct and has sufficient creditsCheck internet connectivity:
ping 8.8.8.8Ensure your account has access to GPT-4o and the TTS API
“TTS audio not playing”
Check if audio output is configured:
sudo raspi-config→ System Options → AudioTest audio with:
speaker-test -t sine -f 440Ensure your speaker/headphones are connected to the correct audio jack
“Button press not detected”
Check if the User Button LED lights up when pressed
Ensure the Fusion HAT+ is properly seated on the GPIO pins
Verify the button callback is set correctly
“Image analysis returns generic responses”
Ensure good lighting when capturing book covers
Position the book cover squarely in the camera frame
Try with well-known books first for better recognition
Clean the camera lens if blurry
This project demonstrates the powerful combination of computer vision, natural language processing, and physical computing to create an intelligent book analysis system. It showcases how AI can enhance everyday interactions with physical objects like books, making information more accessible and engaging!