5.3 State Change Detection
When the button controls other devices, it can not only work when it is pressed, but stop when it is released. It is also possible to switch the working state each time the button is pressed.
In order to achieve this effect, you need to know how to toggle the working state between off and on when the button is pressed, That is “state change detection”.
In this project, we will use the button to control the motor.
Required Components
In this project, we need the following components.
It’s definitely convenient to buy a whole kit, here’s the link:
Name |
ITEMS IN THIS KIT |
LINK |
|---|---|---|
3 in 1 Starter Kit |
380+ |
You can also buy them separately from the links below.
COMPONENT INTRODUCTION |
PURCHASE LINK |
|---|---|
- |
|
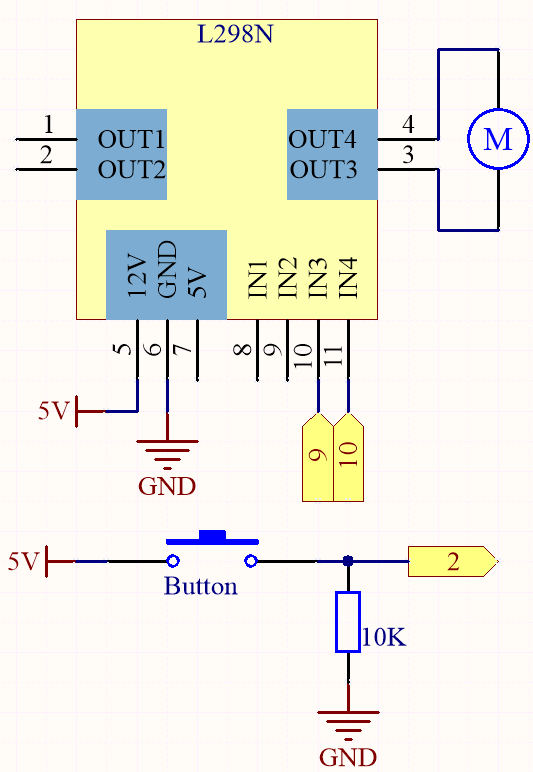
Schematic

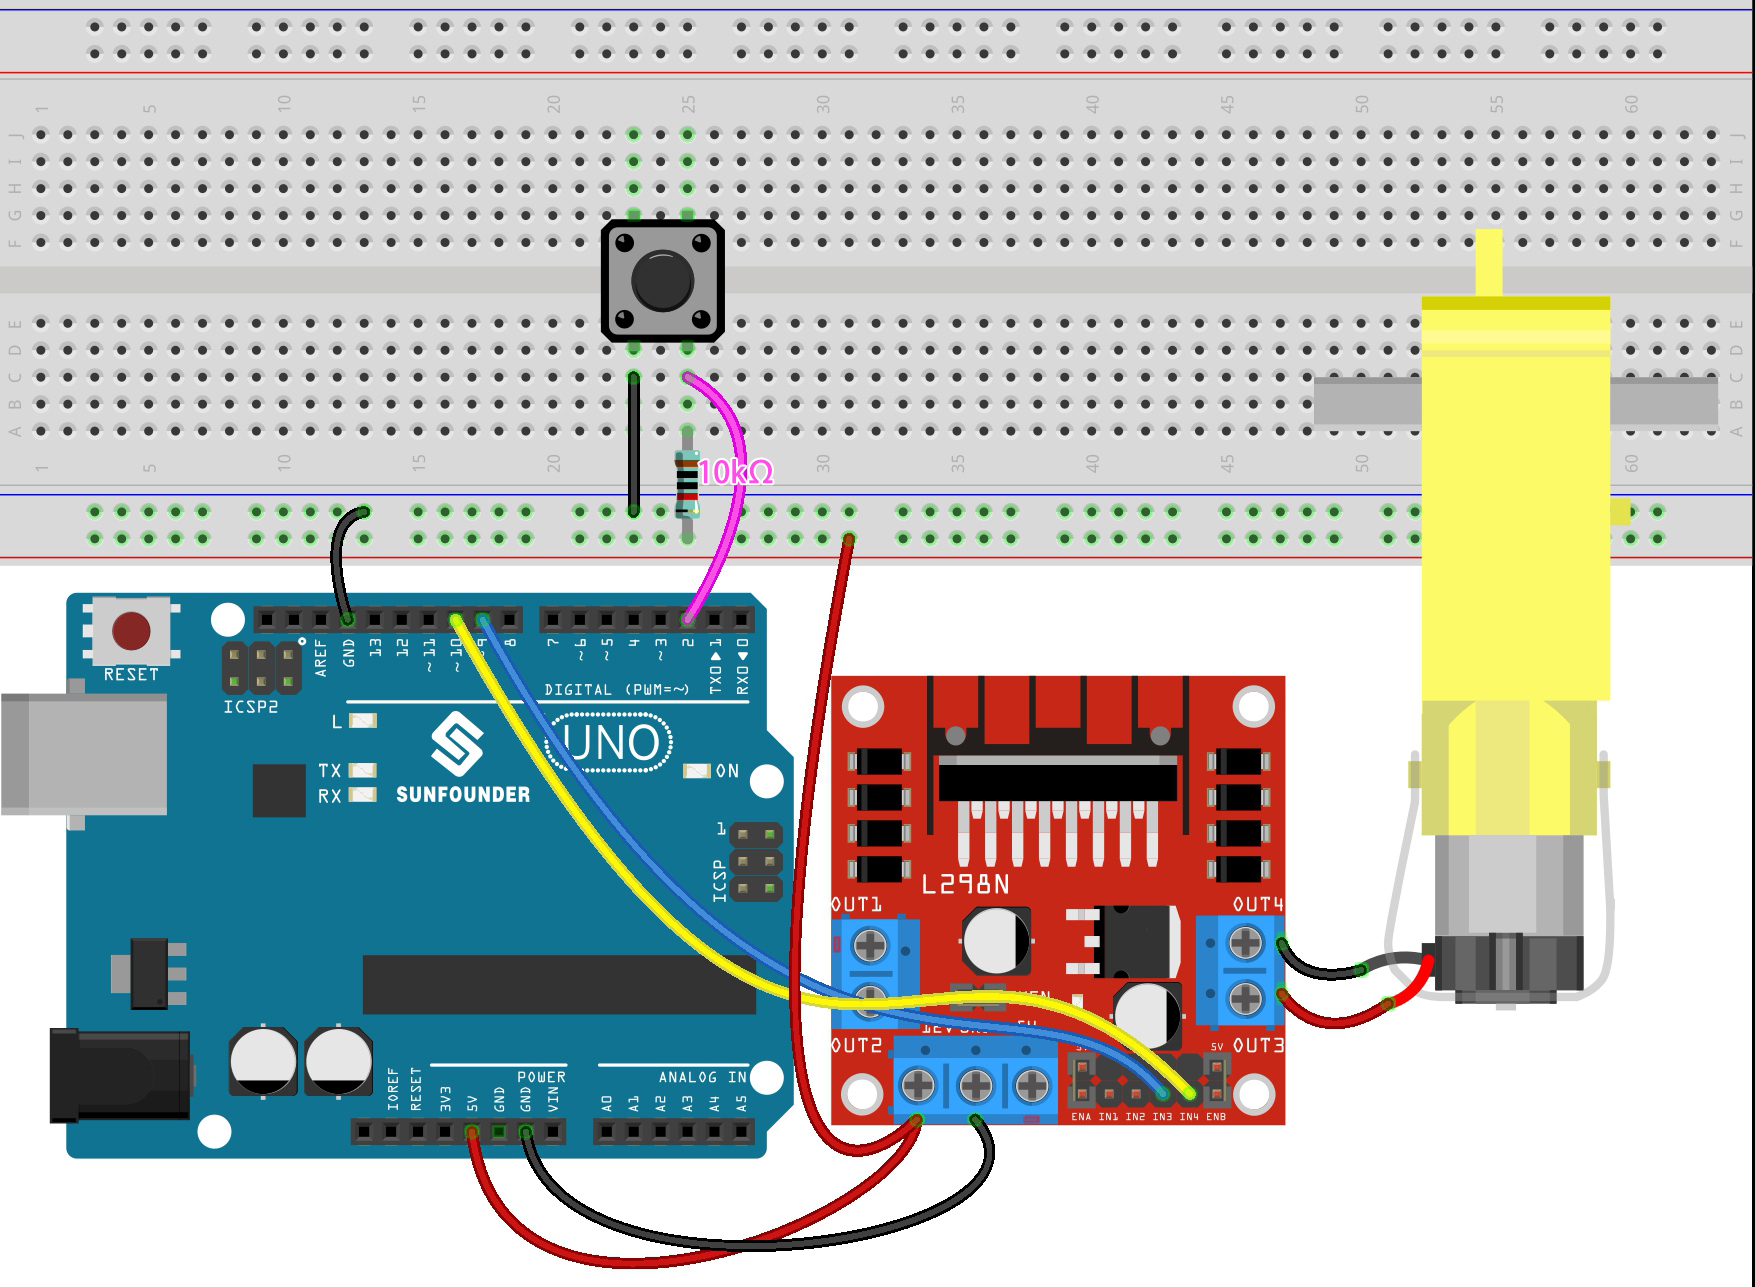
Wiring

Code
Note
Open the
5.3.state_change_detection.inofile under the path of3in1-kit\basic_project\5.3.state_change_detection.Or copy this code into Arduino IDE.
Or upload the code through the Arduino Web Editor.
After the code is uploaded successfully, you press the button and the motor will turn; until you press the button again, the motor will stop.
How it works?
Create variables and define pins for the motor and button.
...
int detectionState = 0;
int buttonState = 0;
int lastButtonState = 0;
detectionStateis a flag whose value changes each time the button is pressed, e.g., 0 this time, 1 the next, and so on alternately.buttonStateandlastButtonStateare used to record the state of the button this time and the last time, to compare whether the button was pressed or released.
Initialize each pin and set the baud rate of the serial monitor.
void setup() {
    pinMode(buttonPin, INPUT);
    Serial.begin(9600);
    pinMode(motorPinA,OUTPUT);
    pinMode(motorPinB,OUTPUT);
}
First read the state of the button, and if the button is pressed, the variable
detectionStatewill switch its value from 0 to 1 or 1 to 0. WhendetectionStateis 1, the motor will be turned. It has the effect that this time the button is pressed, the motor turns, the next time the button is pressed, the motor stops, and so on alternately.void loop() { // Toggle the detectionState each time the button is pressed buttonState = digitalRead(buttonPin); if (buttonState != lastButtonState) { if (buttonState == HIGH) { detectionState=(detectionState+1)%2; Serial.print("The detection state is: "); Serial.println(detectionState); } delay(50); } lastButtonState = buttonState; // According to the detectionState, start the motor if(detectionState==1){ digitalWrite(motorPinA,HIGH); digitalWrite(motorPinB,LOW); }else{ digitalWrite(motorPinA,LOW); digitalWrite(motorPinB,LOW); } }
The entire workflow is as follows.
Read the button value.
buttonState = digitalRead(buttonPin);
If
buttonStateandlastButtonStateare not equal, it means that the button state has changed, continue with the next judgment, and store the button state at this time into the variablelastButtonState.delay(50)is used to eliminate jitter.
if (buttonState != lastButtonState) {
...
    delay(50);
}
lastButtonState = buttonState;
When the button is pressed, its value is HIGH. Here, when the button is pressed, the value of the variable
detectionStateis changed, e.g., from 0 to 1 after an operation.
if (buttonState == HIGH) {
    detectionState=(detectionState+1)%2;
    Serial.print("The detection state is: ");
    Serial.println(detectionState);
    }
When the variable
detectionStateis 1, let the motor rotate, otherwise stop.
if(detectionState==1){
    digitalWrite(motorPinA,HIGH);
    digitalWrite(motorPinB,LOW);
}else{
    digitalWrite(motorPinA,LOW);
    digitalWrite(motorPinB,LOW);
}