5.15 EEPROM
EEPROM is a memory, so the data it stores will not be erased when the main control board is turned off. You can use it to record some data and read it the next time you turn it on.
As an example, you can make a sports counter that keeps track of how many rope skippings you do every day.
You can also write data to it in one program and read it in another. For example, when you are working on a car project, the speeds of the two motors are inconsistent. You can write a calibration program to record the compensation value of the motor speed.
Required Components
In this project, we need the following components.
It’s definitely convenient to buy a whole kit, here’s the link:
Name |
ITEMS IN THIS KIT |
LINK |
|---|---|---|
3 in 1 Starter Kit |
380+ |
You can also buy them separately from the links below.
COMPONENT INTRODUCTION |
PURCHASE LINK |
|---|---|
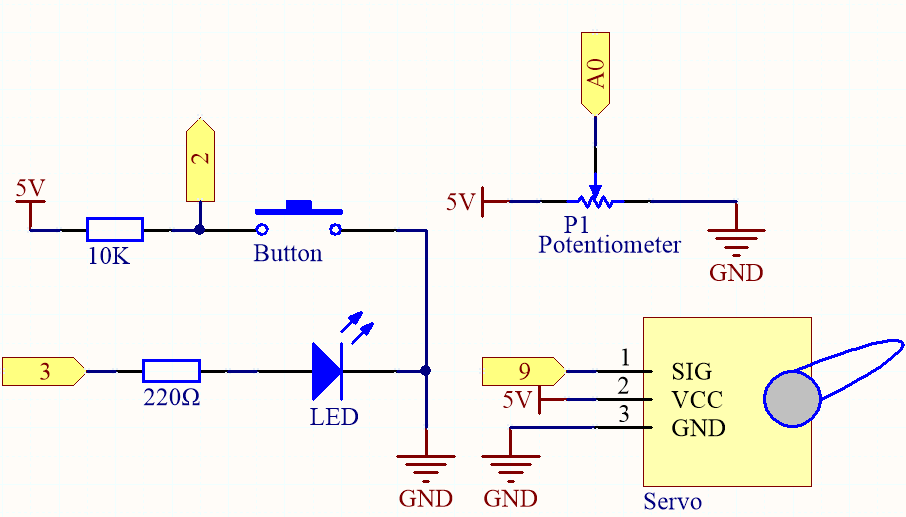
Schematic
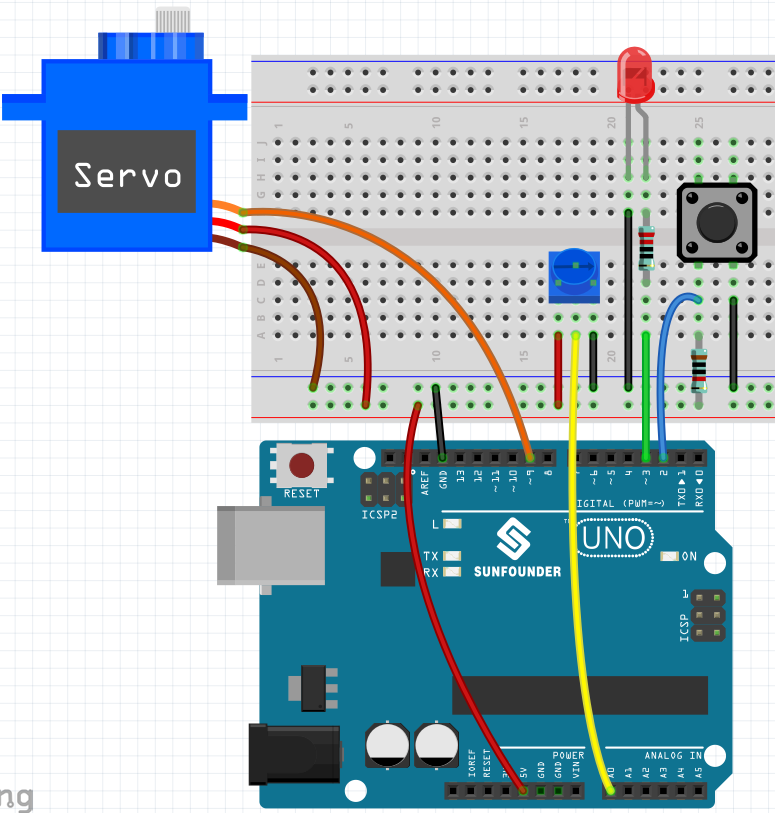
Wiring
Code
Note
Open the
5.15.eeproom.inofile under the path of3in1-kit\basic_project\5.15.eeproom.Or copy this code into Arduino IDE.
Or upload the code through the Arduino Web Editor.
To use this circuit, you simply press the button to begin recording and input the desired information through a potentiometer. Now, the board will repeat your actions endlessly (and it blinks an led each iteration) until you press the button again to record new actions. You may also vary the amount of time recorded by changing the values of resolution and recordTime.
How it works?
Import the
EEPROM.hlibrary, and initialize the EEPROM memory.... #include <EEPROM.h>//used to store recorded values ... float resolution = 1000;//MUST be less than EEPROM.length() float recordTime = 5; //delay time bool recording = false; ...
Please note that
/MUST be less than EEPROM.length(), insetup()it will print the memory of your board’s EEPROM, which should be 1024 for SunFounder R3 board. If you are using a different board, you can change the value of the variableresolution.Print the EEPROM memory of your board.
void setup() {
    ...
    Serial.begin(9600);
    //Serial.println(EEPROM.length());
}
To find the size of your board’s EEPROM memory, uncomment the line
Serial.println(EEPROM.read(i)). This will print the size of EEPROM in the serial monitor, and you can change the value of the variableresolutionaccordingly.As soon as a button press is detected, then recording begins and the required information is entered via a potentiometer. Now the board repeats your action endlessly (and flashes an LED for each repetition) until you press the button again, recording a new action.
void loop() {
    if (recording == true) {//record
        for (int i = 1; i <= resolution; i++) {
            digitalWrite(ledPin, HIGH); //light status led
            int val = map(analogRead(A0), 0, 1023, 0, 180);
            EEPROM.write(i, val);
            //Serial.println(EEPROM.read(i));
            myServo.write(val);
            delay(recordTime);
        }
        digitalWrite(ledPin, LOW); //turn off status led
        delay(1000);//give time for person
        recording = false;
    }
    else {
        for (int i = 1; i <= resolution; i++) {//playback
            if (digitalRead(buttonPin) == 0) {//stop playback and record new values
                recording = true;
                break;
            }
            int readval = EEPROM.read(i);
            myServo.write(readval);
            //Serial.println(readval);
            delay(recordTime);
        }
        digitalWrite(ledPin, HIGH); //show a new repeat
        delay(100);
        digitalWrite(ledPin, LOW);
    }
}
Make the variable
recordingtrue when the button is pressed.When the variable
recordingis true, start recording the action in the memory range.Read the value of the potentiometer and map it to 0-180 to store it in EEPROM and control the rotation of the servo.
The LED lights up at the start of recording and goes off at the end.
Repeat the recorded action with a quick flash of the LED to remind you of a new repeat.
About the
EEPROMlibrary.Here are some of its functions.
write(address,value): Write a byte to the EEPROM.address: the location to write to, starting from 0 (int)value: the value to write, from 0 to 255 (byte)An EEPROM write takes 3.3 ms to complete. The EEPROM memory has a specified life of 100,000 write/erase cycles, so you may need to be careful about how often you write to it.
Read(address): Reads a byte from the EEPROM. Locations that have never been written to have the value of 255.update(address,value): Write a byte to the EEPROM. The value is written only if differs from the one already saved at the same address.An EEPROM write takes 3.3 ms to complete. The EEPROM memory has a specified life of 100,000 write/erase cycles, so using this function instead of write() can save cycles if the written data does not change often
EEPROM.put(address, data): Write any data type or object to the EEPROM.address: the location to read from, starting from 0 (int).data: the data to read, can be a primitive type (eg. float) or a custom struct.This function uses EEPROM.update() to perform the write, so does not rewrites the value if it didn’t change.
EEPROM.get(address, data): Read any data type or object from the EEPROM.address: the location to read from, starting from 0 (int).data: the data to read, can be a primitive type (eg. float) or a custom struct.