Lesson 2 Controlling an LED by a Button
Introduction
In this lesson, we will learn how to turn an LED on or off by a button.
Components
- 1 * Raspberry Pi
- 1 * Breadboard
- 1 * LED
- 1 * Button
- 1 * Resistor (220Ω)
- Jumper wires
Principle
Button
Buttons are a common component used to control electronic devices. They are usually used as switches to connect or disconnect circuits. Although buttons come in a variety of sizes and shapes, the one used here is a 6mm mini-button as shown in the following pictures. Pins pointed out by the arrows of same color are meant to be connected.
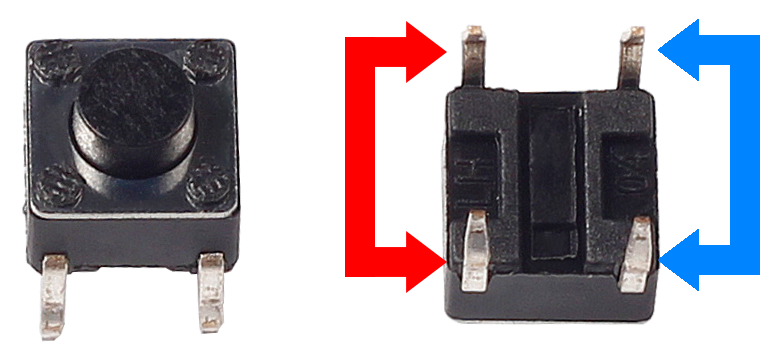
When the button is pressed, the pins pointed by the blue arrow will connect to the pins pointed by the red arrow (see the above figure), thus closing the circuit, as shown in the following diagrams.

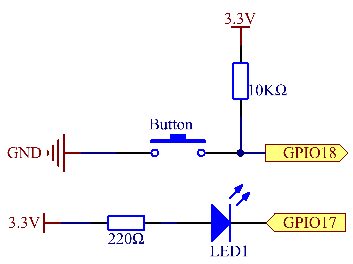
Generally, the button can be connected directly to the LED in a circuit to turn on or off the LED, which is comparatively simple. However, sometimes the LED will brighten automatically without any button pressed, which is caused by various kinds of external interference. In order to avoid this interference, a pull-up resistor is used – usually connect a 1K–10KΩ resistor between the button and VCC. It can be connected to VCC to consume the interference when the button is off.
Schematic Diagram
Use a normally open button as the input of Raspberry Pi. When the button is pressed, the GPIO connected to the button will turn into low level (0V). We can detect the state of the GPIO connected to the button through programming. That is, if the GPIO turns into low level, it means the button is pressed. You can run the corresponding code when the button is pressed, and then the LED will light up.
Experimental Procedures
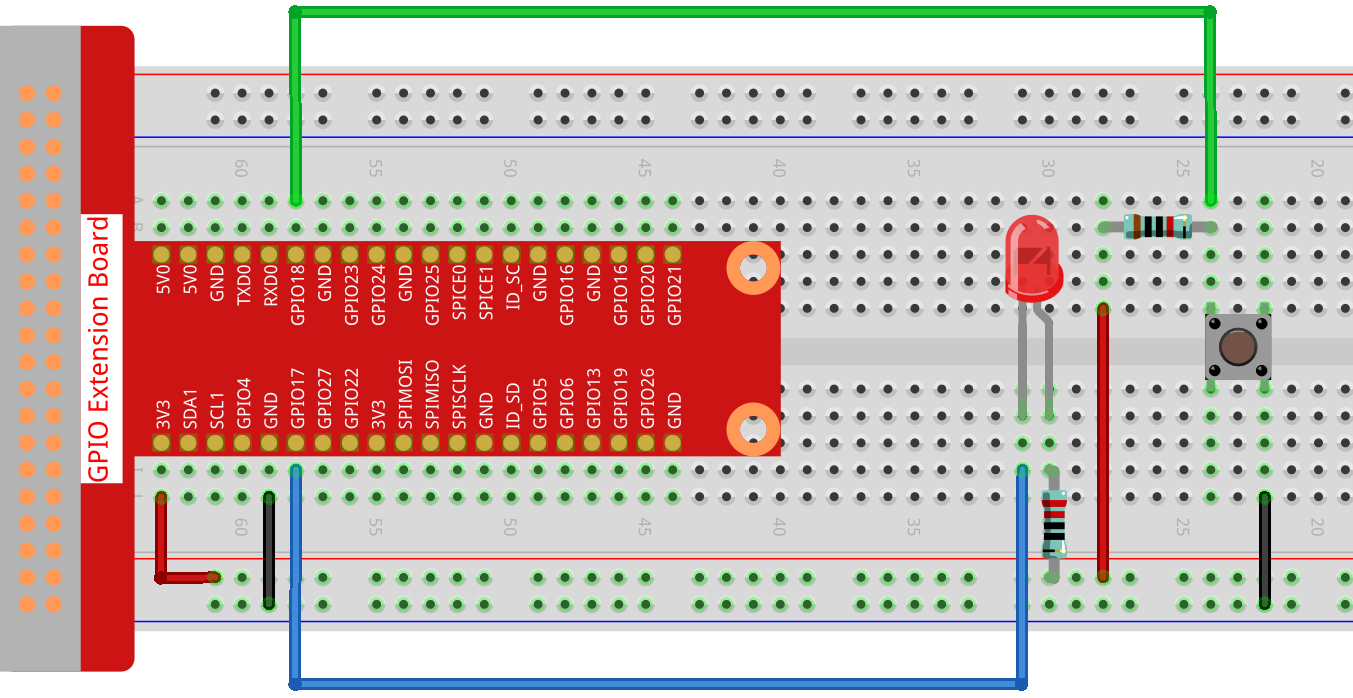
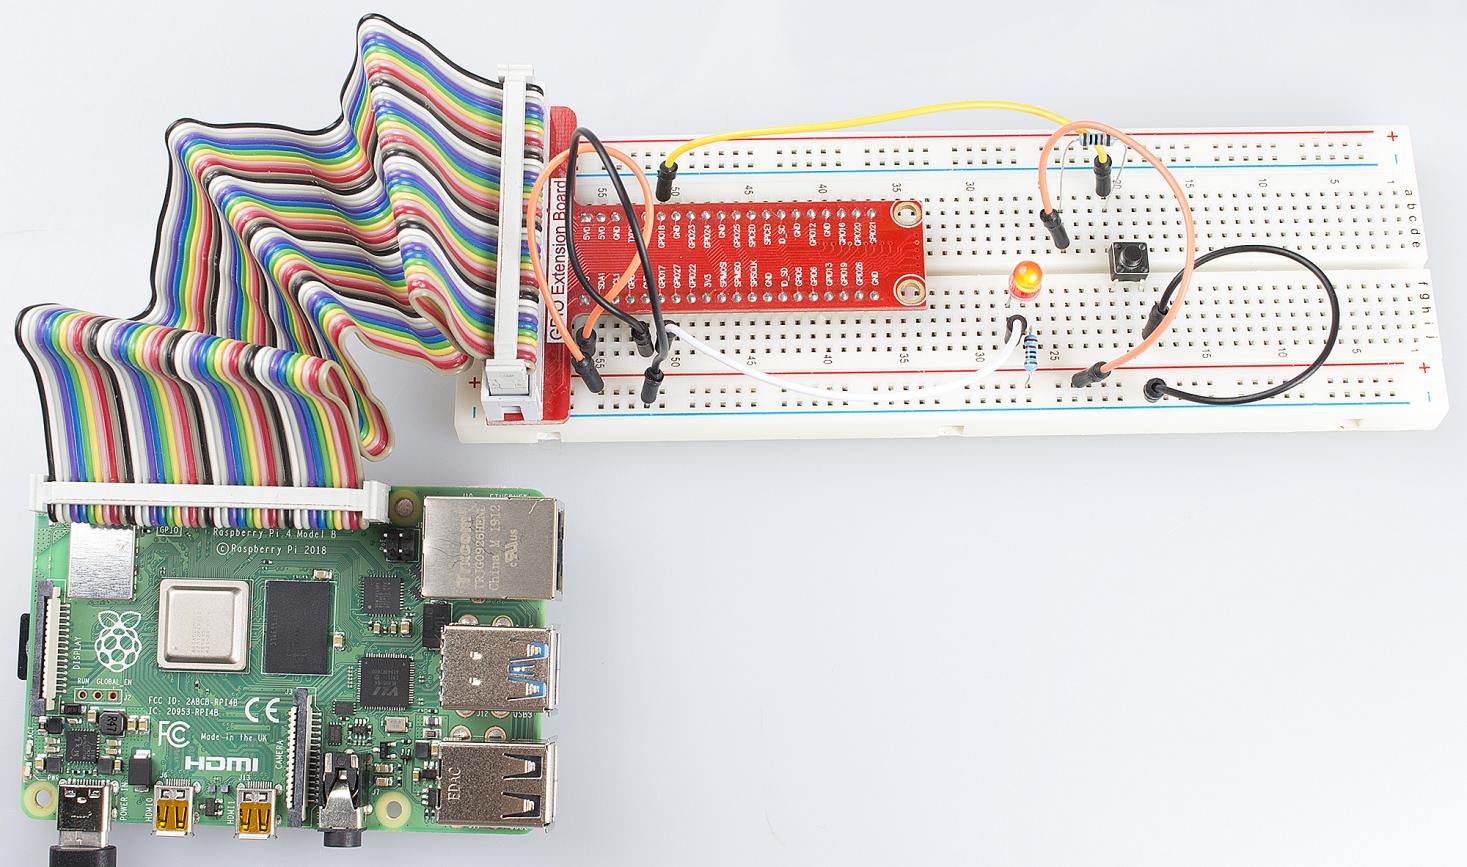
Step 1: Build the circuit.
For C Language Users:
Step 2: Change directory.
cd /home/pi/Sunfounder_SuperKit_C_code_for_RaspberryPi/02_BtnAndLed/
Step 3: Compile.
gcc BtnAndLed.c -o BtnAndLed -lwiringPi
Step 4: Run.
sudo ./BtnAndLed
Note
If it does not work after running, or there is an error prompt: “wiringPi.h: No such file or directory”, please refer to C code is not working?.
Code
#include <wiringPi.h>
#include <stdio.h>

#define LedPin    0
#define ButtonPin 1

int main(void)
{
    if(wiringPiSetup() == -1){ //when initialize wiring failed,print messageto screen
        printf("setup wiringPi failed !");
        return 1;
    }

    pinMode(LedPin, OUTPUT);
    pinMode(ButtonPin, INPUT);

    pullUpDnControl(ButtonPin, PUD_UP);  //pull up to 3.3V,make GPIO1 a stable level
    while(1){
        digitalWrite(LedPin, HIGH);
        if(digitalRead(ButtonPin) == 0){ //indicate that button has pressed down
            digitalWrite(LedPin, LOW);   //led on
        }
    }

    return 0;
}
For Python Users:
Step 2: Change directory.
cd /home/pi/Sunfounder_SuperKit_Python_code_for_RaspberryPi/
Step 3: Run.
sudo python3 02_btnAndLed.py
Now, press the button, and the LED will light up; press the button again, and the LED will go out. At the same time, the state of the LED will be printed on the screen.
Code
import RPi.GPIO as GPIO
import time

LedPin = 17
BtnPin = 18

Led_status = 1

def setup():
    GPIO.setmode(GPIO.BCM)       # Numbers GPIOs by BCM
    GPIO.setup(LedPin, GPIO.OUT)   # Set LedPin's mode is output
    GPIO.setup(BtnPin, GPIO.IN, pull_up_down=GPIO.PUD_UP)    # Set BtnPin's mode is input, and pull up to high level(3.3V)
    GPIO.output(LedPin, GPIO.HIGH) # Set LedPin high(+3.3V) to off led

def swLed(ev=None):
    global Led_status
    Led_status = not Led_status
    GPIO.output(LedPin, Led_status)  # switch led status(on-->off; off-->on)
    if Led_status == 1:
        print ("led off...")
    else:
        print ("...led on")

def loop():
    GPIO.add_event_detect(BtnPin, GPIO.FALLING, callback=swLed, bouncetime=200) # wait for falling and set bouncetime to prevent the callback function from being called multiple times when the button is pressed
    while True:
        time.sleep(1)   # Don't do anything

def destroy():
    GPIO.output(LedPin, GPIO.HIGH)     # led off
    GPIO.cleanup()                     # Release resource

if __name__ == '__main__':     # Program start from here
    setup()
    try:
        loop()
    except KeyboardInterrupt:  # When 'Ctrl+C' is pressed, the child program destroy() will be  executed.
        destroy()
Summary
Through this experiment, you have learnt how to control the GPIOs of the Raspberry Pi by programming.