Passive Buzzer
Note
🌟 Welcome to the SunFounder Facebook Community! Whether you’re into Raspberry Pi, Arduino, or ESP32, you’ll find inspiration, help ideas here.
✅ Be the first to get free learning resources.
✅ Stay updated on new products & exclusive giveaways.
✅ Share your creations and get real feedback.
Kit purchase
Looking for parts? Check out our all-in-one kits below — packed with components, beginner-friendly guides, and tons of fun.

Name |
Includes Arduino board |
PURCHASE LINK |
|---|---|---|
Ultimate Sensor Kit |
Arduino Uno R4 Minima |
|
Elite Explorer Kit |
Arduino Uno R4 WiFi |
|
3 in 1 Ultimate Starter Kit |
Arduino Uno R4 Minima |
|
Universal Maker Sensor Kit |
× |
Course Introduction
In this lesson, we will learn how to use the Passive Buzzer Module with Arduino.
Note
If this is your first time working with an Arduino project, we recommend downloading and reviewing the basic materials first.
Required Components
In this project, we need the following components:
SN |
COMPONENT INTRODUCTION |
QUANTITY |
PURCHASE LINK |
|---|---|---|---|
1 |
Arduino UNO R4 Minima |
1 |
|
2 |
USB Type-C cable |
1 |
|
3 |
Breadboard |
1 |
|
4 |
Wires |
Several |
|
5 |
Passive Buzzer Module |
1 |
Wiring
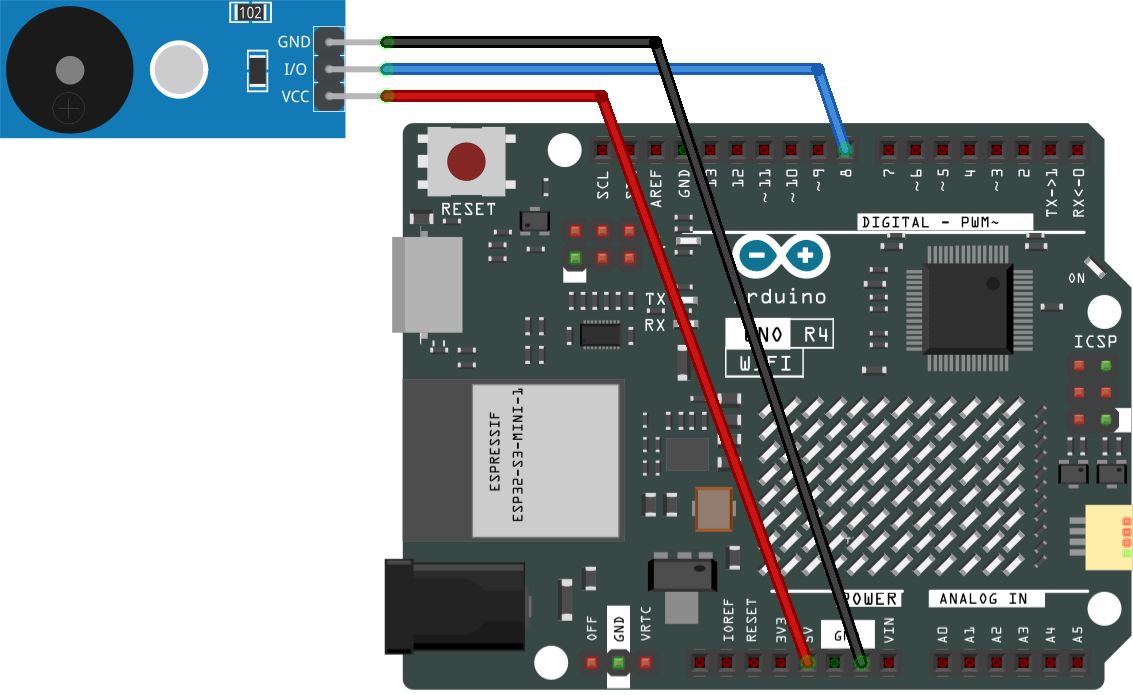
Common Connections:
Passive Buzzer Module
I/O: Connect to 8 on the Arduino.
-: Connect to GND on the Arduino.
+: Connect to 5V on the Arduino.
Writing the Code
Note
You can copy this code into Arduino IDE.
Don’t forget to select the board(Arduino UNO R4 Minima) and the correct port before clicking the Upload button.
/*
  This example demonstrates how to play simple melodies
  using a passive buzzer module and the tone() function.

  Board: Arduino Uno R3 / Uno R4
  Component: Passive Buzzer Module (e.g. KY-006)
  Pin connection:
    - Buzzer signal pin -> Digital pin 8
    - VCC -> 5V
    - GND -> GND

  Note:
  Two melodies are included in this sketch.
  Only ONE melody should be active at a time.
  The other melody is commented out and can be enabled if needed.
*/

#include "pitches.h"

const int buzzerPin = 8;

// ------------------------------------------------------------
// Melody selection
// Uncomment ONE melody block below to play the desired song
// ------------------------------------------------------------

// Melody 1: Ode to Joy (Beethoven) - one section
/*
int melody[] = {
  NOTE_E4, NOTE_E4, NOTE_F4, NOTE_G4,
  NOTE_G4, NOTE_F4, NOTE_E4, NOTE_D4,
  NOTE_C4, NOTE_C4, NOTE_D4, NOTE_E4,
  NOTE_E4, NOTE_D4, NOTE_D4
};

int noteDurations[] = {
  4, 4, 4, 4,
  4, 4, 4, 4,
  4, 4, 4, 4,
  2, 4, 2
};
*/

// Melody 2: Happy Birthday (classic version)
int melody[] = {
  NOTE_G4, NOTE_G4, NOTE_A4, NOTE_G4, NOTE_C5, NOTE_B4,
  NOTE_G4, NOTE_G4, NOTE_A4, NOTE_G4, NOTE_D5, NOTE_C5,
  NOTE_G4, NOTE_G4, NOTE_G5, NOTE_E5, NOTE_C5, NOTE_B4, NOTE_A4,
  NOTE_F5, NOTE_F5, NOTE_E5, NOTE_C5, NOTE_D5, NOTE_C5
};

int noteDurations[] = {
  4, 4, 4, 4, 4, 4,
  4, 4, 4, 4, 4, 4,
  4, 4, 4, 4, 4, 4, 4,
  4, 4, 4, 4, 4, 4
};

void setup() {
  // Calculate the total number of notes in the melody
  int notes = sizeof(melody) / sizeof(melody[0]);

  // Play the melody once
  for (int i = 0; i < notes; i++) {

    // Calculate note duration
    // 1000 ms = one whole note
    // 4 = quarter note, 8 = eighth note, etc.
    int noteDuration = 1000 / noteDurations[i];

    // Generate the sound at the given frequency
    // Duration is controlled manually using delay()
    tone(buzzerPin, melody[i]);

    // Keep the note playing for the calculated duration
    delay(noteDuration);

    // Stop the sound before the next note
    noTone(buzzerPin);

    // Short pause between notes for better clarity
    delay(noteDuration * 0.3);
  }
}

void loop() {
  // The melody is played once in setup().
  // No repetition is needed in loop().
}