7. Setup a Web Server
In this article, you will learn how to make Pico W a web server that allows you to operate the circuit and get readings from the sensor from a browser.
1. Required Components
In this project, we need the following components.
It’s definitely convenient to buy a whole kit, here’s the link:
Name |
ITEMS IN THIS KIT |
LINK |
|---|---|---|
Kepler Kit |
450+ |
You can also buy them separately from the links below.
SN |
COMPONENT |
QUANTITY |
LINK |
|---|---|---|---|
1 |
1 |
||
2 |
Micro USB Cable |
1 |
|
3 |
1 |
||
4 |
Several |
||
5 |
4(1-330Ω, 2-220Ω, 1-10KΩ) |
||
6 |
1 |
||
7 |
1 |
||
8 |
1 |
||
9 |
18650 Battery |
1 |
|
10 |
Battery Holder |
1 |
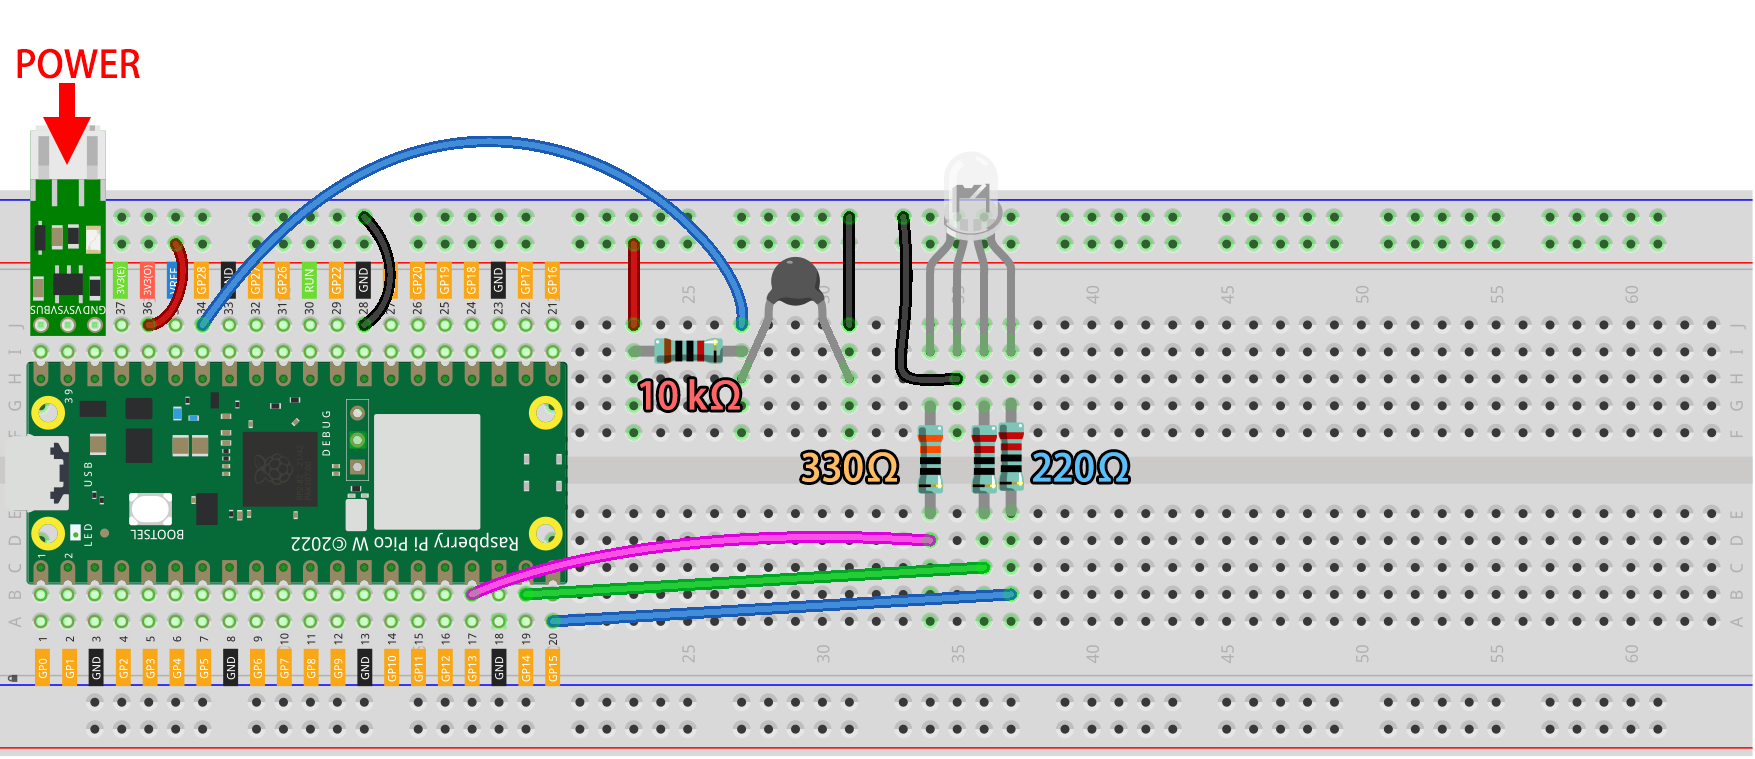
2. Build the Circuit
Warning
Make sure your Li-po Charger Module is connected as shown in the diagram. Otherwise, a short circuit will likely damage your battery and circuitry.
3. Run the Code
Open the
7_web_page.pyfile under the path ofkepler-kit-main/iot.Click the Run current script button or press F5 to run it. After successful connection, you will see the IP of Pico W.
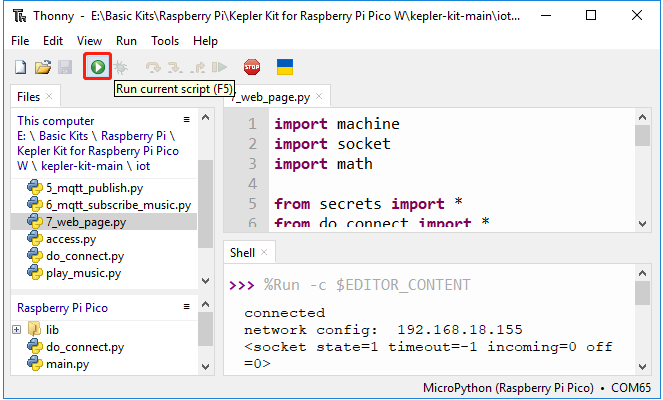
Note
Before running the code, you need to make sure you have
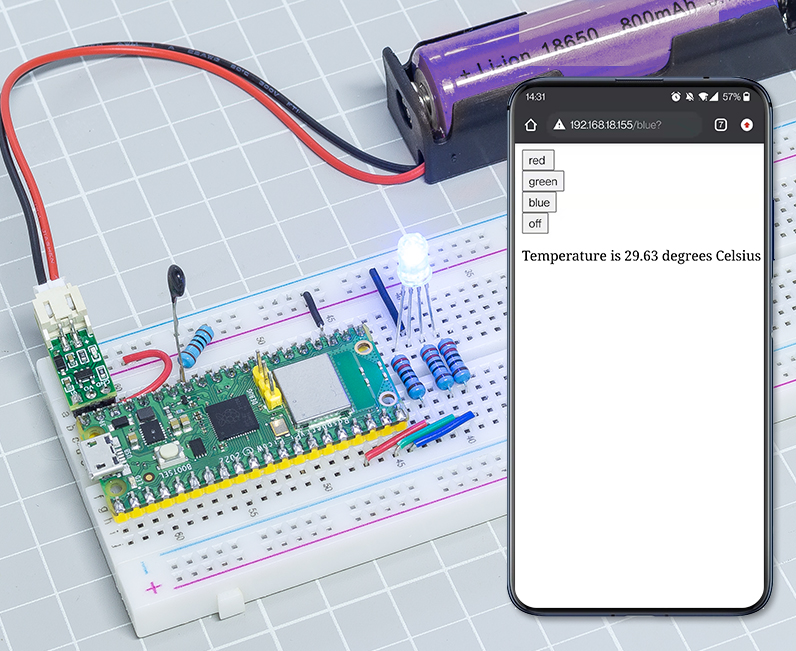
do_connect.pyandsecrets.pyscripts in your Pico W, if not please refer to 1. Access to the Network to create them.Enter the IP address of the Pico W into your browser to access the web page built for this project. Click any button to change the color of the RGB LEDs and refresh the temperature and humidity.
If you want this script to be able to boot up, you can save it to the Raspberry Pi Pico W as
main.py.
How it works?
The web page you are visiting is actually hosted on some server, and the socket on the server will send the web page to us when we visit it. A socket is the way a server can listen for a client that wants to connect to it.
In this project, Pico W is your server, and your computer is accessing the web page hosted on Pico W through a browser.
First we create a socket, which requires an IP address and a port. The network connection and the way to get the IP are described in 1. Access to the Network. And for port, we use 80. After setting up the socket, return it and use it for the next step.
import socket

def open_socket(ip):
    # Open a socket
    address = (ip, 80)
    connection = socket.socket()
    connection.bind(address)
    connection.listen(1)
    print(connection)
    return(connection)
Then, set up your web service where the socket you set up earlier will be used. The following code will allow your Pico W to receive access requests from your browser.
def serve(connection):
    while True:
        client = connection.accept()[0]
        request = client.recv(1024)
        client.close()
Next, you need an html page to send to the visitor. This example stores a simple html page in the form of characters in the variable html.
Note
If you want to be able to write your own html, you can get help at HTML.COM.
def webpage(value):
    html = f"""
            <!DOCTYPE html>
            <html>
            <body>
            <form action="./red">
            <input type="submit" value="red " />
            </form>
            <form action="./green">
            <input type="submit" value="green" />
            </form>
            <form action="./blue">
            <input type="submit" value="blue" />
            </form>
            <form action="./off">
            <input type="submit" value="off" />
            </form>
            <p>Temperature is {value} degrees Celsius</p>
            </body>
            </html>
            """
    return html
Send html page to visitor.
def serve(connection):
    while True:
        client = connection.accept()[0]
        request = client.recv(1024)
        html=webpage(0)
        client.send(html)
        client.close()
The page can be accessed through your browser if you combine the above parts. If you want to see the effect, run the code below with thonny.
import machine
import socket

from secrets import *
from do_connect import *

def webpage(value):
    html = f"""
            <!DOCTYPE html>
            <html>
            <body>
            <form action="./red">
            <input type="submit" value="red " />
            </form>
            <form action="./green">
            <input type="submit" value="green" />
            </form>
            <form action="./blue">
            <input type="submit" value="blue" />
            </form>
            <form action="./off">
            <input type="submit" value="off" />
            </form>
            <p>Temperature is {value} degrees Celsius</p>
            </body>
            </html>
            """
    return html

def open_socket(ip):
    # Open a socket
    address = (ip, 80)
    connection = socket.socket()
    connection.bind(address)
    connection.listen(1)
    print(connection)
    return(connection)

def serve(connection):
    while True:
        client = connection.accept()[0]
        request = client.recv(1024)
        html=webpage(0)
        client.send(html)
        client.close()

try:
    ip=do_connect()
    if ip is not None:
        connection=open_socket(ip)
        serve(connection)
except KeyboardInterrupt:
    machine.reset()
When you run the code above, you will see that it displays only a web page, does not allow you to control RGB LEDs, nor does it show sensor readings. The web service needs to be refined further.
The first thing we need to know is what information the server receives when the browser accesses the web page. Therefore, change serve() slightly to print request.
def serve(connection):
    while True:
        client = connection.accept()[0]
        request = client.recv(1024)
        request = str(request)
        print(request)
        html=webpage(0)
        client.send(html)
        client.close()
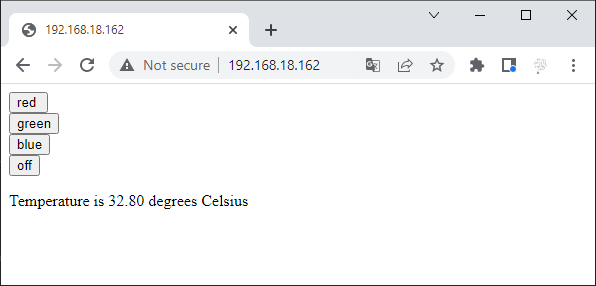
Re-run the script and the Shell will print the following message when we press a key on the web page.
b'GET /red? HTTP/1.1\r\nHost: 192.168.18.162\r\nConnection: keep-alive.......q=0.5\r\n\r\n'
b'GET /favicon.ico HTTP/1.1\r\nHost: 192.168.18.162\r\nConnection: keep-alive.......q=0.5\r\n\r\n'
b'GET /blue? HTTP/1.1\r\nHost: 192.168.18.162\r\nConnection: keep-alive.......q=0.5\r\n\r\n'
b'GET /favicon.ico HTTP/1.1\r\nHost: 192.168.18.162\r\nConnection: keep-alive.......q=0.5\r\n\r\n'
They are too long to read!!!
But all we really need is the small piece of information in front of /red?, /blue?.
It tells us which button was pressed. So we refined serve() a bit to extract the keystroke information.
def serve(connection):
    while True:
        client = connection.accept()[0]
        request = client.recv(1024)
        request = str(request)
        try:
            request = request.split()[1]
        except IndexError:
            pass
        print(request)
        html=webpage(0)
        client.send(html)
        client.close()
Re-run the program and the Shell will print the following message when we press a key on the web page.
/red?
/favicon.ico
/blue?
/favicon.ico
/off?
/favicon.ico
Then, we just need to change the color of the RGB LED according to the value of request.
def serve(connection):
    while True:
        client = connection.accept()[0]
        request = client.recv(1024)
        request = str(request)
        try:
            request = request.split()[1]
        except IndexError:
            pass

        print(request)

        if request == '/off?':
            red.low()
            green.low()
            blue.low()
        elif request == '/red?':
            red.high()
            green.low()
            blue.low()
        elif request == '/green?':
            red.low()
            green.high()
            blue.low()
        elif request == '/blue?':
            red.low()
            green.low()
            blue.high()

        html=webpage(0)
        client.send(html)
        client.close()
The last thing is to display the thermistor value on the web page (see 2.13 Thermometer for details on using the thermistor).
This part is actually done by modifying the text on the html.
We set the parameters in the webpage(value) function and simply change the incoming parameters to change the number displayed on the web page.
def serve(connection):
    while True:
        client = connection.accept()[0]
        request = client.recv(1024)
        request = str(request)
        try:
            request = request.split()[1]
        except IndexError:
            pass

        #print(request)

        if request == '/off?':
            red.low()
            green.low()
            blue.low()
        elif request == '/red?':
            red.high()
            green.low()
            blue.low()
        elif request == '/green?':
            red.low()
            green.high()
            blue.low()
        elif request == '/blue?':
            red.low()
            green.low()
            blue.high()

        value='%.2f'%temperature()
        html=webpage(value)
        client.send(html)
        client.close()