2. Follow the @CheerLights
This is a romantic project, join the @CheerLights - Twitter LED color-changing community, which allows LEDs all over the world to change colors simultaneously.
You can place it in a corner of your office to remind yourself that you are not alone.
You can tweeting @cheerlights and including the color name in the tweet. This will change the LEDs around the world to the color you specify.
Required Components
In this project, we need the following components.
It’s definitely convenient to buy a whole kit, here’s the link:
Name |
ITEMS IN THIS KIT |
LINK |
|---|---|---|
Kepler Kit |
450+ |
You can also buy them separately from the links below.
SN |
COMPONENT |
QUANTITY |
LINK |
|---|---|---|---|
1 |
1 |
||
2 |
Micro USB Cable |
1 |
|
3 |
1 |
||
4 |
Several |
||
5 |
1 |
||
6 |
1 |
||
7 |
18650 Battery |
1 |
|
8 |
Battery Holder |
1 |
Steps
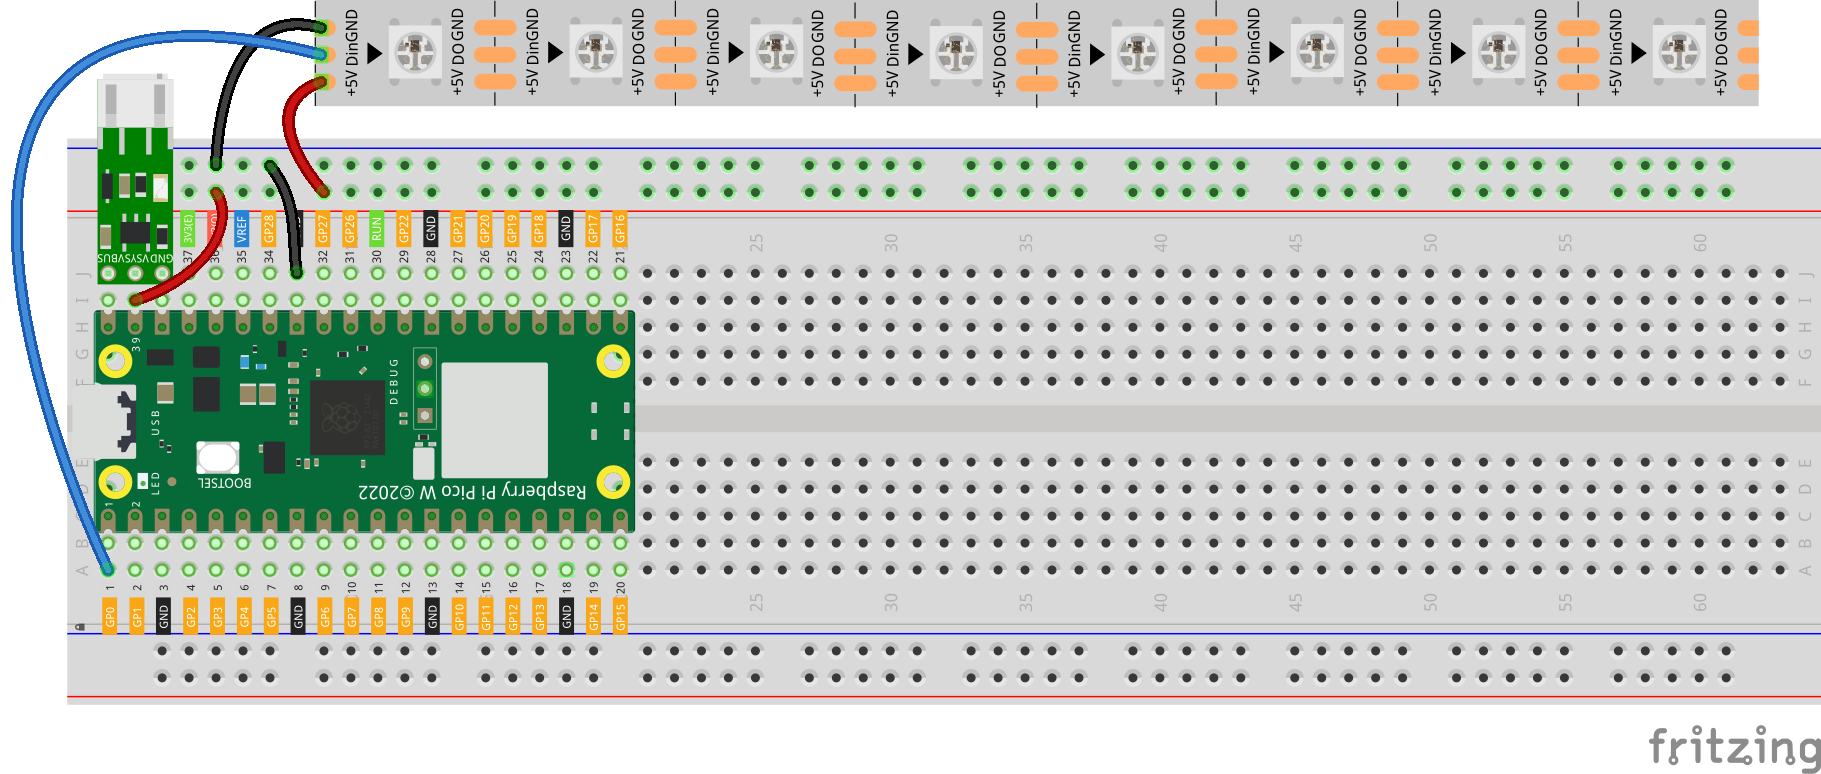
Build the circuit.
The Li-po Charger Module used here will power your circuit so you can disconnect the USB cable and take your project somewhere else to play!
Warning
Make sure your Li-po Charger Module is connected as shown in the diagram. Otherwise, a short circuit will likely damage your battery and circuitry.
Switch the path to the folder where you downloaded the code package before and open the
2_cheer_light.pyfile under the path ofkepler-kit-main/iot.To run the script, click the Run current script button or press F5, then you will see the connected prompt, the IP and the color (0xff0000 is red) in the Shell.
Note
Before running the code, you need to make sure you have
do_connect.pyandsecrets.pyscripts in your Pico W, if not please refer to 1. Access to the Network to create them.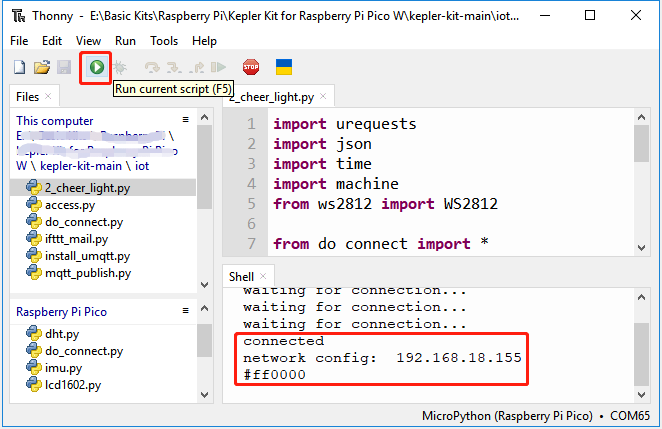
After the script runs, the WS2812 RGB strip will show a color, sometimes the color will change.
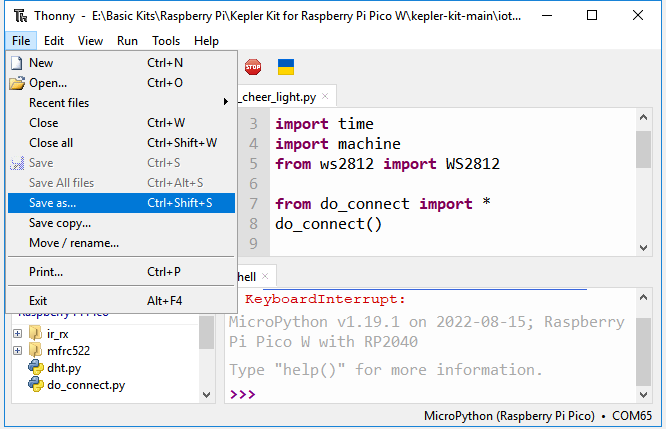
If you want to run this script on boot, you need to save it to the Raspberry Pi Pico W as
main.py, as follows.Stop the script from running and click File -> Save as.
Select Raspberry Pi Pico in the popup window that appears.
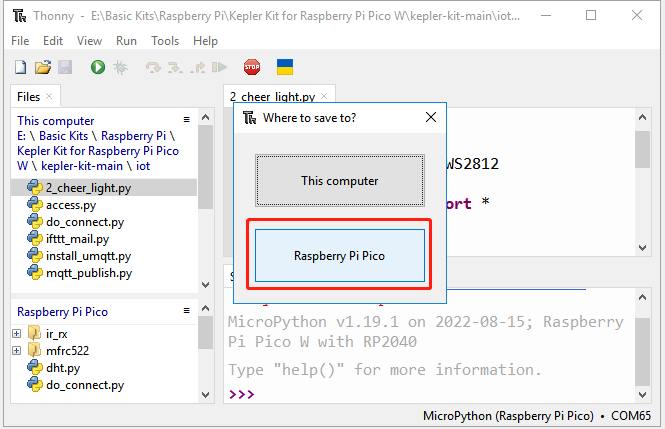
Set the file name to
main.py. A prompt will appear if the same file already exists on your Pico W.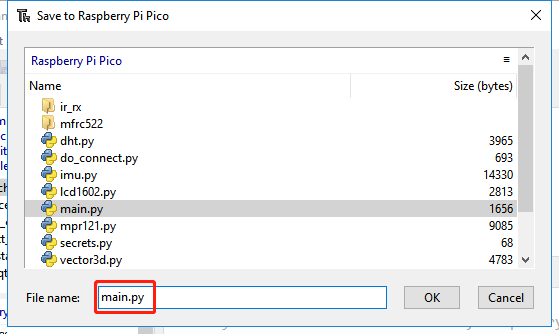
You can now unplug the USB cable and use the Li-po Charger Module to power the Raspberry Pi Pico W. Put it in a corner and it will work automatically.
How it works?
The Raspberry Pi Pico W needs to be connected to the Internet, as described in 1. Access to the Network. For this project, just use it.
from do_connect import *
do_connect()
Set WS2812 RGB strip, please refer to 3.3 RGB LED Strip for its usage details.
import machine
from ws2812 import WS2812
ws = WS2812(machine.Pin(18), 8)
Now, we need a way to get the color of @CheerLights. There is a back-end system that takes the color changes from Twitter and posts them in JSON format to the URL: http://api.thingspeak.com/channels/1417/field/2/last.json.
If you open this URL directly in your browser, you will see something like the following. All we need is the field2 data, which is a hexadecimal color-coded string.
{"created_at":"2022-08-16T06:12:44Z","entry_id":870488,"field2":"#ff00ff"}
We need to use the urequests module to get this data and the json module to convert this character into a python dictionary.
The following code gets the latest @CheerLights color from the url and returns a color value that can be used by WS2812.
def get_colour():
    url = "http://api.thingspeak.com/channels/1417/field/2/last.json"
    try:
        r = urequests.get(url)
        if r.status_code > 199 and r.status_code < 300:
            cheerlights = json.loads(r.content.decode('utf-8'))
            print(cheerlights['field2'])
            colour = int('0x'+cheerlights['field2'][1:7])#Convert from String to Integer
            r.close()
            return colour
        else:
            return None
    except Exception as e:
        print(e)
        return None
Finally, use a loop to make the ws2812 work once per minute.
while True:
    colour = get_colour()
    if colour is not None:
        ws.write_all(colour)
    time.sleep(60)