Note
Hello, welcome to the SunFounder Raspberry Pi & Arduino & ESP32 Enthusiasts Community on Facebook! Dive deeper into Raspberry Pi, Arduino, and ESP32 with fellow enthusiasts.
Why Join?
Expert Support: Solve post-sale issues and technical challenges with help from our community and team.
Learn & Share: Exchange tips and tutorials to enhance your skills.
Exclusive Previews: Get early access to new product announcements and sneak peeks.
Special Discounts: Enjoy exclusive discounts on our newest products.
Festive Promotions and Giveaways: Take part in giveaways and holiday promotions.
👉 Ready to explore and create with us? Click [here] and join today!
2.9 - Feel the Magnetism
The most common type of reed switch contains a pair of magnetizable, flexible, metal reeds whose end portions are separated by a small gap when the switch is open.
A magnetic field from an electromagnet or a permanent magnet will cause the reeds to attract each other, thus completing an electrical circuit. The spring force of the reeds causes them to separate, and open the circuit, when the magnetic field ceases.
A common example of a reed switch application is to detect the opening of a door or windows, for a security alarm.
Schematic
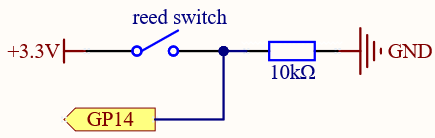
By default, GP14 is low; and will go high when the magnet is near the reed switch.
The purpose of the 10K resistor is to keep the GP14 at a steady low level when no magnet is near.
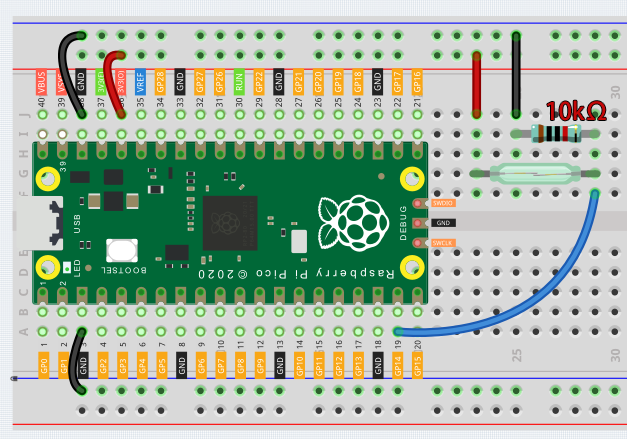
Wiring
Code
Note
You can open the file
2.9_feel_the_magnetism.inounder the path ofeuler-kit/arduino/2.9_feel_the_magnetism.Or copy this code into Arduino IDE.
Then select the Raspberry Pi Pico board and the correct port before clicking the Upload button.
When a magnet approaches, the circuit will be closed. Just like the button in the 2.5 - Reading Button Value chapter.