Note
Hello, welcome to the SunFounder Raspberry Pi & Arduino & ESP32 Enthusiasts Community on Facebook! Dive deeper into Raspberry Pi, Arduino, and ESP32 with fellow enthusiasts.
Why Join?
Expert Support: Solve post-sale issues and technical challenges with help from our community and team.
Learn & Share: Exchange tips and tutorials to enhance your skills.
Exclusive Previews: Get early access to new product announcements and sneak peeks.
Special Discounts: Enjoy exclusive discounts on our newest products.
Festive Promotions and Giveaways: Take part in giveaways and holiday promotions.
👉 Ready to explore and create with us? Click [here] and join today!
Bluetooth Environmental Monitor
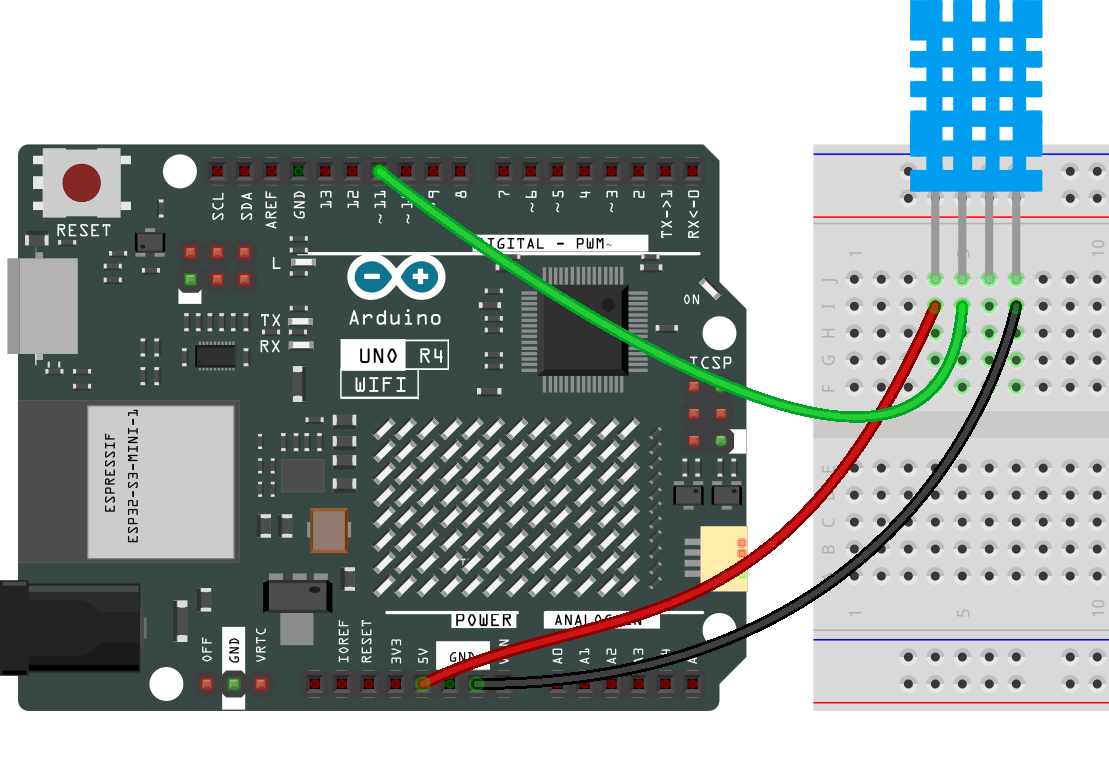
This project uses an Android app created with MIT App Inventor to receive and display environmental data from an Arduino board. The Arduino board fetches data from a DHT11 sensor to measure temperature and humidity. Once the data is collected, it’s transmitted over Bluetooth. The app will display the data on the screen once it receives it.
The Android application will be constructed utilizing a complimentary web-based platform known as MIT App Inventor. The project presents an excellent opportunity to gain familiarity with the interfacing of an Arduino with a smartphone.
Required Components
In this project, we need the following components.
It’s definitely convenient to buy a whole kit, here’s the link:
Name |
ITEMS IN THIS KIT |
LINK |
|---|---|---|
Elite Explorer Kit |
300+ |
You can also buy them separately from the links below.
COMPONENT INTRODUCTION |
PURCHASE LINK |
|---|---|
- |
|
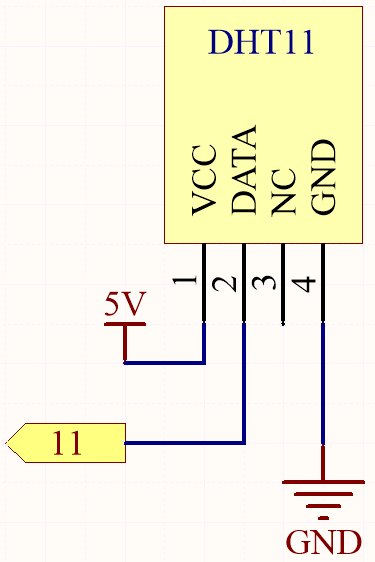
1. Build the Cirduit
2. Create the Android App
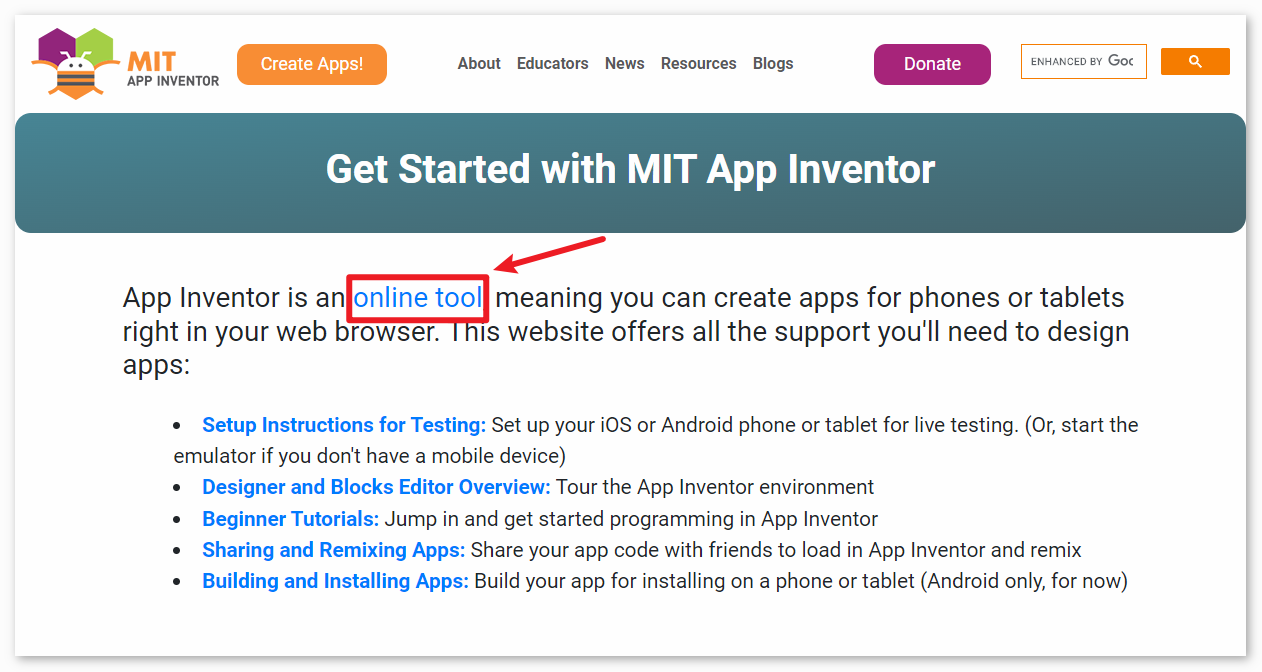
The Android application will be developed using a free web application known as MIT App Inventor. MIT App Inventor serves as an excellent starting point for Android development, owing to its intuitive drag-and-drop features allowing for the creation of simplistic applications.
Now, let’s begin.
Go to Get Started with MIT App Inventor, and click “online tool” to login. You will require a Google account to register with MIT App Inventor.
After logging in, navigate to Projects -> Import project (.aia) from my computer. Subsequently, upload the
ble_environmental_monitor.aiafile located in the pathelite-explorer-kit-main\iot_project\08-bluetooth_environmental_monitor.You can also directly download here:
ble_environmental_monitor.aia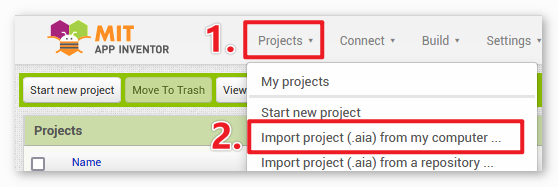
Upon uploading the
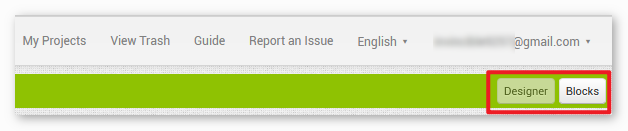
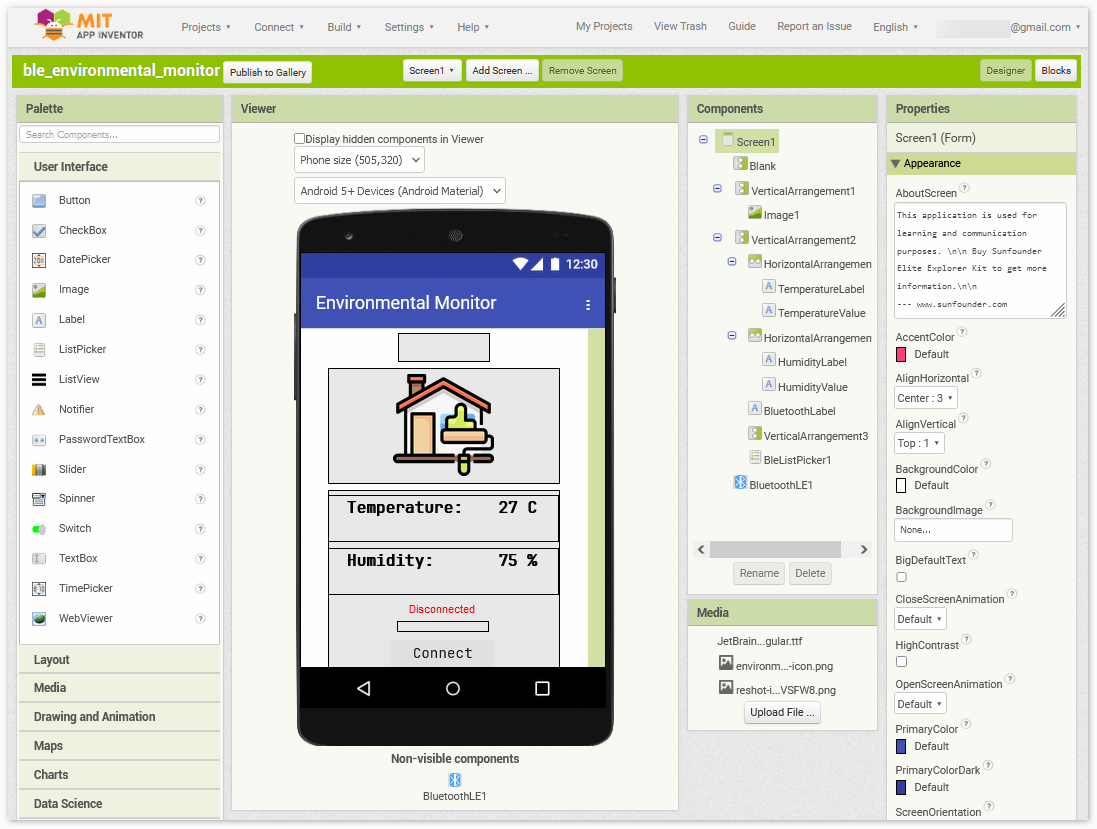
.aiafile, you will see the application on the MIT App Inventor software. This is a pre-configured template. You can modify this template after you have familiarized yourself with MIT App Inventor through the following steps.In MIT App Inventor, you have 2 primary sections: the Designer and the Blocks. You can switch between these two sections in the upper right corner of the page.
The Designer allows you to add buttons, text, screens, and modify the overall aesthetic of your application.
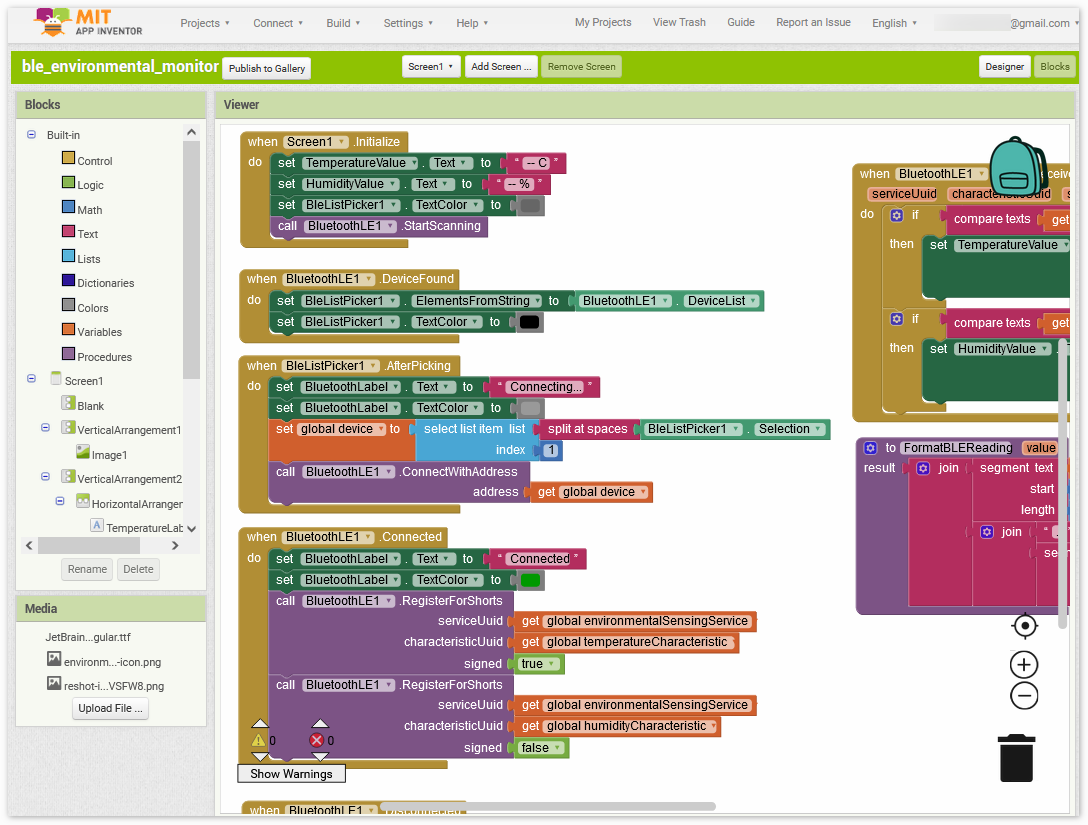
Next, there’s the Blocks section. This section lets you craft custom functionalities for your app, allowing you to program each component on the app’s GUI to achieve desired features.
To install the application on a smartphone, navigate to the Build tab.
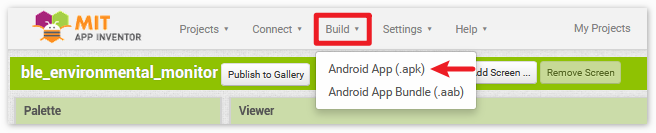
You can generate a
.apkfile. After selecting this option, a page will appear allowing you to choose between downloading a.apkfile or scanning a QR code for installation. Follow the installation guide to complete the application installation.You also download our pre-compiled APK here:
ble_environmental_monitor.apkIf you wish to upload this app to Google Play or another app marketplace, you can generate a
.aabfile.
3. Upload the Code
Open the
08-bluetooth_environmental_monitor.inofile under the path ofelite-explorer-kit-main\iot_project\08-bluetooth_environmental_monitor, or copy this code into Arduino IDE.Note
To install the library, use the Arduino Library Manager to search for and install “DHT sensor library” and “ArduinoBLE”.
  1/*
  2  This code is designed for an Arduino Uno R4 board to read temperature and humidity data
  3  from a DHT11 sensor. It then transmits this data via Bluetooth Low Energy (BLE) to a connected
  4  device. The code uses the DHT library for reading sensor data and the ArduinoBLE library for
  5  Bluetooth communication. The BLE service and characteristics are set up according to the
  6  specifications of the Bluetooth SIG for environmental sensing. Additionally, the code includes
  7  functions for managing BLE connection and disconnection events, as well as a debug function
  8  that prints sensor data to the serial monitor.
  9
 10  Board: Arduino Uno R4
 11  Component: DHT11
 12  Library: https://github.com/adafruit/DHT-sensor-library  (DHT sensor library by Adafruit)
 13           https://www.arduino.cc/reference/en/libraries/arduinoble/ (ArduinoBLE by Arduino)
 14*/
 15
 16
 17#include <DHT.h>
 18#include <ArduinoBLE.h>
 19
 20#define DHTPIN 11      // Define the pin used to connect the sensor
 21#define DHTTYPE DHT11  // Define the sensor type
 22
 23// Define UUIDs for BLE Environmental Sensing Service and Characteristics as per Bluetooth SIG specifications
 24// https://bitbucket.org/bluetooth-SIG/public/src/8a7ea26ae56d43e6fea88693232a01a78e28213e/assigned_numbers/uuids/service_uuids.yaml#lines-104:105
 25BLEService environmentalSensingService("181A");
 26// https://bitbucket.org/bluetooth-SIG/public/src/8a7ea26ae56d43e6fea88693232a01a78e28213e/assigned_numbers/uuids/characteristic_uuids.yaml#lines-299:303
 27BLEShortCharacteristic temperatureCharacteristic("2A6E", BLERead | BLENotify);
 28BLEUnsignedShortCharacteristic humidityCharacteristic("2A6F", BLERead | BLENotify);
 29
 30DHT dht(DHTPIN, DHTTYPE);  // Create a DHT object
 31
 32unsigned long lastUpdateTime = 0;           // Timestamp of last sensor data update
 33const unsigned long updateInterval = 5000;  // Sensor data update interval (ms)
 34
 35void setup() {
 36
 37  Serial.begin(9600);  // Initialize serial communication at 9600 baud
 38  dht.begin();         // Initialize DHT sensor
 39
 40  // Initialize BLE, halt if initialization fails
 41  if (!BLE.begin()) {
 42    Serial.println("starting Bluetooth® Low Energy module failed!");
 43    while (1)
 44      ;
 45  }
 46
 47  setupBle();  // Setup BLE service and characteristics
 48}
 49
 50void loop() {
 51
 52  BLE.poll();  // Poll for BLE events
 53
 54  // Check if it's time to update sensor data
 55  if (lastUpdateTime == 0 || millis() - lastUpdateTime > updateInterval) {
 56    float humidity = dht.readHumidity();        // Read humidity
 57    float temperature = dht.readTemperature();  // Read temperature
 58
 59    // Check if any reads failed and exit early (to try again).
 60    if (isnan(humidity) || isnan(temperature)) {
 61      Serial.println(F("Failed to read from DHT sensor!"));
 62      return;
 63    }
 64
 65    // Debug: print sensor data to serial monitor
 66    printDHT(humidity, temperature);
 67
 68    // Update BLE characteristics with new sensor data
 69    temperatureCharacteristic.writeValue(round(temperature * 100.0));
 70    humidityCharacteristic.writeValue(round(humidity * 100.0));
 71
 72    lastUpdateTime = millis();  // Update timestamp
 73  }
 74}
 75
 76void printDHT(float h, float t) {
 77  // Print humidity and temperature data to serial monitor
 78  Serial.print(F("Humidity: "));
 79  Serial.print(h);
 80  Serial.print(F("%  Temperature: "));
 81  Serial.print(t);
 82  Serial.println(F("°C "));
 83}
 84
 85void setupBle() {
 86  // Set advertised local name and service UUID:
 87  BLE.setLocalName("UNO R4 Home");
 88  BLE.setAdvertisedService(environmentalSensingService);
 89
 90  // Add characteristics to the service
 91  environmentalSensingService.addCharacteristic(temperatureCharacteristic);
 92  environmentalSensingService.addCharacteristic(humidityCharacteristic);
 93
 94  // Add service
 95  BLE.addService(environmentalSensingService);
 96
 97  // Set initial characteristic values
 98  temperatureCharacteristic.writeValue(0);
 99  humidityCharacteristic.writeValue(0);
100
101  // Set BLE event handlers for connection and disconnection
102  BLE.setEventHandler(BLEConnected, blePeripheralConnectHandler);
103  BLE.setEventHandler(BLEDisconnected, blePeripheralDisconnectHandler);
104
105  // Start advertising
106  BLE.advertise();
107}
108
109void blePeripheralConnectHandler(BLEDevice central) {
110  // Handle BLE peripheral connect event
111  digitalWrite(LED_BUILTIN, HIGH);  // Turn on built-in LED
112  Serial.print(F("Connected to central: "));
113  Serial.println(central.address());
114}
115
116void blePeripheralDisconnectHandler(BLEDevice central) {
117  // Handle BLE peripheral disconnect event
118  digitalWrite(LED_BUILTIN, LOW);  // Turn off built-in LED
119  Serial.print(F("Disconnected from central: "));
120  Serial.println(central.address());
121}
After selecting the correct board and port, click the Upload button.
Open the Serial monitor(set baudrate to 9600) to view debug messages.
4. App and Bluetooth module Connection
Ensure that the application created earlier is installed on your smartphone.
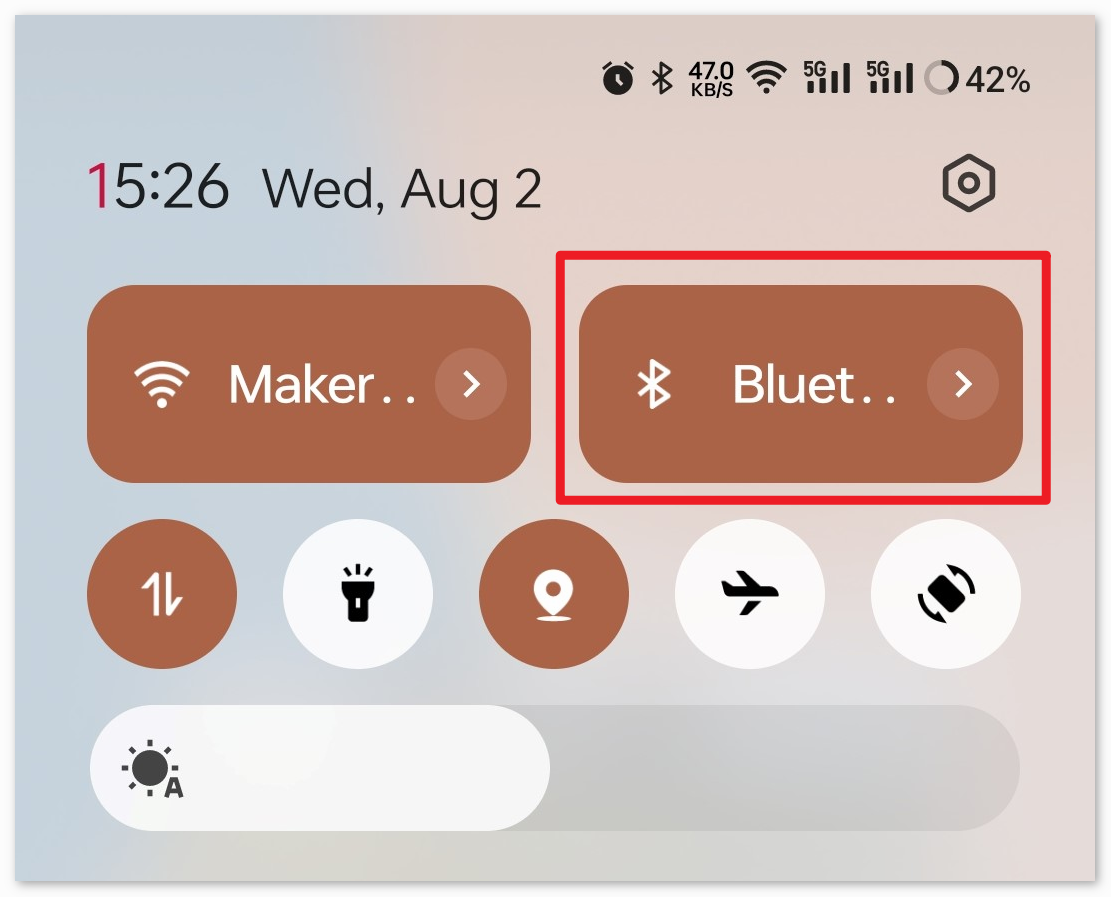
Initially, turn on Bluetooth on your smartphone.
Now open the newly installed Environmental Monitor APP.
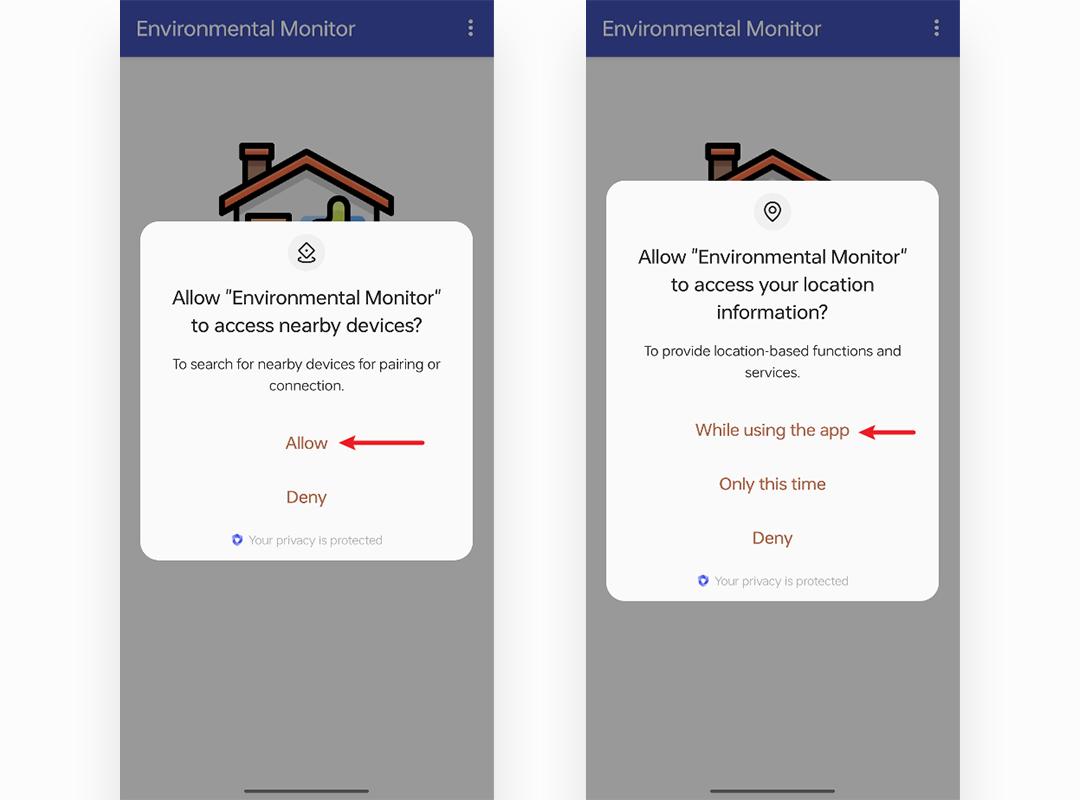
When you first open this app, two authorization prompts will pop up in succession. These are the permissions required for using Bluetooth.
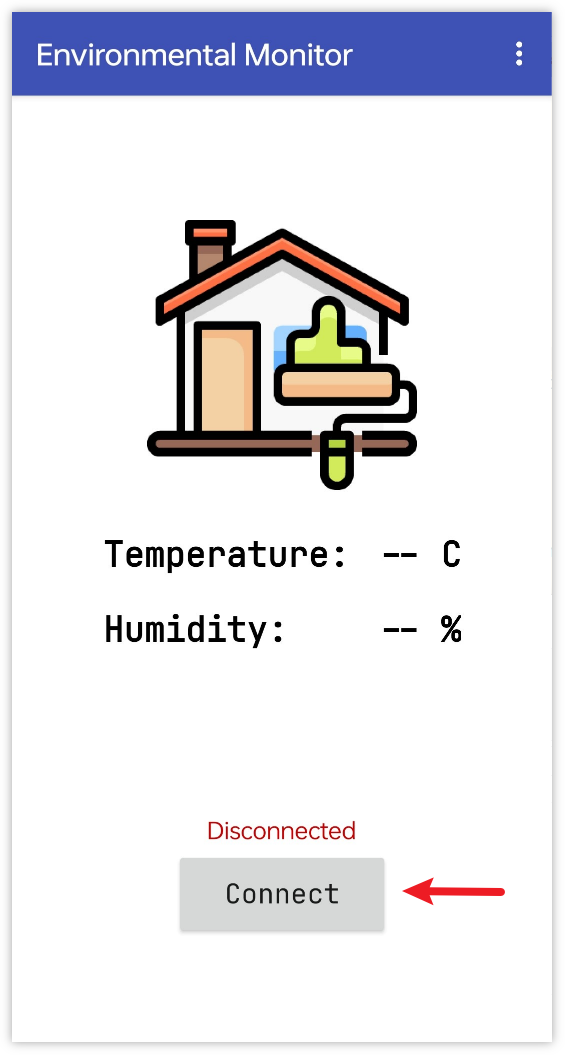
In the APP, click on Connect button to establish a connection between the APP and Bluetooth module.
This page displays a list of all paired Bluetooth devices. Choose the
xx.xx.xx.xx.xx.xx UNO R4 Homeoption from the list. The name of each device is listed next to its MAC address.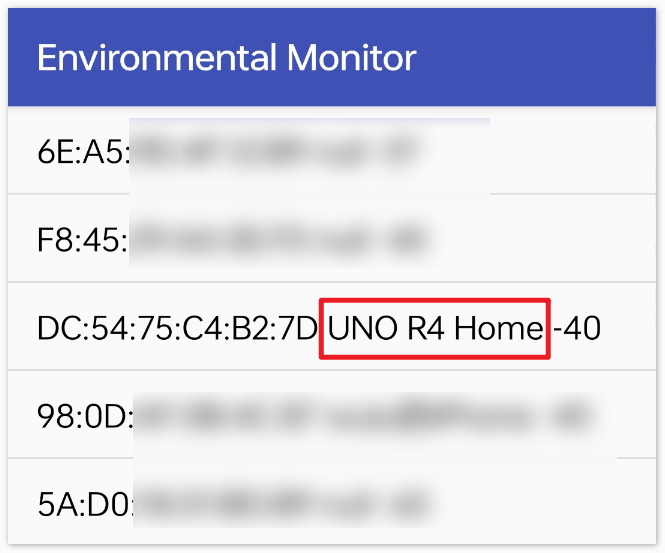
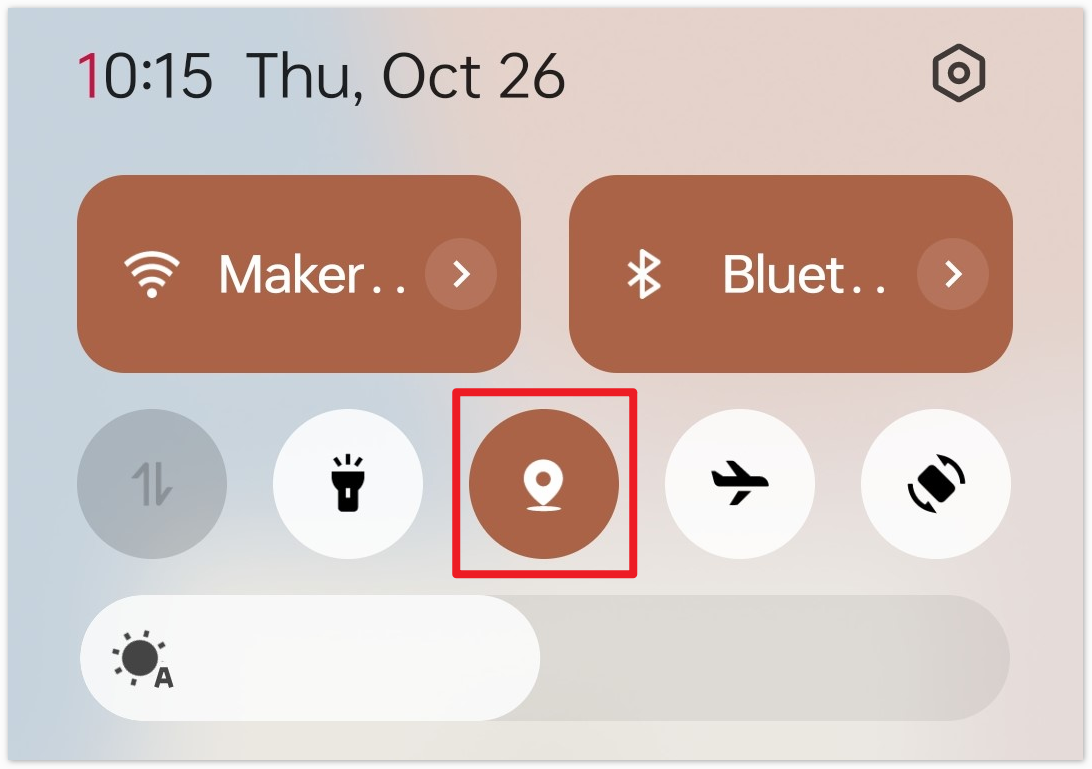
If you don’t see any devices on the page shown above, you can try turning on the location switch of the device (some Android system versions bundle the location switch with the Bluetooth function).
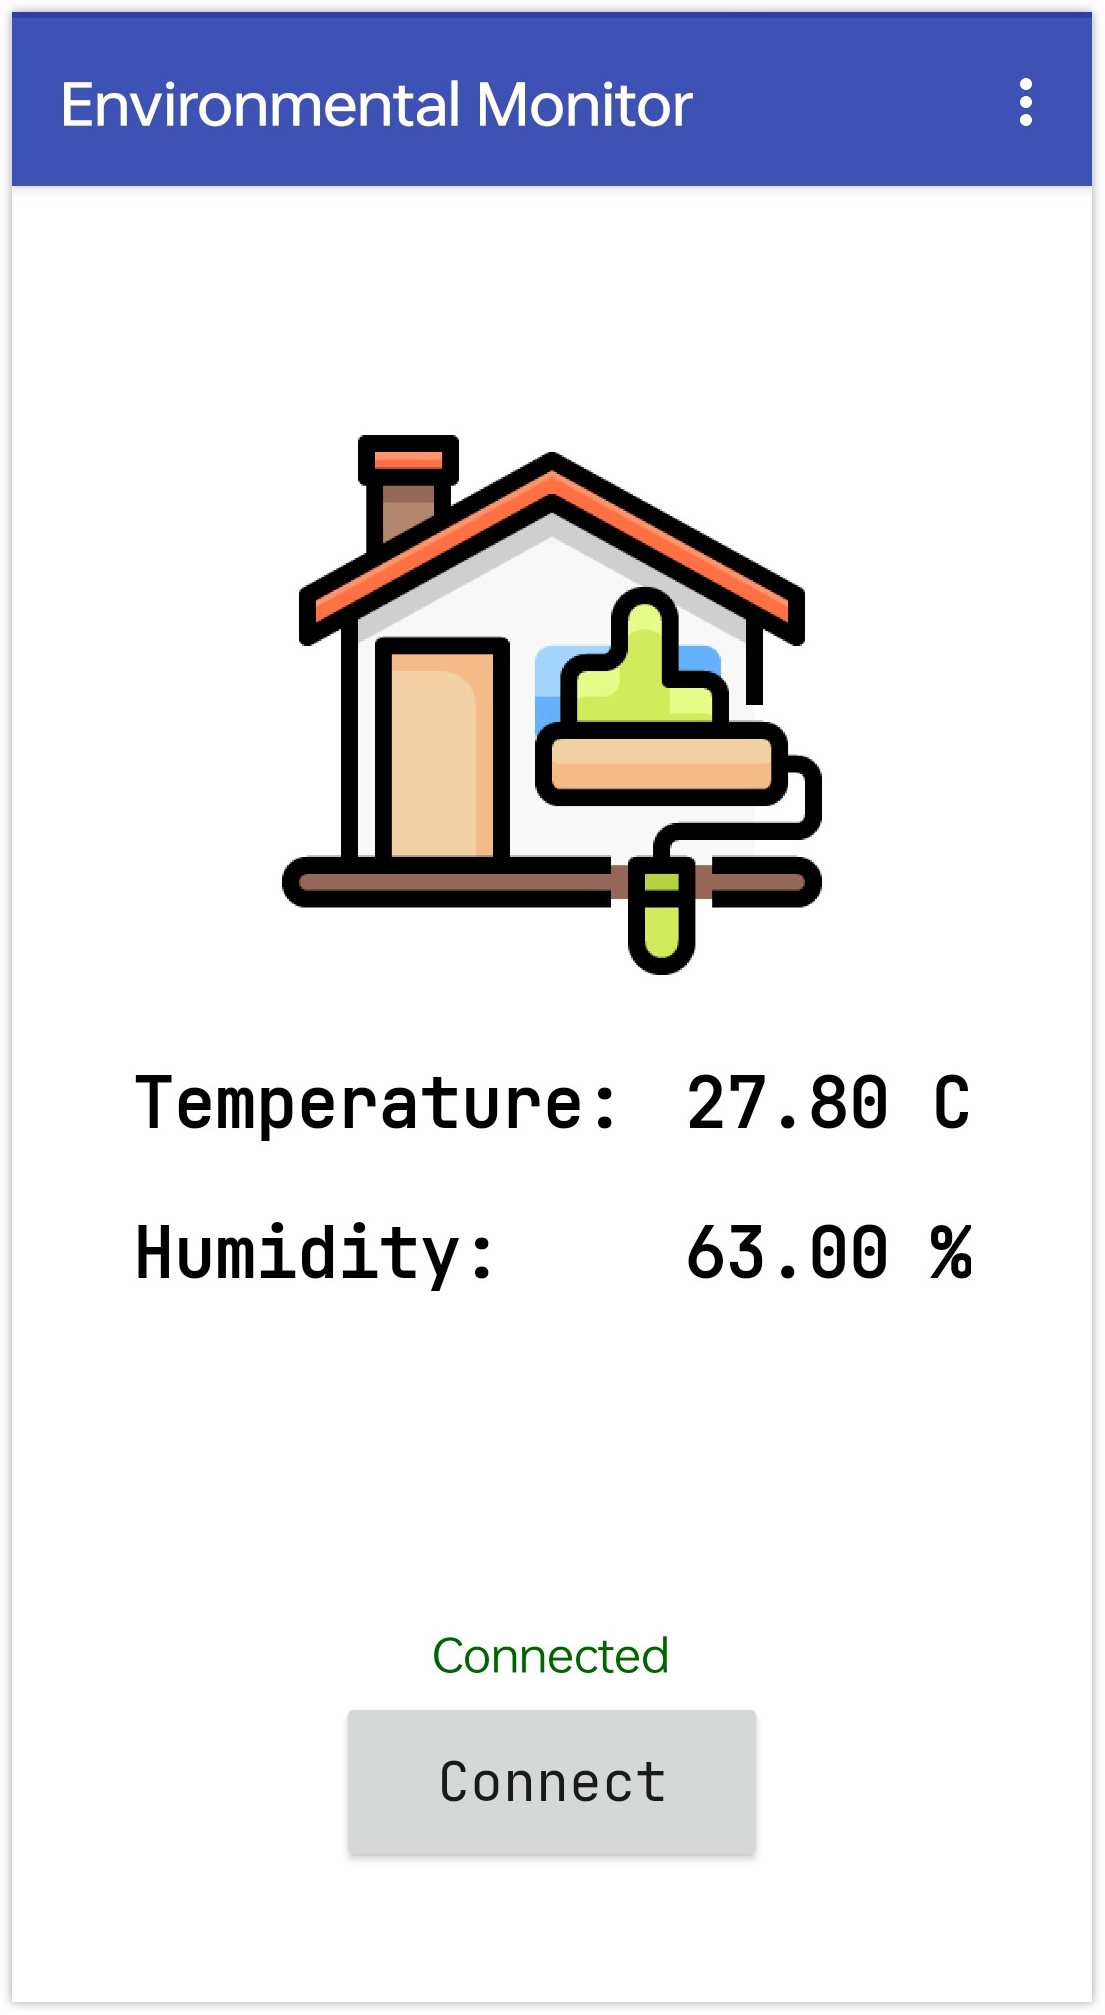
After a successful connection, you will be redirected to the main page where it will display temperature and humidity.
5. Code explanation
Importing Libraries and Defining Constants
Import the required libraries and define constants for the DHT sensor pin and type.
Note
To install the library, use the Arduino Library Manager to search for and install “DHT sensor library” and “ArduinoBLE”.
#include <DHT.h>
#include <ArduinoBLE.h>
#define DHTPIN 11
#define DHTTYPE DHT11
Initializing BLE Services and Characteristics
Define the UUIDs for BLE Environmental Sensing Service and Characteristics. We are using the pre-defined UUIDs provided by Bluetooth SIG. The environmentalSensingService is assigned
0x181A, while0x2A6Eand0x2A6Fare reserved for temperature and humidity, respectively.
BLEService environmentalSensingService("181A");
BLEShortCharacteristic temperatureCharacteristic("2A6E", BLERead | BLENotify);
BLEUnsignedShortCharacteristic humidityCharacteristic("2A6F", BLERead | BLENotify);
Setup Function
Initialize the Serial communication, DHT sensor, and BLE.
void setup() {
  Serial.begin(9600);
  dht.begin();
  if (!BLE.begin()) {
    Serial.println("starting Bluetooth® Low Energy module failed!");
    while (1)
      ;
  }
  setupBle();
}
Main Loop
Poll for BLE events and update sensor data at regular intervals.
The
millis() - lastUpdateTime > updateIntervalline ensures that the sensor data is updated every updateInterval milliseconds.
void loop() {
  BLE.poll();
  if (millis() - lastUpdateTime > updateInterval) {
    // Read sensor data and update BLE characteristics
  }
}
BLE and Debug Functions
Functions for setting up BLE, printing debug information, and managing BLE events.
void printDHT(float h, float t) { /* ... */ }
void setupBle() { /* ... */ }
void blePeripheralConnectHandler(BLEDevice central) { /* ... */ }
void blePeripheralDisconnectHandler(BLEDevice central) { /* ... */ }
printDHT(float h, float t): Used to print the temperature and humidity data read by DHT11 on the serial monitor. This function is for debugging purposes.setupBle(): Initializes Bluetooth, including setting the broadcast name, characteristics, and services.blePeripheralConnectHandler(BLEDevice central)andblePeripheralDisconnectHandler(BLEDevice central): These functions handle events when Bluetooth connects or disconnects. When a device successfully connects with UNO R4 via Bluetooth, the onboard LED lights up. When the device disconnects, the LED turns off.