Note
Hello, welcome to the SunFounder Raspberry Pi & Arduino & ESP32 Enthusiasts Community on Facebook! Dive deeper into Raspberry Pi, Arduino, and ESP32 with fellow enthusiasts.
Why Join?
Expert Support: Solve post-sale issues and technical challenges with help from our community and team.
Learn & Share: Exchange tips and tutorials to enhance your skills.
Exclusive Previews: Get early access to new product announcements and sneak peeks.
Special Discounts: Enjoy exclusive discounts on our newest products.
Festive Promotions and Giveaways: Take part in giveaways and holiday promotions.
👉 Ready to explore and create with us? Click [here] and join today!
Bluetooth Message Box
This project receives messages and displays them on an LCD screen.
You can use it as a family message board, reminding family members who haven’t left yet to remember to take their keys.
Required Components
In this project, we need the following components.
It’s definitely convenient to buy a whole kit, here’s the link:
Name |
ITEMS IN THIS KIT |
LINK |
|---|---|---|
Elite Explorer Kit |
300+ |
You can also buy them separately from the links below.
COMPONENT INTRODUCTION |
PURCHASE LINK |
|---|---|
- |
|
Wiring

Schematic

Generate the UUID
UUIDs play a crucial role in BLE communication, ensuring the uniqueness of devices and accuracy of data exchange between them. You need to customize UUIDs to create your own BLE services and characteristics to meet specific application requirements. (Here, we need to create a characteristic that supports text input.)
Use the Online UUID Generator Tool to create UUIDs unique to you to avoid UUID conflicts.
Generate two version 4 UUIDs.

Copy them and replace the two UUIDs in your code.
#define SERVICE_UUID "uuid1"
#define CHARACTERISTIC_UUID "uuid2"
Install the Library
ArduinoBLE.h: Used for handling Bluetooth Low Energy (BLE) communication.
LiquidCrystal_I2C.h: Used to control a 16x2 character LCD screen with an I2C interface.
Run the Code
Note
You can open the file
07_lightblue_lcd.inounder the path ofelite-explorer-kit-main\iot_project\07_lightblue_lcddirectly.Or copy this code into Arduino IDE.
Note
To install the library, use the Arduino Library Manager to search for and install “ArduinoBLE” and “LiquidCrystal I2C”.
 1/*
 2  The code implements a Bluetooth Low Energy (BLE) peripheral using an Arduino Uno R4 WiFi
 3  board. It advertises a BLE service with a custom UUID and a characteristic that can be read
 4  and written to. A Liquid Crystal Display (LCD) with an I2C interface is used to display the
 5  message when the BLE central device writes to the characteristic.
 6
 7  Board: Arduino Uno R4 WiFI
 8  Component: Liquid Crystal Display 1602 with I2C Interface
 9  Library: https://www.arduino.cc/reference/en/libraries/liquidcrystal-i2c/ (LiquidCrystal I2C by Frank de Brabander)
10           https://www.arduino.cc/reference/en/libraries/arduinoble/ (ArduinoBLE by Arduino)
11*/
12
13#include <Wire.h>
14#include <LiquidCrystal_I2C.h>
15#include <ArduinoBLE.h>
16
17#define SERVICE_UUID "19B10002-E8AA-548E-4F6C-D104768A1214"
18#define CHARACTERISTIC_UUID "19B10003-E8AA-548E-4F6C-D104768A1214"
19
20// Define a BLE service with a UUID
21BLEService boxService(SERVICE_UUID);
22
23// Define a BLE characteristic with a UUID and properties
24char *stringValue = "AAAAAAAAAAAAAAAAAAAAAAAAAAAAAAAA";
25BLECharacteristic boxCharacteristic(CHARACTERISTIC_UUID, BLERead | BLEWrite, stringValue);
26
27// Initialize a 16x2 LCD using I2C
28LiquidCrystal_I2C lcd(0x27, 16, 2);
29
30void setup() {
31  Serial.begin(9600);
32  while (!Serial)
33    ;
34  if (!BLE.begin()) {
35    Serial.println("starting Bluetooth® Low Energy module failed!");
36    while (1)
37      ;
38  }
39
40  // Set advertised local name and service UUID:
41  BLE.setLocalName("UNO R4 BLE");
42  BLE.setAdvertisedService(boxService);
43  // Add characteristics to the service
44  boxService.addCharacteristic(boxCharacteristic);
45
46  // Add service
47  BLE.addService(boxService);
48
49  // Start advertising
50  BLE.advertise();
51  Serial.println("BLE Peripheral");
52
53  // Initialize the LCD
54  lcd.init();
55  lcd.backlight();
56  lcd.clear();
57  lcd.setCursor(0, 0);
58  lcd.print("Bluetooth LCD");
59}
60
61void loop() {
62  BLEDevice central = BLE.central();
63  if (central) {  // If a central device is connected
64    Serial.print("Connected to central: ");
65    Serial.println(central.address());
66
67    while (central.connected()) {                      // While the central device is connected
68      if (boxCharacteristic.written()) {               // Check if the characteristic has been written
69        int length = boxCharacteristic.valueLength();  // Get the length of the written value
70        byte buffer[length + 1];                       // Create a buffer to store the value
71        boxCharacteristic.readValue(buffer, length);   // Read the value into the buffer
72        buffer[length] = '\0';                         // Null-terminate the buffer to treat it as a string
73        Serial.print("Characteristic event, written: ");
74        Serial.print((char *)buffer);
75
76        // Print the received message to the LCD
77        lcd.clear();
78        lcd.setCursor(0, 0);
79        lcd.print("Message:       ");
80        lcd.setCursor(0, 1);
81        lcd.print((char *)buffer);
82      }
83    }
84    Serial.print("Disconnected from central: ");
85    Serial.println(central.address());
86  }
87}
How to play?
To interact with the services and characteristics created in this sketch, you should use a generic Bluetooth® Low Energy central app like LightBlue (available for iOS and Android) or nRF Connect (for Android).
Let’s use LightBlue as an example to demonstrate how to control Arduino’s LED via Bluetooth.
Download the LightBlue app from the App Store (for iOS) or Google Play (for Android).
Connecting Arduino with Your Smartphone via Bluetooth
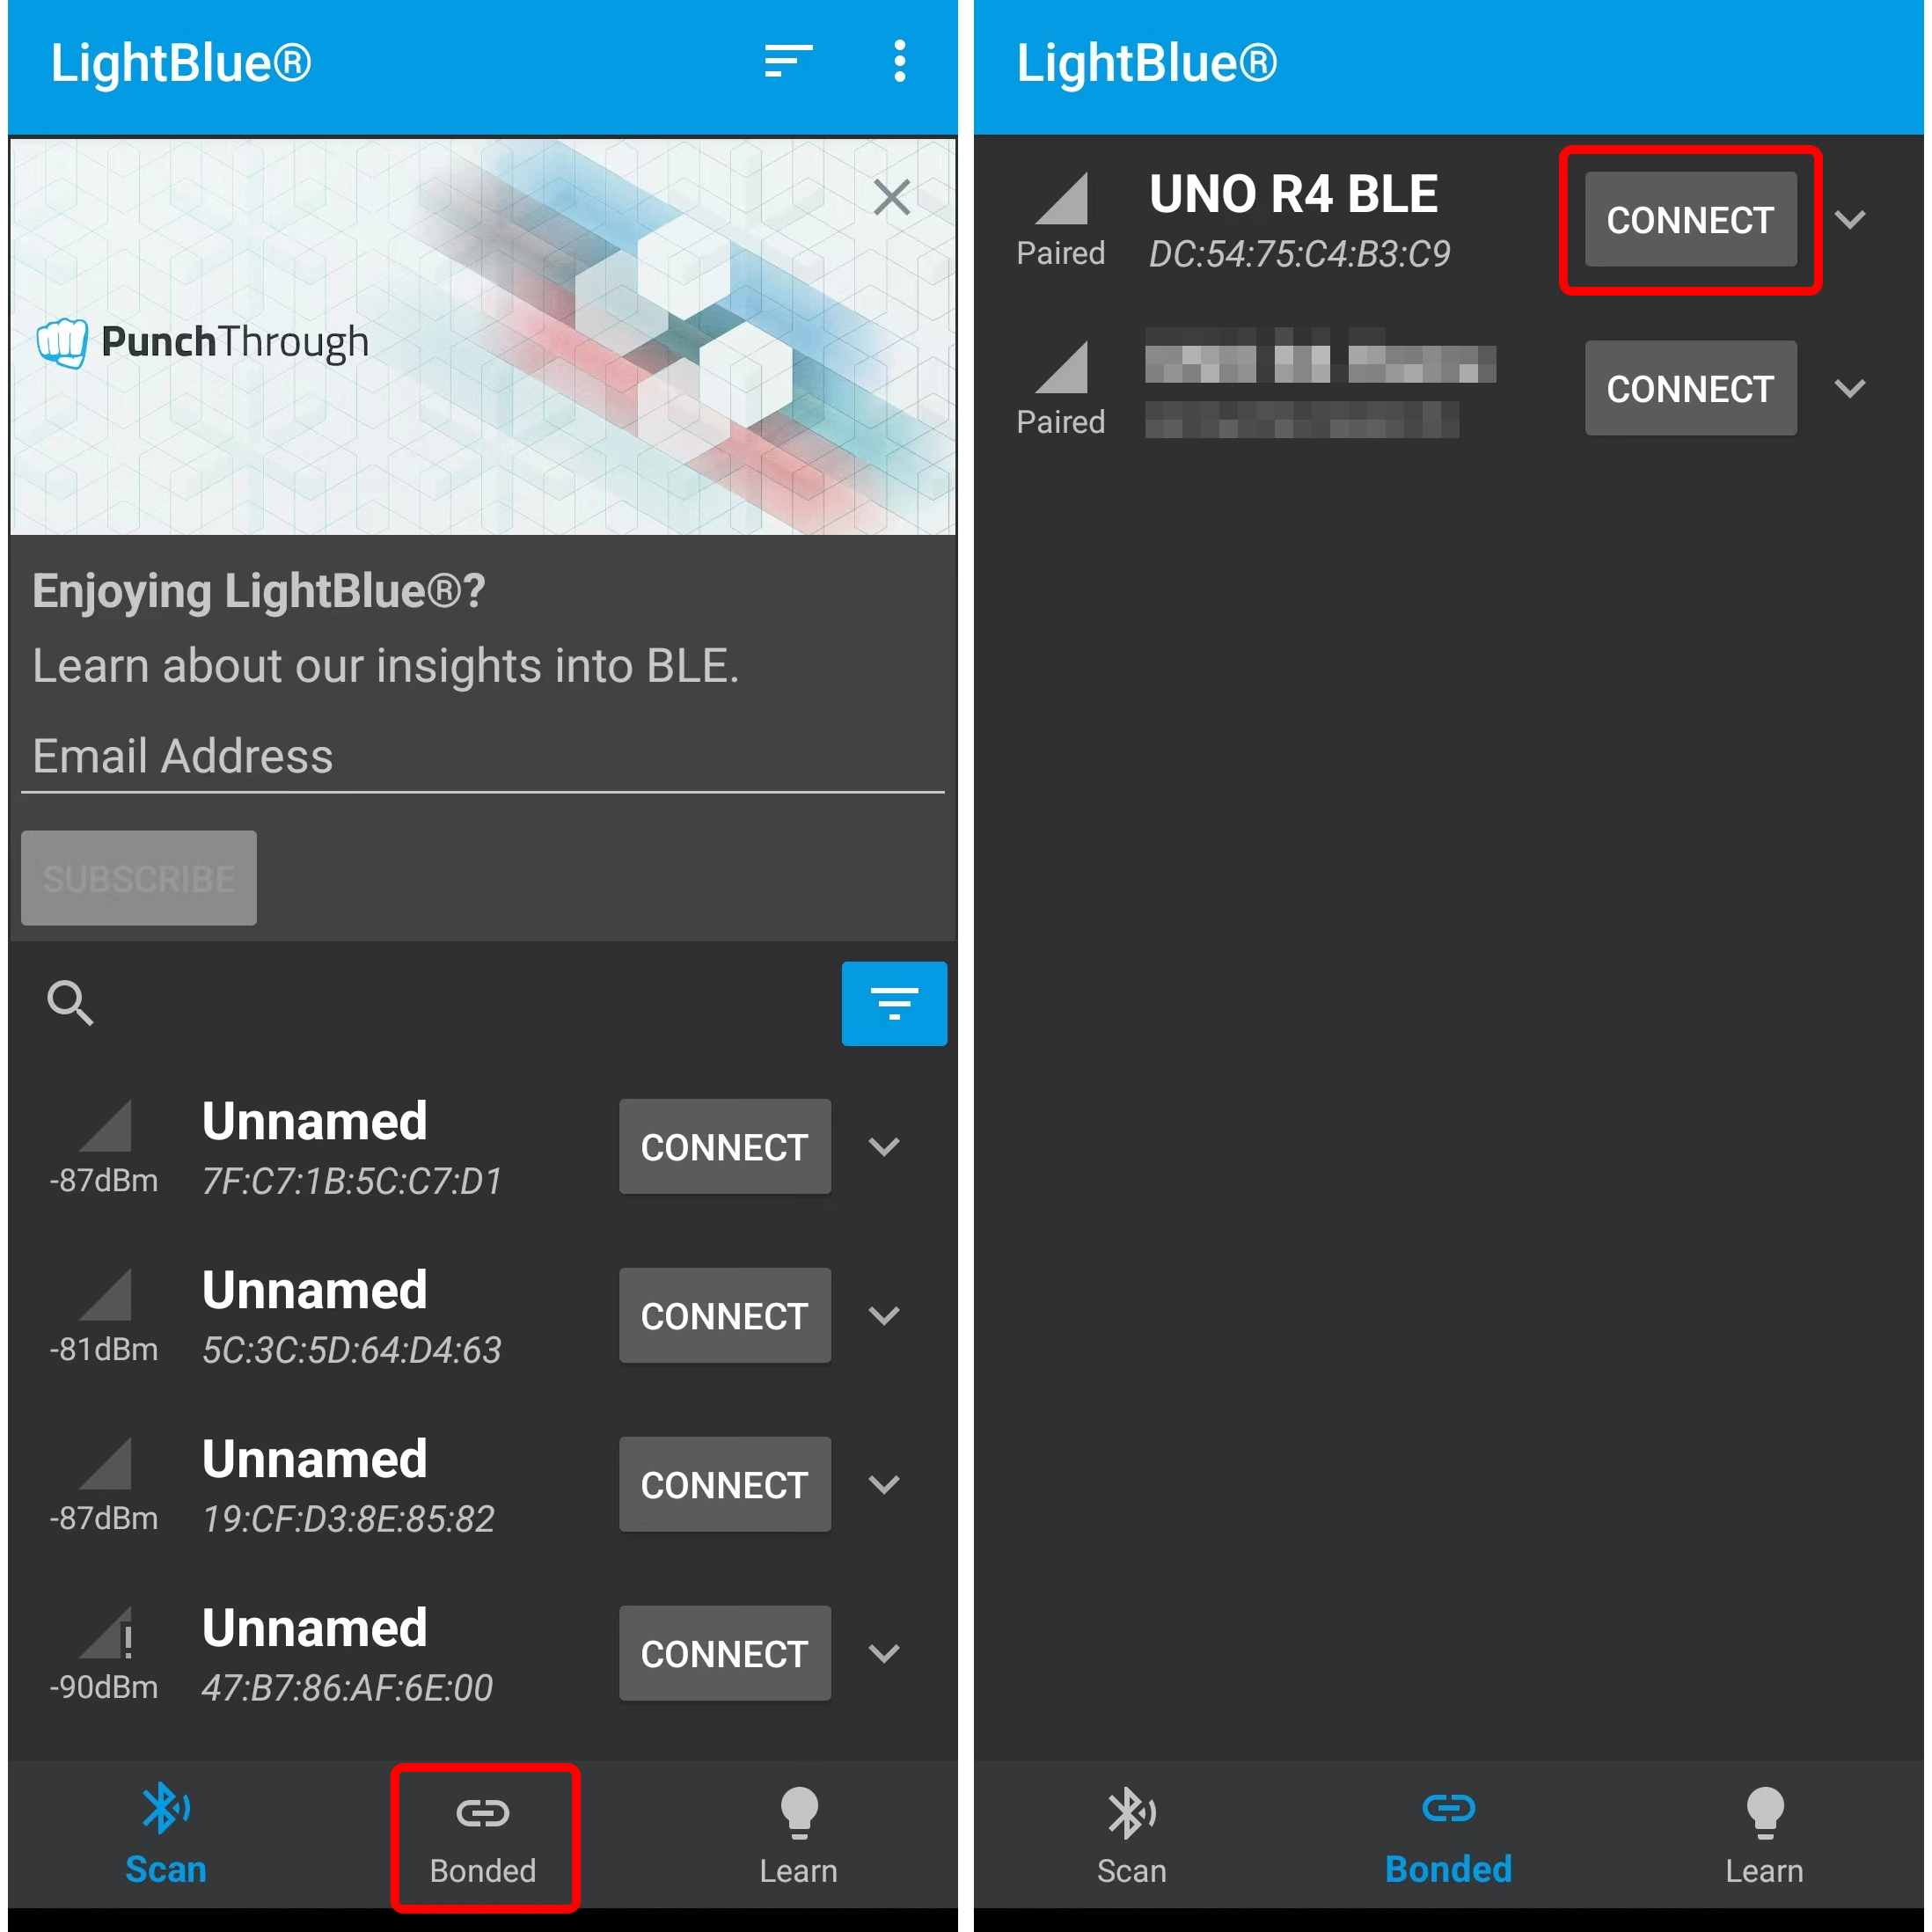
Go to your Bluetooth settings and locate the device named “UNO R4 BLE.” Connect to it.

Interacting with Arduino via Bluetooth Using LightBlue
Launch LightBlue and tap on the Bonded tab at the bottom of the interface. Here, you’ll see a list of BLE devices that your smartphone has previously paired with. Locate UNO R4 BLE and tap CONNECT.
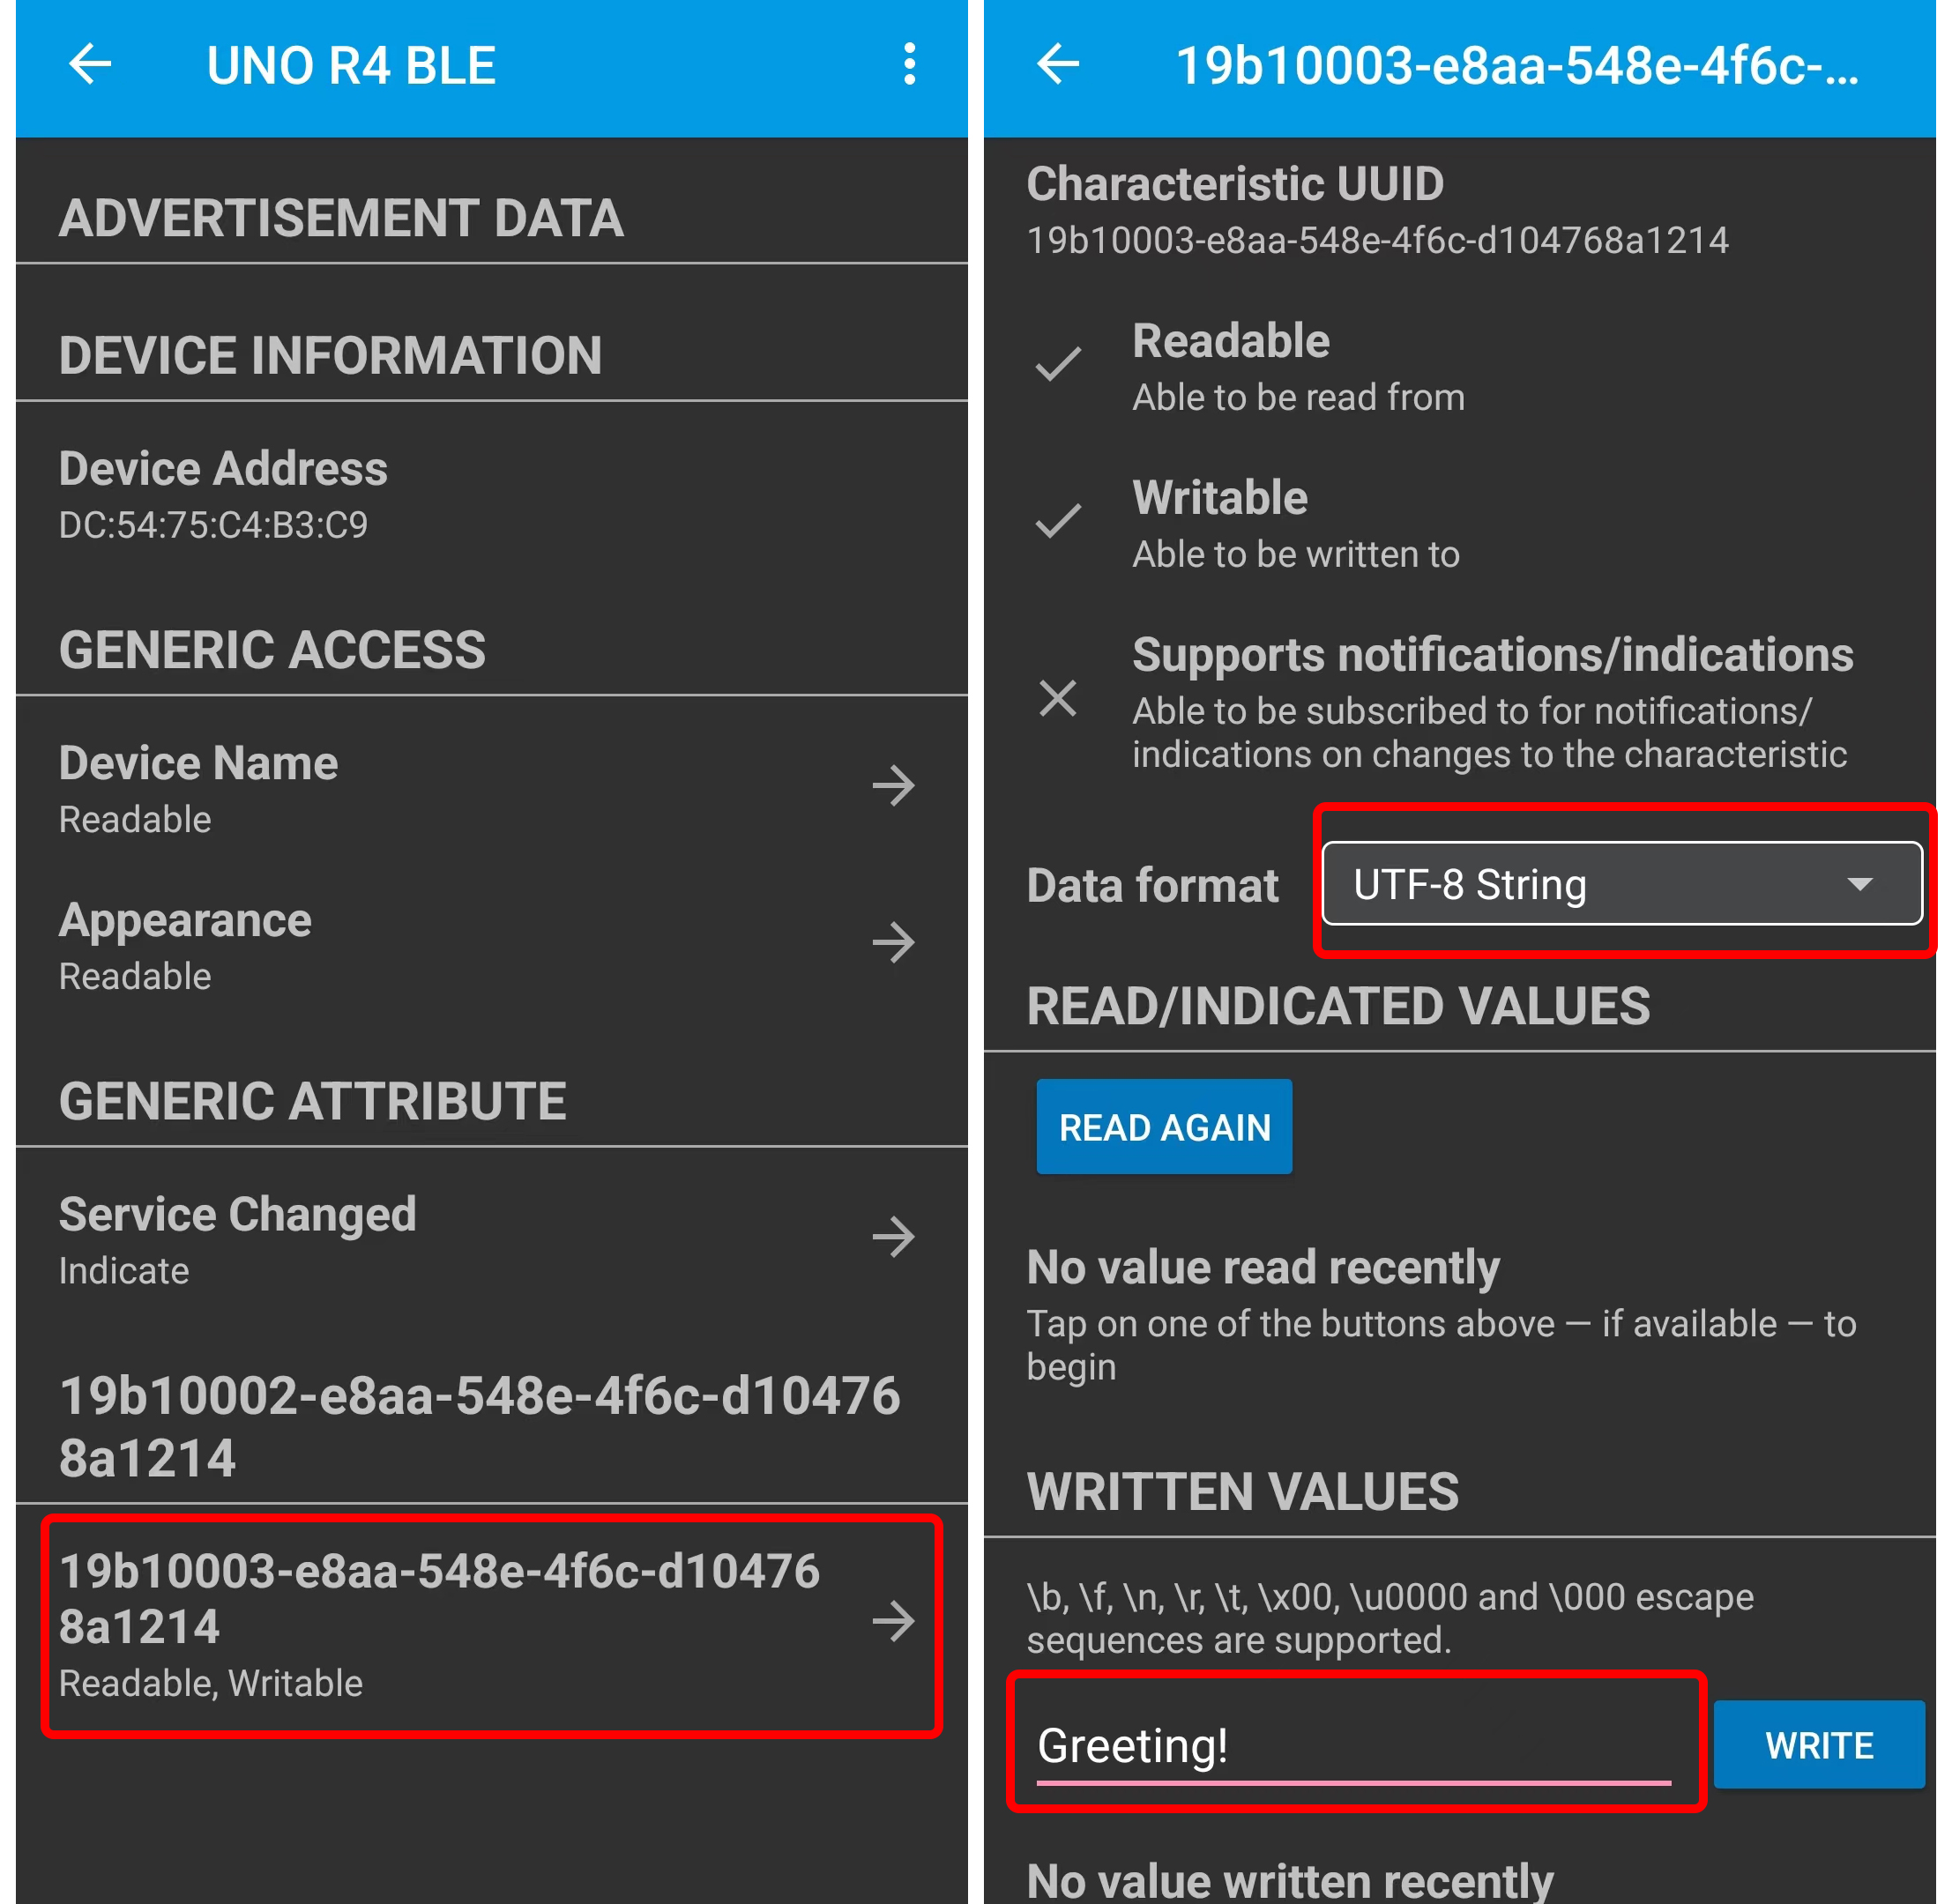
Once connected, you’ll gain access to detailed information about the Bluetooth device. Scroll down to find your service UUID and your Characteristic UUID.
Tap on the Characteristic. You’ll notice that this Characteristic is both readable and writable, allowing you to both read from and write to it.
Continue scrolling to the “Data format” section and change it to UTF-8 String. Enter text in the text box and click write. The message you entered will appear on the LCD.
How it works?
Here are the main parts of the code and explanations of their functions:
Include the required libraries:
ArduinoBLE.h: Used for handling BLE communication.Wire.h: Used for I2C communication.LiquidCrystal_I2C.h: Used to control a 16x2 character LCD screen with I2C interface.
Define a BLE service and a BLE characteristic:
Use the
BLEServiceclass to define a BLE service and assign it a unique UUID.Use the
BLECharacteristicclass to define a BLE characteristic, assign it a unique UUID, and give it read (BLERead) and write (BLEWrite) permissions.Create a character array
stringValueas the initial value of the characteristic.
Initialize a 16x2 character LCD screen (LCD):
Use the
LiquidCrystal_I2Cclass to initialize an LCD, specifying the I2C address (0x27) and the number of rows and columns (16x2).Turn on the backlight of the LCD, clear the screen, move the cursor to the start of the first row, and display “Bluetooth LCD.”
Perform initialization in the
setup()function:Initialize serial communication.
Initialize the BLE module, and if initialization fails, enter an infinite loop.
Set the local name and service UUID for the BLE peripheral.
Add the BLE characteristic to the BLE service.
Start advertising the BLE service so that central devices can discover and connect to it.
Initialize the LCD.
The
loop()function:Check if there is a central device connected to the BLE peripheral by calling
BLE.central(). If a central device is connected, enter the connection handling logic.In the connected state, check if data has been written to the BLE characteristic by checking
boxCharacteristic.written().If data has been written, get the length of the written data using
boxCharacteristic.valueLength()and create a byte arraybufferto store the written data.Use
boxCharacteristic.readValue()to read data from the BLE characteristic into thebuffer.Add a null character
'\0'to the end of thebufferto convert it to a string.Print the received message to the serial monitor and display it on the LCD.
Continue waiting for the next central device to connect after the central device disconnects.